A Classic Omelette

by Susan Smith in


What often starts out as a desire to share a simple Primal Plate recipe ends up as a lengthy essay about the advisability of eating a particular food. Today, it’s eggs. Are they good for you or not? 

I’m not a nutritionist or doctor and it’s not my job to tell you what to eat but, the credence given to non-scientifically valid research that’s foundational to the current, nutritionally-poor Eatwell guide - whose “politically correct” low-fat, high-carb, low-calorie dogma is repeated over and over in advertising and the media - makes me sick! Or rather, it’ll make you sick if you don’t wise up. 

For years people have been brainwashed into thinking they must avoid or limit their consumption of nature’s most nutritious foods - eggs, red meat and dairy - because they contain saturated fat and cholesterol that allegedly causes heart disease and early death. 

However, the 2015 Scientific Report from the Dietary Guidelines Advisory Committee states:

  “Cholesterol is not a nutrient of concern for overconsumption.”

Ergo, eat as many eggs as you want because dietary sources of cholesterol have a minimal effect on cholesterol levels in the blood! 

1.jpg

Because cholesterol is a nutrient that’s vital to human life, our liver naturally produces cholesterol every single day. The amount of cholesterol the liver produces depends on how much you eat. If you get a lot of cholesterol from food, your liver produces less. You can’t get cholesterol from plants so if you don’t eat cholesterol-rich food (meat, eggs and dairy), your liver produces more. Does that mean the old evidence-free advice and fear mongering about dietary cholesterol was wrong? Well yes but no but. The story won’t lie down.

In March 2019, other ‘scientists’, staying loyal to the old hypothesis, reignited a fear of eggs when they warned: “Among US adults, higher consumption of dietary cholesterol or eggs was significantly associated with higher risk of incident CVD and all-cause mortality in a dose-response manner.”  Meaning, the more eggs you eat, the greater the risk of heart disease and the chances of dying early. 

Forwards and backwards, backwards and forwards…what’s going on? Pride, profit and prejudice…that’s what. 

We’re in the midst of a fight between unethical profiteering from the public’s health and the truth. It seems that the ‘money-grabbing’ Big Boys are winning. It’s not about the public’s health, food security or saving the planet, it’s all about corporate profits and a takeover bid of the world’s food supply by the rich and powerful.

If you want the truth, you’ll have to look to yourself. Being interested in health issues doesn’t make you a conspiracy theorist, it means always being prepared to think ‘experts’ are stupid…because they often are. 

Wilfully blind to the nutritional assets of animal foods, processed and packaged food manufacturers love the UK’s Eatwell guidewhich unconscionably recommends that 71% of people’s daily calories should come from starch and junk foods. Of course they do. Refined sugar and starch, along with industrial vegetable oils, are a cheap and reliable food source to feed the masses. Currently 50% of the average persons diet in the UK is ultra-processed convenience foods that are increasingly composed of inconvenient toxins in brightly coloured packages that should be avoided full stop. 

Flaked, puffed, sugary breakfast cereals, bleached, blanched, nutrient-stripped bread, industrial vegetable oils, meatless burgers genetically engineered to ‘bleed’ like the real thing, ‘chickenless’ Just Egg, ‘butterless’ butter… I don’t care what they call this stuff, it’s definitely not food. As long as Big Food and Big Pharma can get you to ask the wrong questions they don’t have to worry about giving you the right answers. What better way to protect their obscene profits than to ‘piggy-back’ public health advice that food and drug industry shills and government lobbyists help to create and maintain? 

When people don’t investigate the facts and accept what they’re told by a supposed ‘higher authority’, there comes a point at which everything is so embedded in their minds they no longer think there’s any question of choice. 

Almost 20 years ago I purchased Western A Price’s book Nutrition and Physical Degeneration - a compelling, informative read of what modern food production with its reliance on chemicals and technological fixes has got so wrong…with so many sick people as a result. Surprise, surprise! The antidote to the biggest health scam of the century is to stop eating fake food and to start eating real food in accordance with the timeless principles of healthy human diets.  

Taking responsibility for your’s and your family’s health is not what the rich and powerful want you to do. Giant corporations in food and drink e.g. Kellogg’s, Pepsico, Bayer, Nestlé, Unilever, Danone (along with Google and other Goliaths of the agribusiness, food and pharmaceutical industries) are behind the EAT Lancet report - a supposedly ‘independent’ comprehensive assessment of existing science on health and sustainability - produced by 37 so called scientists, the vast majority of whom started out with a premise that favoured vegan/vegetarian diets. Aided and abetted by media-hype (because the science doesn’t cut it) they’re on a mission to transform the way we eat by inducing a global shift to plant-based diets whereby protein and fat intake will depend heavily on plant sources rather than animals. Eggs are practically non-existent. In fact, the EAT Lancet diet recommends more calories from added sugar than from beef, lamb, pork, chicken, other poultry and eggs all added together! 

Unfortunately, their one-size-fits-all “Planetary health diet” is fundamentally flawed. It is both nutritionally deficient and unsustainable. The first thing that needs saying is that the current industrial farming/food production system is unsustainable, environmentally ruinous, and cruel to both animals and humans alike. The second is that all nutrients are better absorbed by the body in their animal form. As an animal lover, I’m afraid that’s just the way things are. The kindest, indeed the only realistic solution, is to sack-off factory farming and urgently re-introduce grazing animals to grasslands thereby allowing them to feed on the natural diet they evolved to eat and to replenish the soil with their waste. Grazing animals produce manure and urine that feeds the deep root systems of plants, which sequester carbon out of the air back in to the soil thus promoting its physical health and wildlife biodiversity. In summary, food security means including grazing animals that convert vegetation that we cannot eat (grass), on land we cannot farm, in to nutrient dense food for humans. At the same time, they re-fertilise the land that they feed on and help to reverse the effects of climate change. Sounds like a plan! If we don’t start to respect, nurture and protect the world’s soils today, experts predict that within the next 60 years there will be no soil left to grow food in! 

Meanwhile, agrochemical and seed companies and food manufacturers want to “conquer the world” with plant-based, lab-grown meat and other ‘modern foods’. They’re relying on future ‘sustainable intensification’ made possible by a range of new technologies, which they expect to hugely benefit financially from. The goal is to persuade people that overly-processed, manufactured foods loaded with artificial ingredients will cost a lot less than animal derived foods, be more nutritious, better tasting and more convenient. FFS! Our bodies are smarter than that! We were told genetically engineered crops would “feed the world” and then the grim reality hit home. Now Monsanto/Bayer faces thousands of Round-up cancer lawsuits worldwide.

An ounce of common sense is better than any university education. Aside from liver, which let’s face it is a bit of an acquired taste, eggs are the healthiest food on the planet. Since eggs are nature's perfect food and have been valued since the beginning of time, Humpty Dumpty most certainly isn’t going to fall off the wall on my watch! 

health coach food medic eggs.jpg

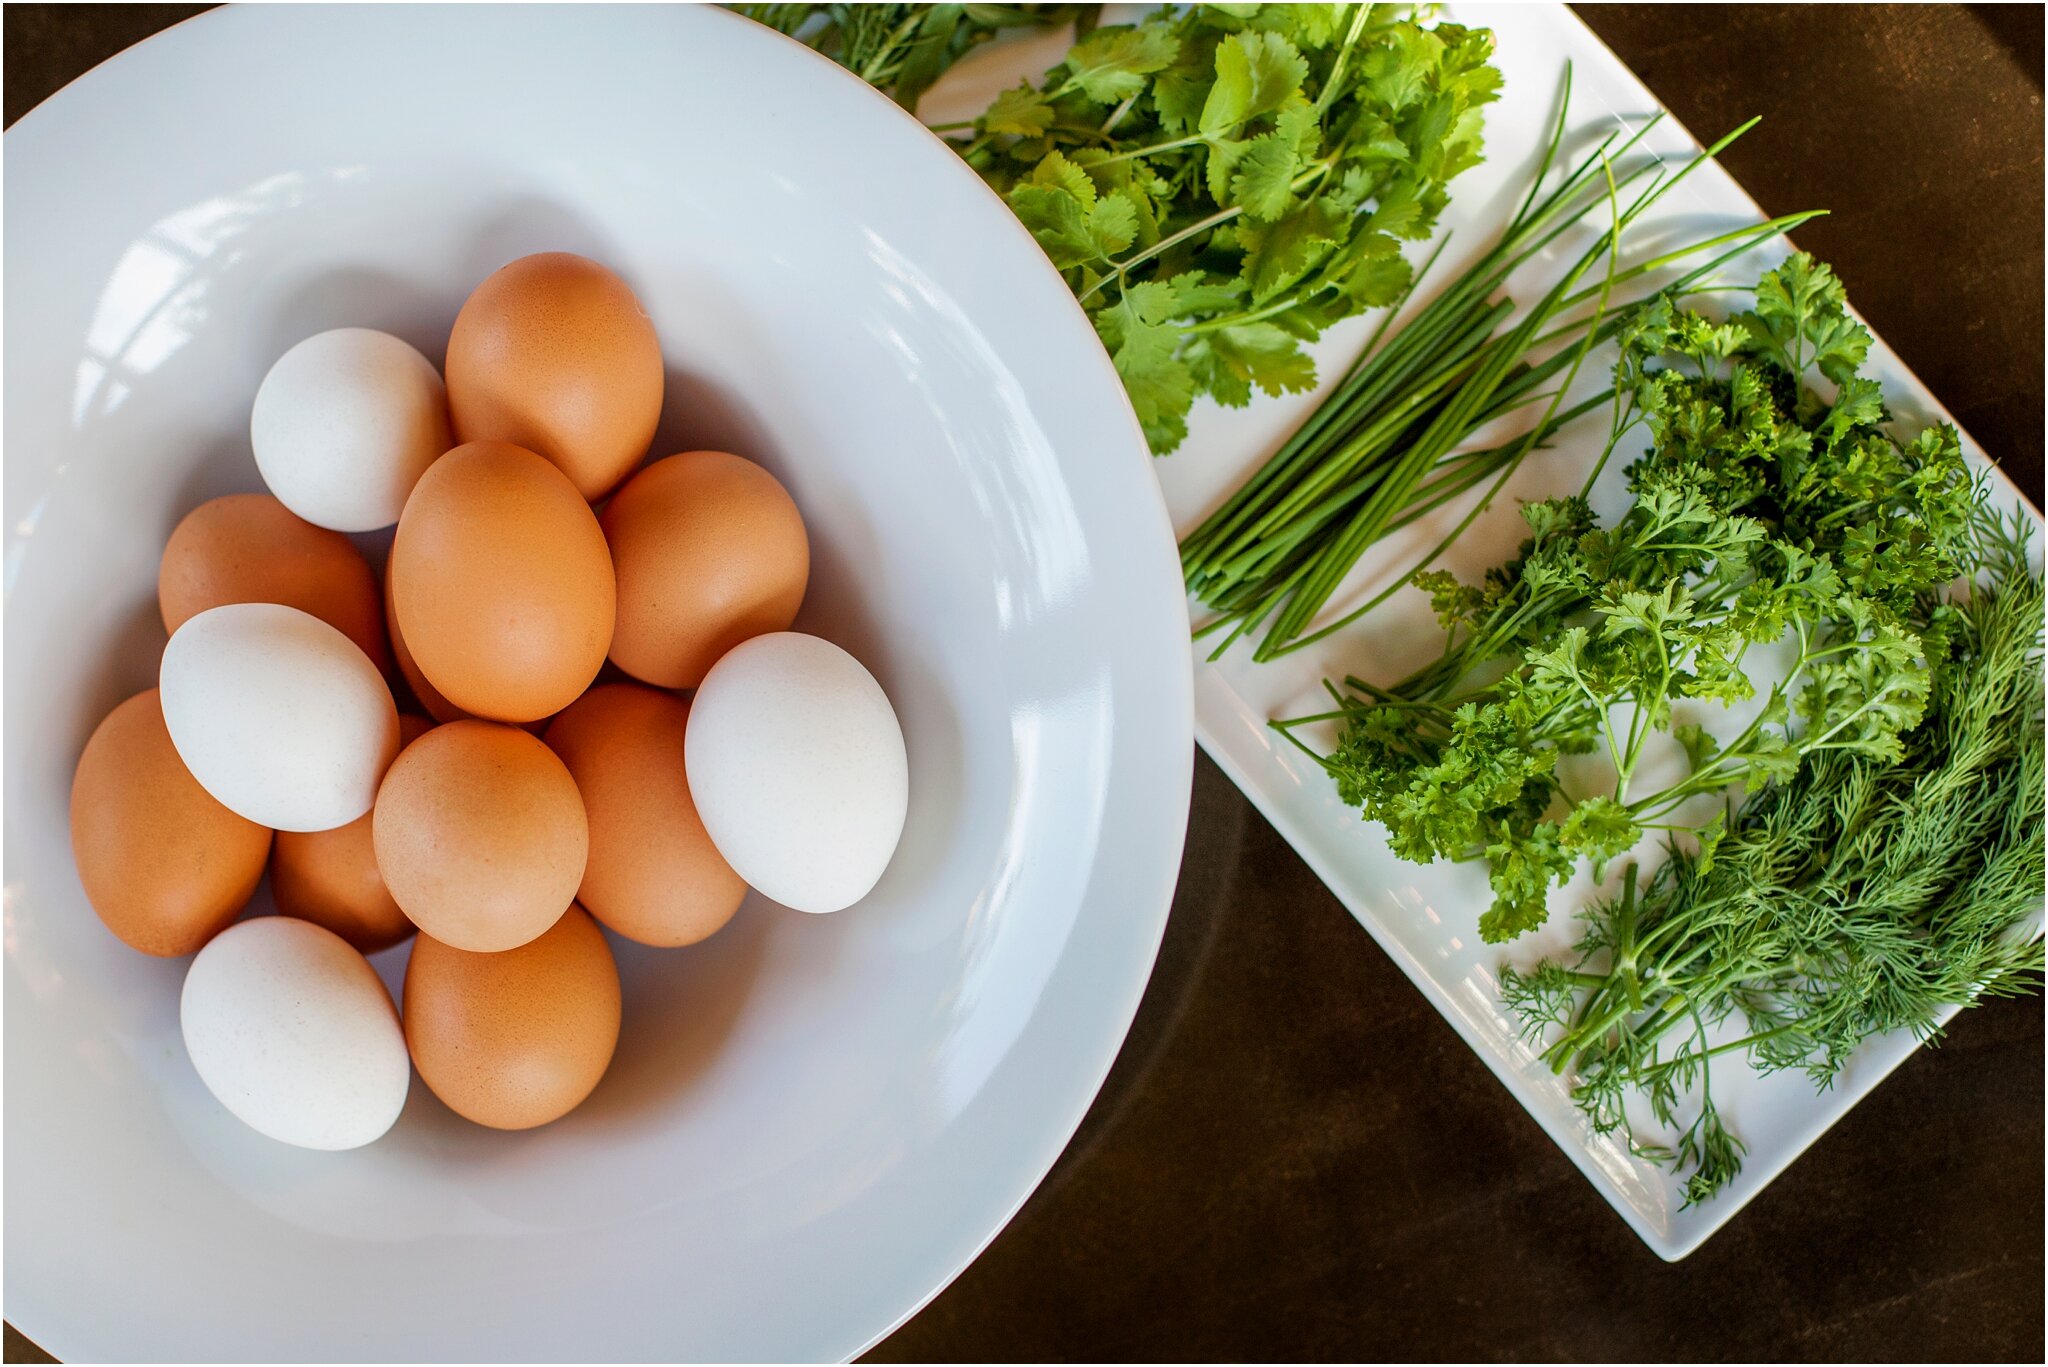
A large, whole hen egg provides excellent, high-quality protein with a perfect amino acid profile and is loaded with 13 essential vitamins, minerals and fatty acids that contribute to the health of the brain and nervous system. I think of them as a mighty multivitamin and mineral pill in a shell that are every cook’s best friend. Eggs are cheap, taste great, cook in minutes and go with just about everything. 

But not just any old egg. They must be fresh, organic and truly free-range i.e. laid by happy hens in small flocks that spend most of their days outside with access to fresh grass. I’d like to keep chickens in my own back garden henhouse one day but until I learn how, I’ll continue to buy biodynamic eggs from hens that scratch and forage in rolling pastures and nearby woodlands. I’ve always had a big interest in food and firmly believe that Mother Nature knows best. Healthy food is not produced by men meddling with nature. Frankly, I’d sooner be vegan than eat industrially-produced eggs from de-beaked, fraudulently named ‘free-range’, commercial-laying hens. Warning: Sensitive souls need not click here for the horrendous cruelty involved  but for those of you that still haven’t connected the dots between intensive farming and the food on your plate, please do me the courtesy!

Now we’re clear on that score, I do not ’chicken out’ on how many eggs I eat. Which not counting those I include in homemade cakes, bakes and sauces, is at least a dozen per week. Eggs are an incredibly versatile, inexpensive, nutrient-dense real food option for people eating low-carb. Because there are no ‘essential carbs’ in nature and I want my family to eat well, feel great and live long, the vast majority of Primal Plate recipes are based on ‘fat protein’ found in meat, eggs and dairy rather than ‘carb protein’ found in grains, pulses and beans. With a small amount of seasonal fruit, occasional starchy plants (e.g. tiger nuts, sweet potatoes, squash), nuts, seeds and vegetables thrown into the mix, we’re golden. No need to count calories, we eat what we love.

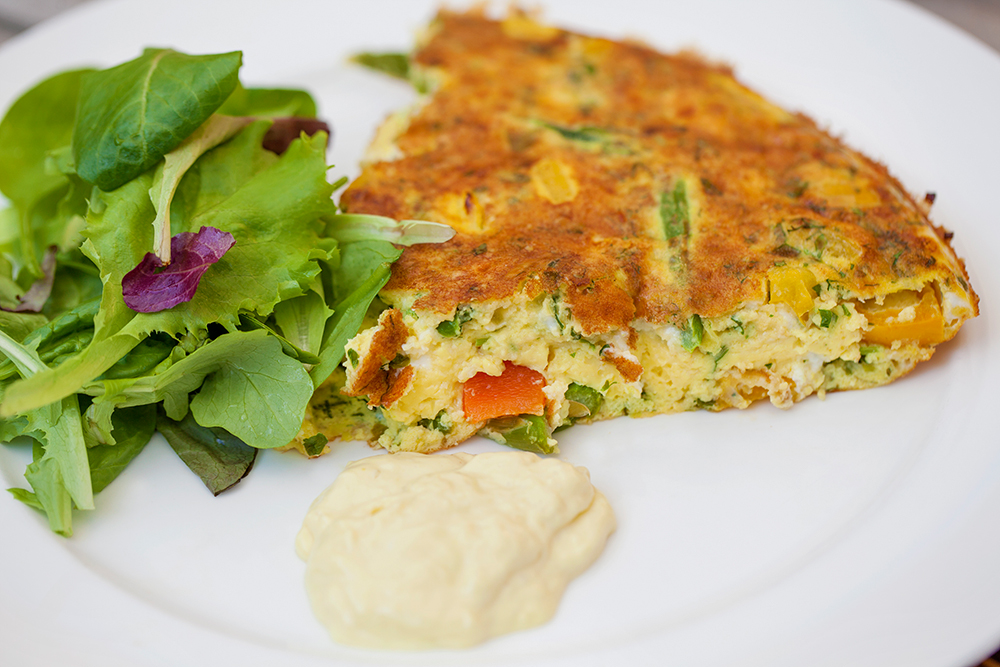
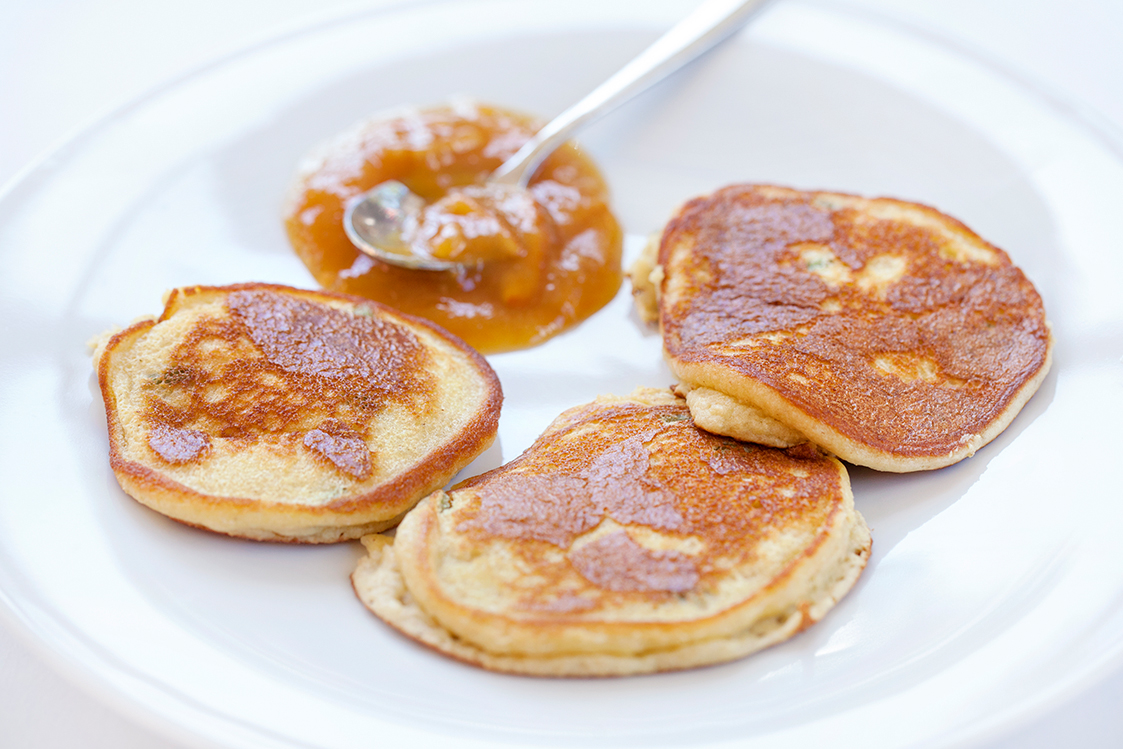
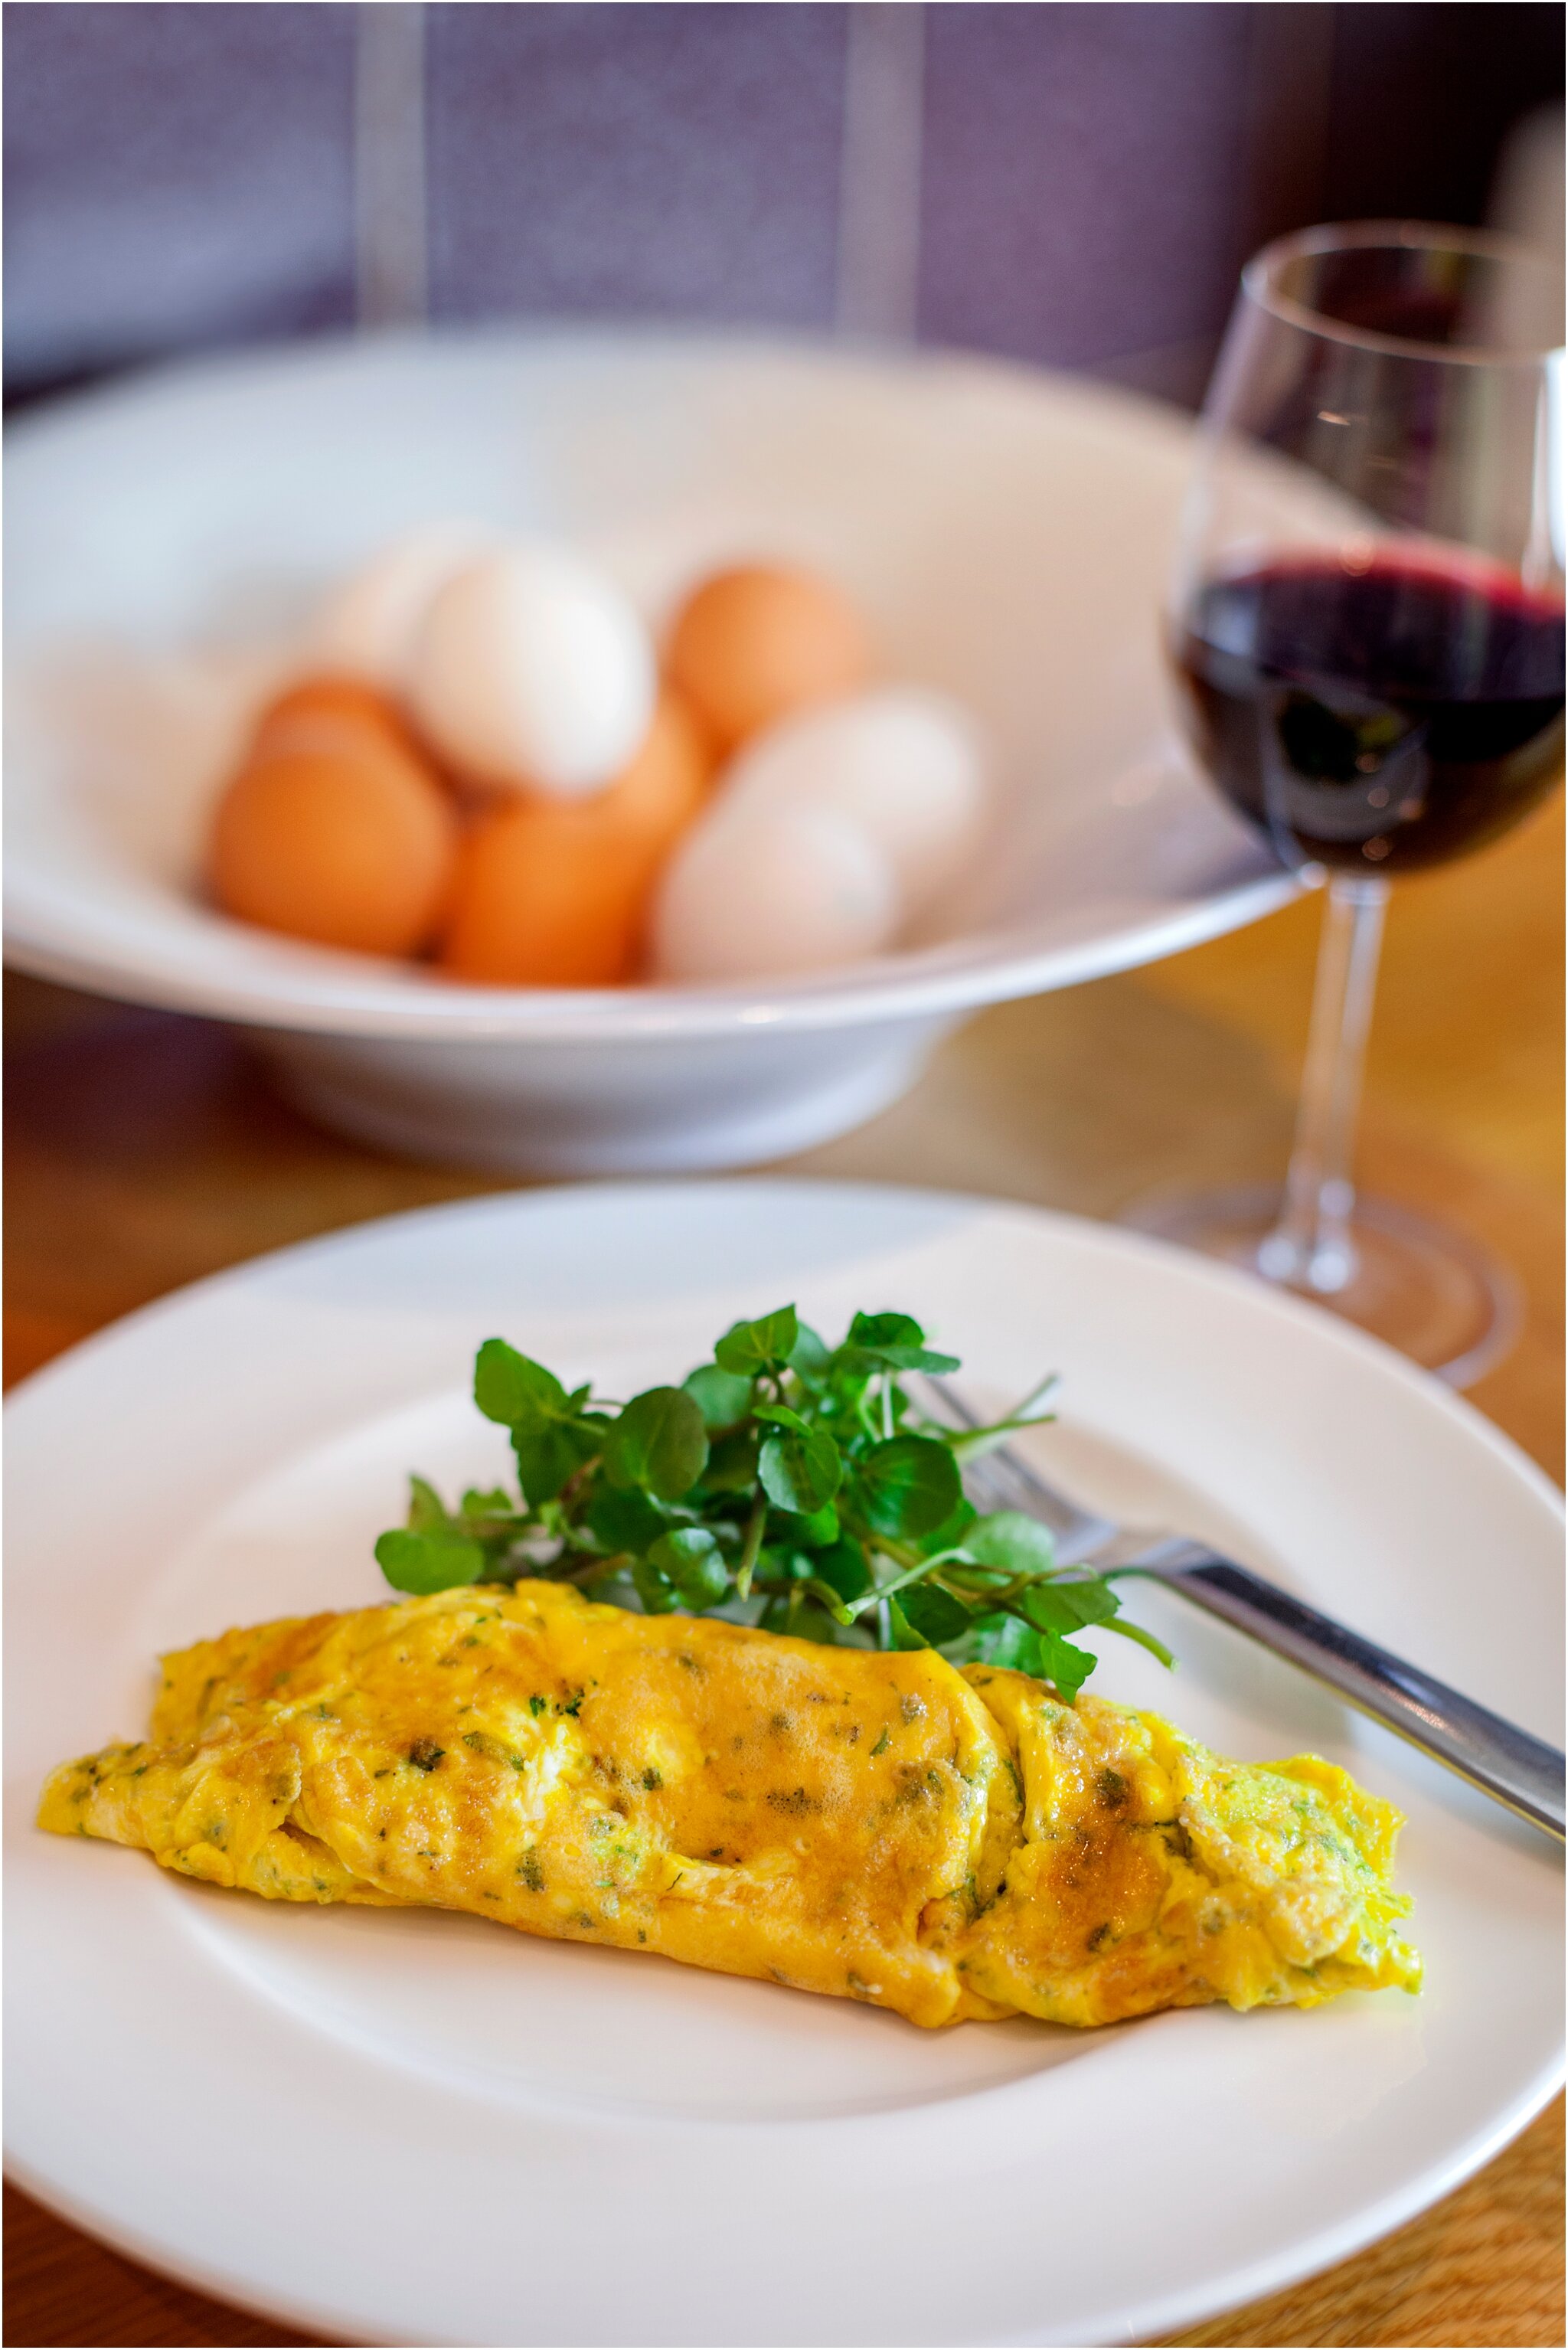
An omelette is delicious at any time of the day. Fill them with your choice of ingredients such as ratatouille, mushrooms, cheese or for a particular treat, strips of wild smoked salmon. Quick-to-make, soft and squidgy in the middle and tinged with gold on the outside, I’ve kept mine simple with the addition of fresh herbs stirred into the eggs before they’re cooked. One omelette will serve one person and, because it’s the ultimate fast food, it's not worth cooking a large one for two. The recipe is for a two-egg omelette, which I cook in a 15cm (6 inch) pan, ideal for one unless you are very hungry, in which case use 3 large eggs and scale up the size of your frying pan to 17cm.

To master the art of simple, get cracking.

7.jpg

A Classic Omelette (serves 1)

Ingredients

2 large organic, free range eggs (the fresher the better)

Himalayan pink salt

freshly ground organic black pepper

2 tsp finely chopped fresh flat leaf parsley

1 tsp finely chopped fresh tarragon

1 tsp finely chopped fresh chives

1 tsp finely chopped fresh coriander

15g organic ghee (or butter)

To finish - optional

Freshly grated, organic Parmesan (with a glass of wine!)


Instructions

Carefully break the eggs into a bowl and using a fork, lightly blend the egg yolks and whites together until just combined - no beating or whisking allowed!

Season with salt and pepper and add the chopped herbs.

3.jpg

Melt the ghee in a non-stick frying pan (ceramic please, not Teflon-coated) and let it get quite hot, then swirl it around so that the base and sides of the pan are evenly coated.

2.jpg

Pour the eggs into the pan, tipping the pan so that it is evenly spread then turn the heat up to its highest setting. Leave the eggs to set for approximately 10 seconds or until a delicate ‘frill’ of cooked egg appears around the outside edges.

4.jpg

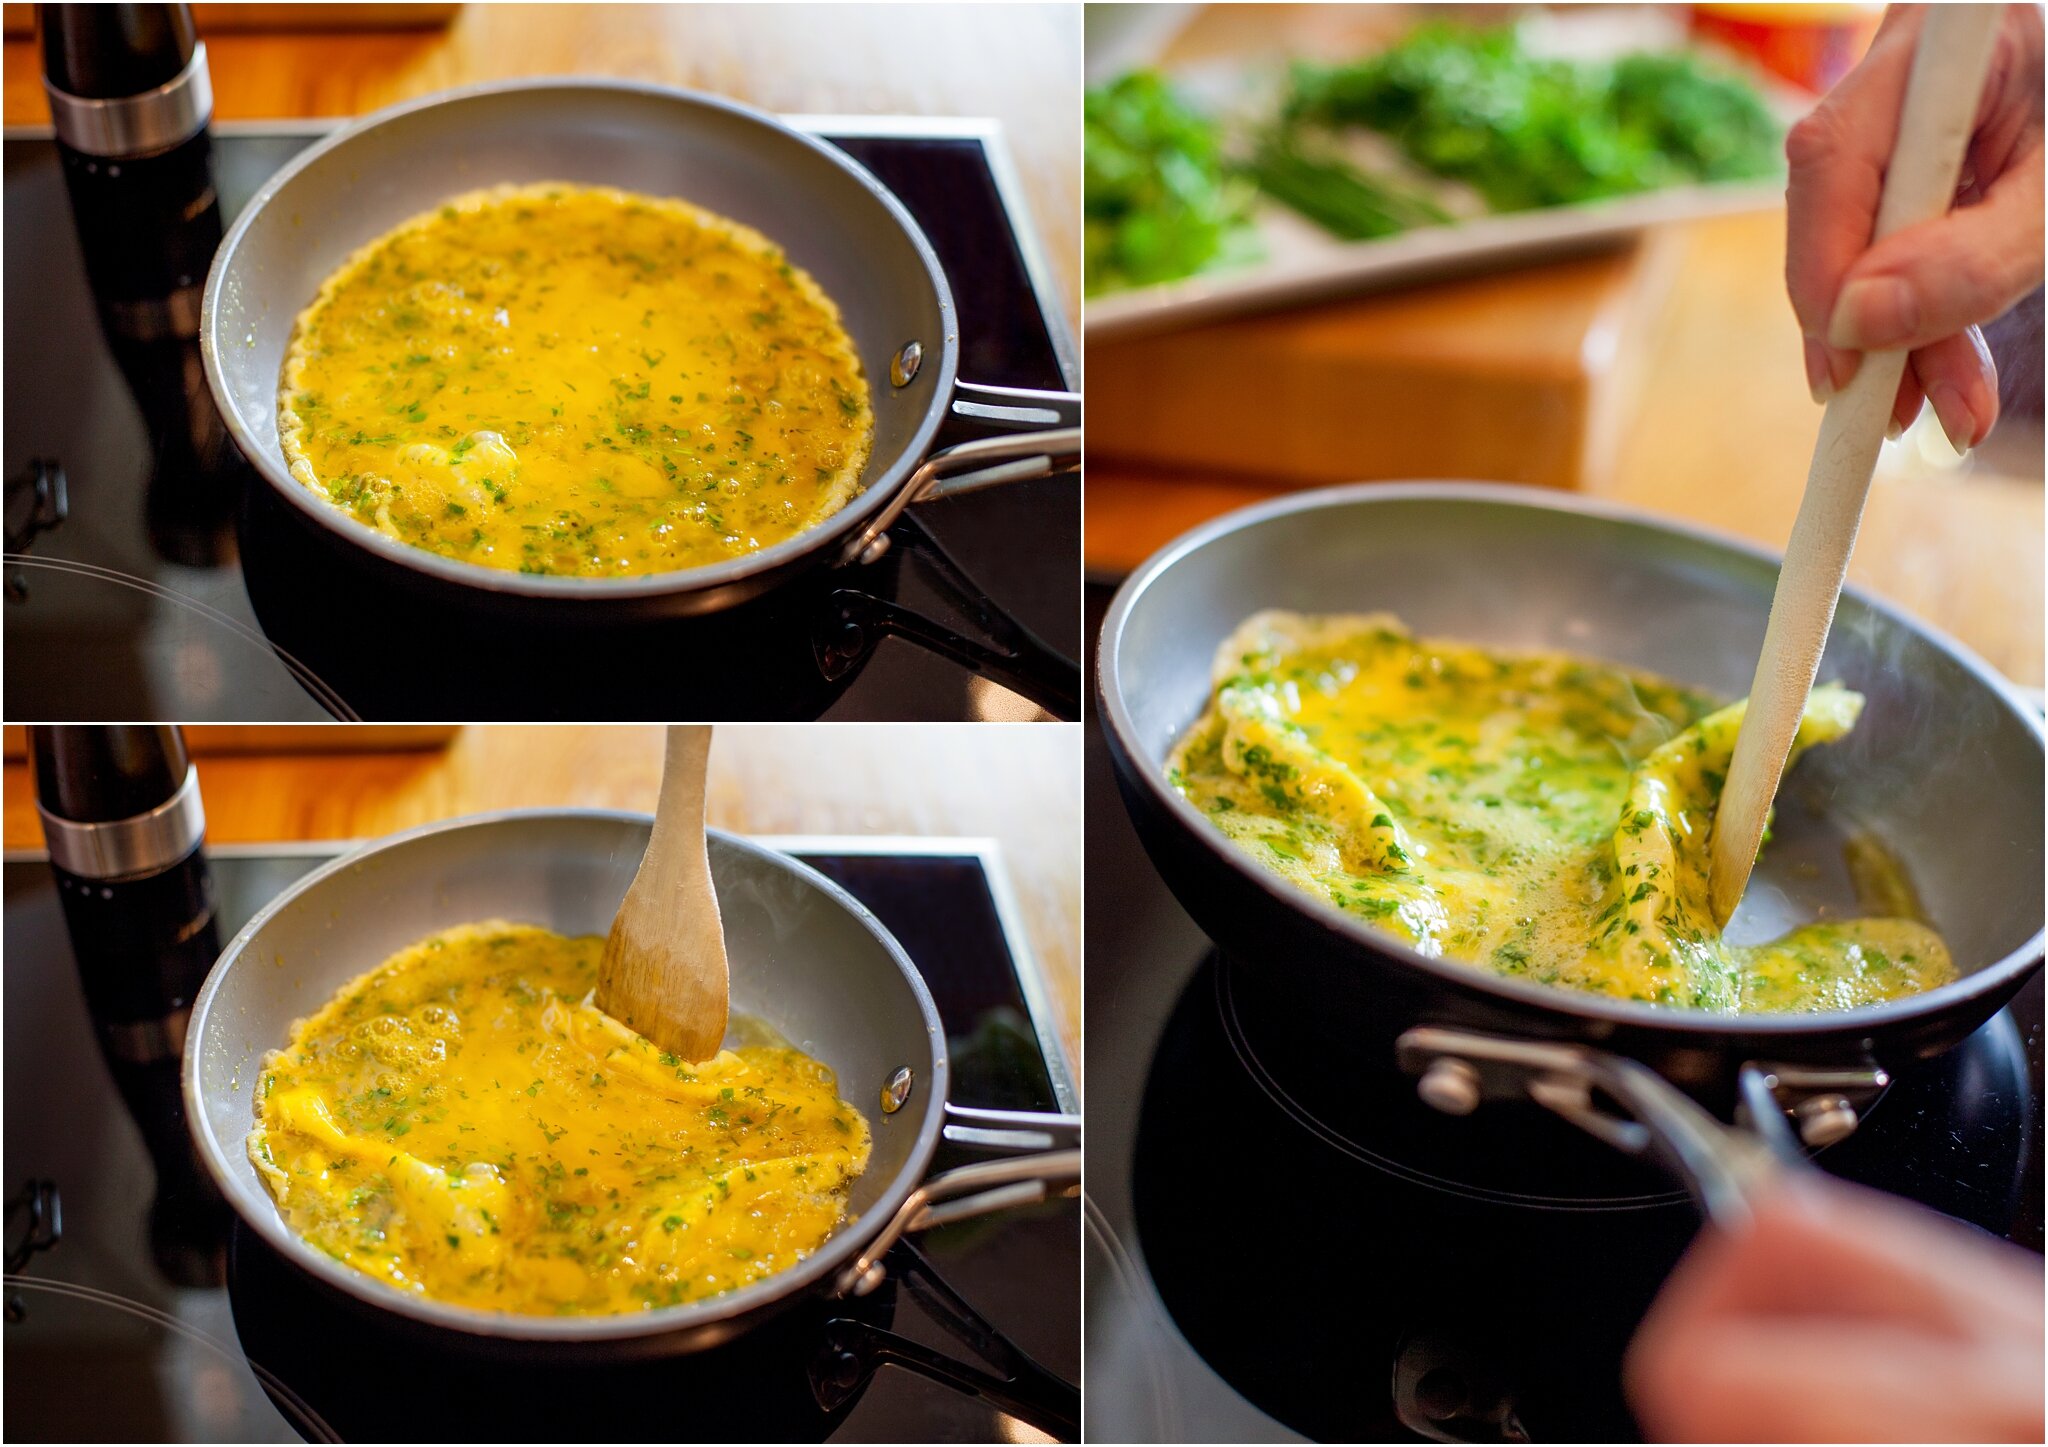
Using a wooden spoon or non-stick spatula, gently draw the edges of the cooked egg towards the centre, tilting the pan to let the still liquid egg run into the empty space at the edges.

Keep doing this until the omelette is almost set but is still a little moist on top - it only takes around a minute. It’s now time to fold your omelette in half or thirds.

5.jpg

To serve the omelette folded in half, run a spatula around the edge of the pan to free the omelette, then tilt the pan over a warmed plate and slide the omelette out allowing the top half of it to flip over and cover the bottom half on the plate.

Alternatively, fold it into three as illustrated in the photos. While the omelette is still in the pan, flip one third over towards the centre, then slide it on to a warmed plate, unfolded edge first, allowing the folded part to flip over and cover the rest.

Serve and eat at once.


Notes

Served with some freshly grated Parmesan sprinkled over and a glass of wine, I guarantee that even the humblest omelette achieves gastronomy status.

You can lighten-up the texture of omelettes by adding 1 tablespoon of filtered water to the eggs before combining the yolks and whites.

The fresh herbs I used are simply what I had available. Fresh chervil and sorrel are good options too.

I use ghee rather than butter because it is less likely to burn at high temperatures. N.B. Making successful omelettes means cooking them on the highest heat that you dare! If you’re using butter, make sure you don’t let it brown before adding the eggs to the pan.

Filled omelettes are usually folded into three. Simply place your filling in the centre before folding into three as directed in the recipe instructions above.

6.jpg


Fat 51g Protein 48g Carbohydrate 1g - per 2 egg herb omelette


Grilled Mackerel With Creamy Keto ‘Potato’ Salad & Watercress

by Susan Smith in ,


Today’s blog post is for a complete summer meal that’s easy to prepare when you have a lot on your plate. Including whizzing together a batch of Macadamia Oil Mayo (I always keep a jar of this at-the-ready in my fridge), everything can be brought together in less than half an hour. It’s healthy, its quick, it’s delish! This year, when the first Jersey Royal potatoes came into season, I couldn’t resist making a real potato salad (cold, pre-cooked potatoes are an excellent source of resistant starch) and it actually took me longer to scrape the papery skins off the potatoes than it takes to make this entire meal! Henceforth, I shall live without pesky potatoes!

It’s the labour intensive ‘potato-peeling’ type of cooking chore that’s been fully exploited by food corporations and made their marketing hype so successful. They’ve convinced society that ’fast’ food and ready meals are quicker, cheaper and easier to get on the table. However, I disagree. You can make Grilled Mackerel with Creamy Keto ‘Potato’ Salad & Watercress in less time than it takes to order a takeaway and have it delivered. It’s probably cheaper too. And obviously, better for your health.

primal plate keto mayonnaise.jpg

Actually, food corporations don’t cook; they process deadly ingredients sourced from the cheapest, most consistently available form of food, namely genetically engineered crops, grown with toxic chemicals. Do you really believe pesticide laden, genetically engineered, processed food - food that could never be created by nature - isn’t disastrous for human health? Whilst most people crave these edible abominations and see them as desirable ‘convenience’ foods, I can’t think of many things more inconvenient than being dependant on fake food contaminated with toxic chemicals. Processed food is chock-full of refined sugar, chemically altered fats, refined carbohydrates and other processed ingredients poisonous to humans that are a root cause of many food-related diseases including obesity, diabetes, heart disease, cancer and Alzheimer’s.

It’s not just biotech giants, industrial farming, food corporations and other toxic chemical food polluters that assault your body. Doctors have been delivering terrible advice for decades. Instead of focusing on the prevention and reversal of obesity and disease by tackling its underlying cause, which is eating modern foods incompatible with our genes, doctors respond to the body’s cries for help by intervening with drugs or surgery to suppress symptoms. Why the medical establishment hasn’t been sued for actually causing bodily harm beats me!

Of course, they are reluctant to admit their mistake, so it could be a very long time before doctors get behind public health advice telling its citizens to return to eating the natural, unprocessed food that was consumed before obesity and diabetes reached epidemic proportions. The fact that the apple doesn’t fall far from the tree was highlighted in a recent BBC1 programme called The Big Crash Diet Experiment. The ‘experiment’ presented itself as an hitherto unknown (at least to doctors), revolutionary treatment for the obesity and diabetes crisis and, if you believe everything you see on TV, the spectacularly successful results really took the doctors by surprise. After all, who knew that a very low calorie diet triggers ketosis, which accelerates weight loss, lowers blood sugar levels and reverses the symptoms of diabetes? Awww, c’mon guys! That would just be me and an entire Primal Health community then!

But still they can’t help themselves. In sharp contrast to the natural, LCHF (ketogenic) whole food diet promoted by Primal Plate, the doctors’ solution was to by-pass any requirement for cooking skills and feed four grossly overweight volunteers highly processed, low-calorie, meal replacement products (a.k.a. The Cambridge Diet)…naturally, under strict medical supervision! They then pronounced themselves the successful innovators of a drug-free advance in modern medicine that could save the NHS millions of pounds. Stop right there! I have never seen a more miserable group of people than the programme’s volunteers, who were made to suffer deprivation and hunger in a ludicrous attempt to limit calorie intake by eating synthetic packaged meal replacements soups and shakes cobbled together in a science lab. This is not my idea of healthcare, nor is it sustainable.

However, if your long-term goal is to get fat and sick, go for it! Last time I looked, products like SlimFast are loaded with chemical thickeners, sugar, artificial sweeteners (e.g. aspartame, maltodextrin and ace-sulfame K), inflammatory vegetable oils (soy and sunflower), carageenan (linked to cancer of the gut), modified maize and soy proteins (genetically modified) and cheap vitamins that are poorly absorbed. 

Here’s a piece of ancestral wisdom based on your genes and human evolution: Cooking nutritionally dense food is where it’s at! If you want to eat well, lose weight and feel great for the rest of your life, you’re going to have to reclaim control over what you’re eating, which means prioritising some time to cooking real, fresh foods. So why has home cooking got such a bad rap since the 1970’s? Because clever advertising duped people into believing that cooking is too hard, too complicated and too time consuming. You can see its effect in society at large (pun intended), there’s an obvious correlation between a preference for eating high carbohydrate, processed food and increasing rates of obesity and chronic diseases.

Notwithstanding the profits-before-people economy at the heart of agriculture, restaurants and fast food industries, we recently decided to eat out and were reminded just how unsatisfying and expensive it can be. In exchange for some promotional photos she’d supplied to a local restaurant, Sarah had been given a £50 voucher that had to be redeemed before the end of June 2018, so it was simply a case of use it or lose it. We each selected a main course off the Early Bird menu, took our Üllo wine purifier to filter our non-organic wine at the table, decided not to negotiate the chorizo part of the dish for something more to our taste, and came home hungry! Total ‘early bird’ price £72.50 + gratuity. That doesn’t seem like good value to me.

Let me compare. Fresh, mackerel fillets, rich in anti-inflammatory omega-3 fatty acids, take no longer than 4-5 minutes to cook under a hot grill. Make-ahead, keto ‘potato' salad, can be assembled several hours before you want to eat it and takes about 15-20 minutes to make, including boiling the eggs and making a batch of mayo. Opening a packet of watercress adds 30 seconds. Finito!

grilled mackerel recipe.jpg

Using premium-priced, organic ingredients (you can buy these cheaper at most supermarkets), Grilled Mackerel Fillets with Creamy Keto ‘Potato’ Salad & Watercress, will feed three people, including a good bottle of organic, low sulphite wine for just £24.70 or £8.23 per person. Say what?

How can home cooked food be “too expensive” or “too time consuming” when there are literally dozens of healthy, delicious meals that can be prepared within half an hour for less than the £8 or so it costs to buy a single gin and tonic or decent glass of wine at your local? This is even before you factor-in the future cost of disability and ill-health because you neglected to eat right. The question is whether you think the rewards of sourcing fresh, preferably organic food and preparing your entire meal is worth the effort. If you’re willing to invest the time and money you’re going to be a lot healthier. Being taught how to cook nutritious food that supports your body is what true healthcare is about. It’s people that don’t cook that get into trouble with diseased states.

Whilst ever public health is stuck in the past and resistant to change, you’ll need to pick a team. Food as medicine is not exactly a revolutionary idea, even to doctors, but you will need to decide whether you’re willing to continue on with the botched up, calamitous, health strategies that allopathic medicine, pharmaceutical companies and food industries have subjugated us all to, or whether to take a more do-it-yourself approach by respecting your hunter gatherer genes and choosing food consistent with your biology. Namely, a higher fat diet that doesn’t include poisonous modern foods such as refined sugar, grains and chemically altered fats and dairy. 

I’d like to start a cooking rebellion. The only way to safely stop obesity and other diet-related disease in its tracks is to remove people’s addiction for highly processed food and to replace it with more pleasurable alternatives. In the case of food, nothing is more delicious than a nutrient-dense, primally aligned, high-fat, moderate-protein and properly prepared, low-carbohydrate diet. 

Grilled Mackerel With Creamy Keto ‘Potato’ Salad and Watercress is a good place to start. 

primal recipes grilled mackerel.jpg

Grilled Mackerel With Creamy Keto ‘Potato’ Salad & Watercress (Serves 4) 

Ingredients - for Creamy Keto ‘Potato’ Salad

1 medium-large organic cauliflower 

75 g organic sour cream or organic crème fraîche

120 g Macadamia Oil Mayo (see recipe in Notes below)

Himalayan pink salt, to taste

freshly ground organic black pepper, to taste

4 large organic eggs, hard-boiled (see Notes below)

2 large organic celery stalks, any outer stringy parts trimmed off with a peeler, then finely diced

2 tbsp fresh organic dill, finely chopped

fresh organic chives, finely chopped - optional


Instructions - to make Creamy Keto ‘Potato’ Salad

Boil a kettle of water. Put the boiling water into the bottom of a steamer.

Prepare the cauliflower by cutting the head (you don't need any stalk) into small bite-size florets.

Place the florets into the steamer basket and steam until the cauliflower is only slightly tender, about 4-6 minutes. Plunge into ice cold water, drain well and set aside.

Peel the eggs and reserve two yolks; dice the remainder and set aside.

In a large mixing bowl, make the dressing by whisking together the sour cream and mayonnaise.

Mash the two reserved egg yolks well with the back of a fork, then add to the cream mixture and whisk together until smooth.

Add the cooled cauliflower, diced eggs, celery, and dill to the dressing. Stir to coat. Taste and season with salt and pepper, if you think it needs it.

Garnish with chopped chives immediately before serving cold or at room temperature.


Ingredients - for Grilled Mackerel & Watercress

600g sustainably caught, skin-on, fresh mackerel fillets (you need 2 mackerel fillets per person, if there’s any leftover, they freeze well)

Himalayan pink salt

Olive oil, for greasing

100g organic watercress, washed, thick stalks removed


Instructions - for Grilled Mackerel

Preheat the grill to Medium-High. 

Line a baking sheet or grill pan with parchment paper or non-stick foil and brush the surface with olive oil.

Dry the mackerel fillets with kitchen paper and season the flesh side with salt.

Lay the mackerel fillets skin side up on the lined baking tray, brush the skin with olive oil and season with salt. 

Grill the fillets for 4 minutes, then if the skin is not already golden brown and crispy, switch the grill to its highest setting and cook for a further 1-2 minutes until it is. 

Serve hot with Creamy Keto ‘Potato’ Salad and a large handful of watercress sprigs. 


Notes:

Because your health is under attack from every direction - environmental toxins, ultra-processed foods and GMOs as well as a host of other threats - Primal Plate always features organic ingredients in its recipes. If you can’t find fresh, organic produce, or really can’t afford to buy it, you can still reduce your exposure to pesticides by checking out EWG’s 2018 Shopper's Guide to Pesticides in Produce. It’s recommended that you avoid the Dirty Dozen (virtually impossible when you’re eating out) and only eat non-organic if it’s listed under these Clean-15

primal plate macadamia oil.jpg

To make Macadamia Oil Mayo:

Ingredients

2 large organic eggs

2½-3 tbsp organic lemon (or lime) juice, freshly squeezed

1 tsp organic Dijon mustard

½ tsp Himalayan pink salt

freshly ground organic black pepper

1-2 drops organic liquid stevia 

200 ml cold pressed macadamia nut oil

50 ml organic extra virgin olive oil

Instructions

Place all the ingredients into a tall, narrow container.

Using a hand-held stick blender, blend everything together until it emulsifies into a pale, creamy mayonnaise. Takes about 30 seconds!

Taste and add a little more lemon/lime juice and seasoning, if liked. N.B. Don’t worry if the mayonnaise seems a little on the runny side when it’s first made. It thickens up to the perfect consistency, when chilled down in a refrigerator. 

Transfer to a glass container and seal with an airtight lid. 

Store in a refrigerator and use within 7 days.

health coach food medic eggs.jpg


To steam-boil eggs - boil a kettle of water. Pour about 2.5cm (1 inch) of the boiling water straight from the kettle into a saucepan. 

Place a steaming basket inside the pan and place the eggs into the steamer-basket (I find a collapsible steamer most useful because one-size fits all pans). 

Put the lid on the pan and steam/boil the eggs for 10-12 minutes until hard-boiled. 


Fat 56g Protein 18g Carbohydrates 8g - per serving

Fat 30g Protein 2g Carbohydrate 0g - per stand-alone serving of Macadamia Oil Mayo

keto recipes mackerel.jpg

Cheddar & Feta Frittata

by Susan Smith in , ,


I should be old enough to know better, but after weeks of ignoring nagging voices telling me Primal Plate must be “GDPR-ready” before 25 May 2018, I finally succumbed to the general confusion by sending out an email to all our blog subscribers, which essentially promised to unsubscribe them by default! Oh, how I despise bureaucracy. Does anyone else recall the ridiculous, government-led Y2K millennium bug scaremongering that told us to prepare for the worst? It was all for naught. And what about the TPS (telephone preference service) that supposedly allows residential phone users to register their wish to opt-out of receiving cold calls? In the nineteen years since we signed up it hasn’t made a jot of difference to the number of nuisance calls we receive. Whilst I agree it’s a good thing to have control over who holds my personal information and for what purpose, I think the hoo-ha and perceived threat of this latest EU legislation is just another sledge hammer to crack a nut. The fact is that data protection enforcement has been extremely lax to date and although, in theory, fines of £500k can be imposed on anyone found flouting the law, I‘m willing to bet no-one will be around to successfully police it. Rant over. If you’re reading this blog, I’m happy you’re still with us and my apologies for last week’s needless attempts to put right your current subscription status, which was never wrong to begin with.

If fathoming out GDPR cost me two days of my life this week, yesterday was a complete wipe-out. I was quietly doing my usual morning face-cleansing ritual in front of my magnifying mirror when to my horror, I sat and watched my right eye - as if in slow motion - fill up with blood! No warning, no obvious reason, no pain, no loss of vision but hell’s teeth, it was frightening! Feeling too faint and too scared to go online to investigate, I was left in a state of shock. Was my brain seeping blood? Was I about to have a stroke? Was my bloodied eye permanently damaged? I had never seen or heard of anyone suffering a trauma as unexpected and dramatic-looking before, so when my husband told me I’d had a subconjunctival haemorrhage and it was completely benign, I was both thankful and relieved. Nevertheless, I took it as a warning to slow down and rest. As someone who can accurately be described as health obsessed, it’s humbling to know I’m not always on point.  I share my experience with you because I believe that stress was the most likely cause of my eye ‘pop’. It’s a reminder that the true “price of anything is the amount of life you exchange for it” (saith Henry David Thoreau). From now on I will be more selective!

In the spirit of ‘rest and restore’, I’ve turned to Sabrina Ghayour’s book entitled Feast for today’s recipe for Cheddar & Feta Frittata. A frittata is such a cheap, quick and easy, low-carb, keto meal to prepare and you can use almost any combination of seasonal vegetables with the eggs and cheese and have dinner on the table within half an hour. If I’m feeling really lazy, I don’t even bother with a salad accompaniment. I segment the sizzling frittata still in its pan and simply serve wedges of it with a glass of wine. There are lots of different frittata combos that we enjoy - leeks and blue cheese is another winner - but for now this Cheddar & Feta Frittata with peppers, fresh herbs and chilli should get you into the frittata groove.

spanish omelette.jpg

Cheddar & Feta Frittata (serves 4)

Ingredients

1 tbsp organic ghee organic olive oil or macadamia nut oil

1 organic red pepper

1 organic green pepper

4 organic spring onions, cut into very thin slices from root to tip

200g organic feta cheese, roughly crumbled into 1 cm chunks

100g organic strong Cheddar cheese, grated

4 organic dried chillies, crushed in a pestle and mortar (or organic chilli flakes - milder than whole bird eye chillies - to taste)

10g fresh organic dill, finely chopped

10g fresh organic coriander, finely chopped

8 large organic eggs

Himalayan pink salt or Celtic sea salt, to taste

Freshly ground organic black pepper, to taste

Instructions

Wash the peppers, halve lengthwise and remove the stems, seeds and membranes, then cut into 1 cm strips and finally into 1cm dice.

Place the ghee (or oil) into a large, non-stick ovenproof frying pan and set over a medium-high heat. 

spanish omelette prep1.jpg

When the oil is hot, add the peppers and stir fry for 2-3 minutes until softened, but not coloured. Set aside to cool.

Meanwhile crack the eggs into a medium-large bowl and beat together well. Mix in the spring onions, feta, Cheddar, crushed chilli/chilli flakes, dill and coriander.

Add the cooked and cooled pepper pieces to the eggs and mix again.

spanish omelette prep.jpg

Set the frying pan back over a medium heat - add a little more ghee/oil if you think it needs it. 

When the pan is hot, tip the egg mixture into the pan, spreading the contents out evenly with a wooden spoon. 

Cover the pan with a lid or stainless steel splatter guard and leave the frittata to cook on the top of the stove for 6-8 minutes or until the edges have set.  

Meanwhile, preheat the grill to High.

Remove the pan lid and place the frittata under the hot grill. Cook until golden brown and sizzling hot.

Check to see that the eggs are cooked through by inserting a knife into the centre of the frittata. If they’re still runny, put back under the grill for 1-2 minutes more until they’ve firmed up completely.

Slice and serve straight from the pan.

spanish omelette serving .jpg

Notes:

You will see from the photos that I ring the changes with whatever vegetables I have to hand. I’ve added lightly steamed rainbow chard to one of the frittatas and lightly steamed English asparagus to another. I could equally be tempted to throw in a couple of handfuls of baby spinach. The more green veggies the better, just don’t overcook them before adding to the eggs.

Leftovers are great served at room temperature.

Fat 36g Protein 31g Carbohydrates 3g - per serving

spanish omelette serving.jpg

Torn Mozzarella and Peppers

by Susan Smith in ,


As predicted, while I grapple with the gargantuan task of becoming a certified health coach, assisting Mirror Imaging at the height of the wedding season and simultaneously checking-out old tenants and finding new ones, I have virtually no time to develop new recipes for this blog. Indeed any attempt to write my blog is secondary to cooking our daily meal and getting enough exercise. Hence, I’ve gotta keep things quick and easy.

It’s a blessing. My brain cells are getting enough of a work-out with coursework and exams so I’ll keep to the point of Primal Plate, which is to simply feature delicious recipes that help you transition from being a carb-dependent sugar-burner to a fat burning beast.

Here’s one such recipe taken from Jill Dupleix’s book, appropriately titled: ‘Very Simple Food’. Torn Mozzarella and Peppers is like a bottomless pizza that sings out ‘Mediterranean’. With more than its fair share of vitamins and minerals - the brightly coloured peppers are a give away - this warm salad relies heavily on the best ingredients you can find. Fresh buffalo mozzarella is heavenly and its soft creaminess pairs beautifully with the slight crunchiness of warm, sweet peppers.

This gorgeous salad only takes minutes to make and can be served either on its own or as a light main course accompanied by crispy Keto Bread Rolls, still warm from the oven.

The easiest meal in the world to prepare and so very healthy and tasty to boot, Torn Mozzarella and Peppers is a yummy, Primal, low-carb winner. I think you’ll enjoy.

peppers.jpg

Torn Mozzarella and Peppers (serves 4)

Ingredients

2 organic sweet red peppers

2 organic sweet yellow peppers 

2 tbsp organic extra virgin olive oil

Himalayan pink salt

Freshly ground organic black pepper

2 tbsp organic flat leaf parsley

2 organic fresh mozzarella balls (convenient for me to buy weekly with my Riverford order but it’s cheaper from Waitrose!)


Instructions

Holding the peppers upright, cut the sides away from the core and seeds, then cut each piece into 1cm squares.

In a saucepan, combine the peppers with the olive oil, salt and pepper and stew gently over a low heat for 10-15 minutes without allowing the peppers to fry or brown. 

Remove from the heat and allow to cool until barely warm.

Set out 4 shallow serving bowls or plates and using a slotted spoon, divide the peppers equally between the plates, saving the cooking juices/oil left in the bottom of the pan.

Drain the mozzarella and pat dry with kitchen roll. Tear the mozzarella into small pieces with your fingers (I don’t discard the thick skin as the original recipe advises - it’s all good!) then distribute evenly between the plates, randomly dotting it over the peppers.

Tear the parsley leaves into shreds with your fingers and scatter on top of the mozzarella. 

Drizzle with the reserved oil to serve.

peppers ingredients.jpg

Notes

This recipe is a great example of how eating low-carb doesn’t mean eating no carbs. You easily consume plenty of carbohydrates (glucose forming food) for your body’s needs when you eat lots of fresh, organic vegetables grown above ground, small amounts of fresh fruit, nuts and seeds. A high-carbohydrate, high insulin-producing diet is pro-inflammatory, immune suppressing, and hormone balance disrupting, which increases the risk of assorted health problems and serious disease.

Interestingly, the total amount of glucose dissolved into the bloodstream in a healthy non-diabetic is only about a teaspoon, or five grams. Exceeding that level quickly becomes toxic; fall much below that and you will pass out. 

It takes approximately 21 days to lessen your reliance on external sources of carbohydrates and become efficient at fat and ketone burning. If you want to be strong, slim, disease and wrinkle free for longer than most people believe possible, limit your carbohydrate intake to less than 150 grams per day. 


Fat 24g Protein 11g Carbohydrate 13g - per serving

sweet pepper recipe.jpg

Chocolate Truffle Pots With Raspberries

by Susan Smith in ,


For crying out loud! How do I know that Christmas is already snapping at my heels again? Answer: When Waitrose start to email and text me that it’s time to bag my preferred Christmas delivery date before all their slots are taken. Apparently, if you don’t want to miss out and be forced to jostle with the rest of the shoppers in-store this Christmas, you’d better be one of the first in their virtual queue. The trouble is, to qualify you have to fill your shopping basket today with everything you might fancy eating in three months time! Looks like wild sockeye salmon, king Madagascan prawns and Nyetimber fizz - the ultimate English alternative to Champagne - are already destined to feature in our Christmas celebrations this year! 

As it happens, last Sunday was one of those all too rare occasions when both my lovely daughters and I sat down together for a family meal. So taken was I at the prospect of this mini social gathering that even though I am currently as run off my feet as it’s possible to be - think headless chicken - I still felt inspired to make something really special for us to eat. These Chocolate Truffle Pots With Raspberries were devoured with so much enthusiasm, I now also know what’s going to be the grand finale to our Christmas lunch! Organised by default, or what? To be honest, they’re such an easy, make-ahead dessert to simply grab from the fridge as you need them, they’ll probably make several dinner party appearances before the festive season gets underway in earnest.

Besides, there’s nothing more un-diet-like than a rich, chocolatey pudding to show people how deliciously easy it is to eat yourself healthy and then stay slim once you’ve decided to ditch high carbohydrates and switch your body’s energy source from sugar to high quality fats. WARNING: If you eat lots of high-fat food whilst continuing to eat sugar and grains, you will get fat! 

Pregnant women and high performance athletes may be an exception, but for the vast majority of us carb intolerants, a high-fat, moderate protein and low-carb diet, especially in combination with gentle intermittent fasting, will burn-off excess body fat, keep you at your optimum weight, reduce chronic inflammation (the root cause of most disease) and help you take back your health and vitality. Sounds too good to be true but I invite you to give LCHF the chance to work its magic before the party season kicks off…by which time there should be significantly less of you to fit into your party clothes!

Very good quality, organic chocolate and a mere tablespoon of organic maple syrup makes six individual Chocolate Truffle Pots With Raspberries that are neither too sweet or too bitter. A sophisticated, delectable dessert that keeps on giving with every luscious spoonful - dig deep for the pretty pink raspberry centre that pairs beautifully with the creaminess of chocolate truffle - and don’t let the big fat lie that you’ve been told, particularly about saturated fat, mar your enjoyment. Though everyone finds it difficult to believe, this heavenly, ‘fit for the gods’ high-fat pudding gets you over the psychological hump of diet deprivation and hangry sugar cravings to actually help you shed body fat. Do you really need any other excuse not to make it?

chocolate pots.jpg

Chocolate Truffle Pots With Raspberries (Serves 6)

Ingredients

150g organic frozen raspberries

50g organic *100% cocoa solids dark chocolate (see Notes below)

75g organic *76% cocoa solids dark chocolate (see Notes below)

300ml organic double cream

4 drops organic liquid stevia

1 tbsp organic maple syrup

1 tsp pure vanilla extract

4 large organic egg yolks

2 tbsp Sukrin:1

Raw organic cacao powder, to dust (see Notes below)

Sukrin icing sugar, to dust

chocolate pots primal recipes.jpg

Instructions

Boil a kettle of water. Pre-heat the oven to 150℃ (130℃ fan) / 300℉ / Gas mark 2.

Put the chocolate into a saucepan with the cream and place over a medium heat. Heat slowly to just below boiling point whilst stirring from time to time until the chocolate is completely melted and the mixture smooth. Stir in the liquid stevia, vanilla extract and maple syrup then set aside to cool slightly.

Divide the frozen raspberries between 6 x 125ml ramekins (25g per ramekin)

recipe step by step 1.jpg

Place the egg yolks and Sukrin:1 into a bowl and stir together using a wooden spoon. Stir in the chocolate mixture and stir to combine.

step by step recipe.jpg

Divide the mixture between the ramekins (approximately 80g per ramekin), settle the mixture evenly into their pots by gently tapping the sides of the ramekins before placing them into a deep roasting tin. Pour enough boiling water into the tin to come halfway up the sides of the ramekins.

step by step chocolate pots.jpg

Bake for 25 minutes. Remove from the oven and leave to to cool, then cover and chill overnight. 

Remove the ramekins from the fridge 30 minutes before serving to allow them to reach room temperature. 

Just before serving dust with cacao powder and a sprinkling of Sukrin icing sugar, if liked  


Notes

Raw cacao is less processed than cocoa powder and so retains natural antioxidants and essential fatty acids. It has the same great taste as cocoa and is used in exactly the same way but for this recipe I chose to go one better. People often ask me if I believe in taking nutritional supplements and indeed I do. Never one to miss a golden opportunity, I used Miessence Berry Radical Antioxidant Superfood - a chocolatey-tasting food supplement - to dust my truffle pots. In fact, if you suspect your diet is deficient in fruit and vegetables, this tasty, high potency formulation gives you the antioxidant equivalent of eight servings of fruit and vegetables in every teaspoon! 

I always prioritise eating well to support good health so there’s no point in being cheap…er frugal, when it comes to feeding your body with the nutrients it needs. Along with Miessence Berry Radical antioxidants, which we usually make into a delicious chocolate milk sweetened with pure stevia drops, we also take a teaspoon each of Miessence InLiven Probiotics and DeepGreen Alkalising Superfood mixed with fresh lemon juice and water, each and every day. At least I then know that no matter how hectic or stressful life gets, my family is never going to be nutritionally short-changed. If you know you don’t always have the time to cook fresh, healthy meals, the Miessence Vitality Pack is the most convenient, natural way to reliably supplement an inadequate diet. 

chocolate pots ingredients.jpg

I had a glut of 100% cocoa solids, no added sugar, organic chocolate bars given to me to sample for a birthday surprise. To be honest, I must be a 100% cocoa solids chocolate ‘wimp’ because I found only one of them smooth and mellow enough to eat straight from its wrapping! The rest will find their way into future Primal Plate recipes to make them even more low-carb. * If you prefer (it’s much cheaper), you can replace the two types of chocolate that I used with 125 grams of Green & Black’s 85% organic dark chocolate. I haven’t tested it out, but I imagine to get a similar taste profile to my chocolate truffle pots (I don’t like overly sweet chocolate), you will need to add less stevia - try adding just 2 stevia drops at first, then taste before adding more to adjust the sweetness to your liking. 


Fat 40g Protein 5g Carbohydrate 9g - per serving


Avocado & Tomato Toasts

by Susan Smith in ,


Simple food is often the best. Today’s post isn’t so much about the recipe, it’s more about awakening the senses with some visual inspiration for a really healthy, low-carb, quick and easy meal. What you see is what you get!

Cool, creamy avocado, roughly mashed together with lime juice and fresh coriander, piled on to hot toast and topped with sweet, sizzling, grilled tomatoes is a delicious, hot and cold taste sensation that beats beans on toast any day of the week! 

Vegan, Paleo and keto friendly, this savoury offering contains enough healthy fat to keep you satiated for hours. Perfect! 

Avocado & Tomato Toasts (serves 4) 

Ingredients

2 large, preferably Hass, organic avocados (or 3 medium)

Organic lime juice, freshly squeezed

Small bunch (approx 20g) fresh organic coriander, leaves only, roughly chopped 

2-3 drops Tabasco pepper sauce

Himalayan fine pink salt

250g organic mixed baby or cherry tomatoes

Freshly ground organic black pepper

Organic extra virgin olive oil, for grilling and drizzling

Extra sprigs of fresh organic coriander leaves, to garnish

Instructions

Pre-heat the grill to High. 

Warm 4 individual serving plates (I do this in the microwave).

Peel and stone the avocados and place in a bowl together with half the lime juice and the tabasco sauce. Roughly mash together with a fork into a fairly coarse textured consistency. 

Taste and season with salt. Add more lime juice if you think it needs extra ‘zing’ then stir in the chopped coriander. Cover the bowl with cling-film and set aside in a refrigerator.

Put the tomatoes in an ovenproof dish and drizzle with a little olive oil. Season with salt and pepper then place under the hot grill for 3-5 minutes until cooked through but not collapsed. 

Whilst the tomatoes are grilling, toast slices of Vegan Paleo Nut & Seed Bread (2 slices per person) on both sides. 

Place the toast on the pre-warmed serving plates. Pile the cool avocado mixture on to the hot toast, dividing it evenly between the slices of toast, then top with the grilled tomatoes. 

Drizzle over a little extra olive oil and decorate with extra coriander leaves, if liked.

Tuck in!


Notes

Avocados ripen after picking. I buy them whilst they’re still hard and keep them in the refrigerator. They’ll usually ripen at room temperature within a couple of days, but you can speed up ripening by putting in a fruit bowl with a ripe banana. Avocados are ready to eat when they yield to gentle pressure in the palm of your hand - please don’t prod them with your fingers as they bruise! Once ripened, they can be put back into a refrigerator to store for a few days longer.


Fat 41g Protein 3g Carbohydrate 6g - per serving of guacamole & tomatoes

Fat 17g Protein 5g Carbohydrate 8g - per slice of Vegan Paleo Nut & Seed Bread toast


Chocolate Orange & Cardamom Fat Nuggets

by Susan Smith in ,


The majority of people think my diet-led lifestyle, as documented on Primal Plate’s blog, is impossibly hard to follow. So at the risk of repeating myself, in today’s post I’m going to attempt to sort the ‘wheat from the chaff’ of excuses people give for turning a blind eye and continuing to make dietary choices that are clearly detrimental to their health. 

First up, “I’ve no time to cook”. Aside from eating raw food or at the very least throwing everything together in a blender to make nutritious soups and smoothies, if you won’t regularly cook real food at home, you’re in trouble. If you’re not willing to invest the time to eat healthy food now, you’ll almost certainly spend time later in a sickened state rueing the day you thought you had something better to do. My secret weapon in the kitchen is enlisting my husband’s help. Don’t try to go it alone, it’s much too much like hard work. I am as much a time-poor cook as you, but needs must if you want to safeguard your health and/or reverse obesity and other diseased states. 

“I can’t cook”. As someone who extrapolates information from unintelligible recipes and reconstructs them for Primal Plate’s website, I can understand that many people, having given cooking a go, have deduced from the results that they can’t cook. However, it’s not your fault if the recipe you followed is just plain wrong, which they often are! All Primal Plate recipes are throughly tested before publication and we re-visit them - oftentimes over and over again - when cooking our own meals. In my absence, both my partner John and daughter Sarah faithfully follow Primal Plate recipes on their iPhones to both shop for and then produce the same delicious results. It’s comforting to know that if anything happens to me they’ll have a volume of healthy recipes to refer to that won’t ever let them down. If you can read, you can cook.

“It’s too expensive”. Buying organic is something I’m really strict about - not just fruit, vegetables, nuts, seeds, meat, fish and dairy but also tea, coffee (made with filtered water), the wine we drink (very low sulphite) and condiments like salt, vinegar, pepper, other spices, herbs and flavourings. The same rule applies to all our personal care and household cleaning products etc. Whilst you can never avoid all the noxious chemicals man has devised in the name of profit and experimentation in this mad world (hello Monsanto/Bayer), you can at least limit your exposure by filtering out all those toxins in your food and drink, the air you breathe and what you absorb via your mouth (toothpaste etc.) and skin. What happens when you combine processed junk food, GMOs, antibiotics, agricultural chemicals, dodgy school dinners, fluoride-loaded water, chemical-based prescription medicines and toxic vaccination programmes? God only knows, but there are people and corporations that are hell-bent on de-populating the earth, and it seems to me that they have the process well in hand! Eating mostly fresh, raw, organic whole foods and going ‘green’ may cost a little more money but it is an act of defiance in support of the environment that can help prevent disease, keep you out of hospital and extend life. What price good health? You decide. 

A high fat diet makes you fat”. No it does not. Eating foods that are high in healthy fats fills you up and makes you want to eat less, which aids weight loss. Just don’t combine high-fat food with high-carbohydrate foods or too much protein. If you eat high carbohydrate foods and more protein than your body requires, it will simply convert most of those calories to sugar (glucose) and then fat. Increased blood sugar levels from whatever source also fuels cancer cell growth. Since reading Fat For Fuel, my goal, which I track most days via myfitnesspal.com, is to eat a diet high in healthy fat with medium amounts of protein and low amounts of carbohydrate. The ratio looks something like this: 94g fat, 65g protein and 49g carbohydrate per day. Anyone who wants to lose weight, combat disease, slow down ageing, boost their brain power and have more energy, needs to get onboard with the principles of Fat For Fuel and quit thinking that the body needs carbohydrates (glucose) for energy, or that eating low-carb means replacing carbohydrates with excessive amounts of protein (also glucose forming!) as subscribed to by followers of Atkins, Paleo and Primal.

One of the concerns I had whilst making the adjustment to our family meals was how to keep up with John and Sarah’s requirement for the extra calories that I don’t need (ah, the joys of ageing!). To get our calorific needs more in alignment, I now practice intermittent fasting i.e not eating solid food for 16-18 hours in every 24 hours. However, these Chocolate Orange & Cardamom Fat Nuggets - little calorific nuggets made primarily from coconut and almond butter (generally referred to by ketogenic dieters as “fat bombs”) have been a real game-changer for us all. 

There will be many more keto-inspired (LCHF) recipes coming soon on Primal Plate’s blog, but for now these Chocolate Orange & Cardamom Fat Nuggets are the most enjoyable way I could think of to satiate your appetite for something sweet, provide bags of energy and to ease the process of switching your body from its reliance on burning glucose for energy to fat burning instead.

Standing in for luxury truffles, after dinner petits fours, semifreddo, mini chocolate parfaits or - in its unformed state - a delicious spoon-from-the-jar chocolate spread, the sophisticated flavour combo of chocolate, orange and cardamom tastes like really expensive chocolate. Better than any chocolates I’ve ever tasted, these little nuggets of goodness are what you might call “happy superfood”. Pure gold for keto-dieters and also the health conscious, sports people and keep fit fanatics, these easy-to-make Chocolate Orange & Cardamom Fat Nuggets should help convince you that if you want to look good on the outside and feel good inside, fat is your new best friend. 

Half this recipe will make 30 chocolates, the other half a ready-to-eat chocolate spread. Very yummy, very moreish, Orange & Cardamom Chocolate Fat Nuggets are no longer a dietary stop-gap for John and Sarah but have earned their place in our house as a daily ‘must-have’ nutritional necessity. 

Chocolate Orange & Cardamom Fat Nuggets (Makes 30 x 10g nuggets plus approx. 200g chocolate spread)

Ingredients:

100g organic coconut butter

100g organic almond butter

200ml organic full-fat coconut milk

50g organic pasture-fed unsalted butter

1 tsp pure vanilla extract

4 tbsp raw organic cacao powder

15 drops organic liquid stevia

1 tbsp raw organic honey

20 organic cardamom pods crushed in a pestle and mortar, husks removed and seeds finely ground

2 organic oranges, zest only


Instructions:

Boil a kettle of water.

Place all the ingredients into a large glass heatproof bowl. 

Pour the boiling water from the kettle into a saucepan large enough to accommodate the bowl of ingredients. 

Place the bowl of ingredients on top of the saucepan of water to create a double-boiler i.e. the base of the bowl should not be in direct contact with the water. Set over a medium-low heat.

Stir the ingredients together until everything melts into a smooth, creamy, pourable mixture that easily drops from a spoon. As soon as the ingredients are well combined take the pan off the heat. N.B. It’s important not to let the mixture get too hot as this will cause it to separate into an oily mess! 

To make a batch of professional-looking, individual fat nuggets, immediately spoon half of the melted mixture into a silicone chocolate mould (I used this one from Lakeland). 

Pour the remaining mixture into a Kilner/mason jar whilst it’s still warm. Cover and set aside to cool.

Meanwhile, open-freeze the individual fat nuggets in their chocolate mould until solid. When completely frozen, unmould them and store in a lidded freezer-proof container in the freezer until you’re ready to eat them. Take them out of the freezer to soften about 10 minutes before serving. Tip: I place each frozen nugget on a dinky, decorative spoon to ‘come-to’ in readiness for serving; this means they melt in your mouth, not on your fingers!    

If posh presentation isn’t your thing, simply pour all of the mixture directly into a 500ml Kilner/mason jar and when it’s cooled down, store in the fridge. You can then spoon it out of the jar as required - i.e. eat it straight off the spoon, add to dairy or nut milk and whizz together in a blender to make chocolate milk, or use as a delicious chocolate spread on hot toast or bread. 

Notes

If the mixture overheats during the melting process causing it to separate, it can be saved by quickly whisking-in a couple of ice cubes.  

To fully enjoy these healthy Chocolate Orange & Cardamom Fat Nuggets, please ignore the recent attack made on saturated fat by the American Heart Association. In my view, it's no more than the death rattle of a desperate organisation that’s lost its credibility and should be defunct. Still, I enjoyed the furore they caused on social media last week! Most people know from experience that public health guidelines encouraging you to eat a diet low in fat and high in carbohydrate and to substitute natural saturated fats for processed, polyunsaturated vegetable oils, simply doesn’t work. It is a dietary formula that makes you sick and fat. Specifically, there never was, and still isn’t, a single shred of scientific evidence to support the demonisation of saturated fat as the root cause of heart disease, high cholesterol, clogged arteries or myocardial infarction. It’s all a big, fat lie! To read more, click here.


Fat 3g Carbohydrate 1g Protein 1g - per nugget or 10g serving of chocolate spread


Raw Sugar-Free Raspberry Jam

by Susan Smith in ,


What to say about this jammy delight? Simply that it’s a healthy alternative to regular jam that can be made in less than 5 minutes flat. I recommend you keep a pot of it in your fridge to slather on toasted Vegan Paleo Nut & Seed Bread - trust me, there are few better ways to start the day than with freshly brewed coffee and pure raspberry jam spread thickly on buttered toast! 

Also delicious served with Grain-Free Scones, for making into smoothies, as a topping for yogurt or ice cream and for sandwiching together Primal Plate’s Vegan Victoria Sandwich Cake.

Raw Sugar-Free Raspberry Jam

Ingredients

200g organic frozen raspberries, defrosted

2 tbsp organic white chia seeds (white chia seeds are nutritionally identical to black chia but are visually more appealing! You can use either)

1½ tsp organic psyllium husks

1 tbsp organic lemon juice

30g Sukrin 1

1 tsp pure vanilla extract


Instructions

Place all the ingredients into a blender or food processor and pulse gently until just smooth. 

Taste and add a little more Sukrin:1 (or a couple of drops of liquid stevia) if you would like a sweeter jam.

Transfer the mixture to a glass container with a lid (I used a mason jar) and allow to set in the fridge.

Notes

This jam is veering towards the tart, which is how I like it! If you want it to taste more like regular jam (sweeter) and you’re not keeping to a keto (very low carb) diet, a tablespoon of raw, organic ‘runny’ honey or maple syrup (for vegans) would be a better choice.


Carbohydrate 36g Protein 8g - per whole pot of jam! 


Spinach, Cherry Tomato & Avocado Salad with Spicy Sicilian Almonds

by Susan Smith in , , ,


Having initially accepted the challenge of featuring delicious, primarily vegetarian, Primal/Paleo recipes on Primal Plate’s blog, I now find myself obsessed with the idea of going one step further. Accordingly, it’s my intention to include many more vegan recipes that can be enjoyed as part of a Primal lifestyle. I’m excited at the prospect. With summer almost upon us, light and easy is the order of the day and it feels entirely appropriate for our meals not to be so dairy dependant. Vegan food eaten in this context, means moving away from Primal and more towards the Paleo diet, which excludes milk, butter, cheese, crème fraîche, cream, ice cream and yogurt.

I am too much of a hedonist to go the whole hog (strictly speaking, Paleo peeps don’t even drink red wine for heaven’s sake!), but I do want to consciously use dairy products less often. Sarah has coined a new phrase for what’s turning out to be a delicious voyage of discovery. She calls it ”Valeo”, which in my view perfectly sums up the logic of eating more healthily without exploiting animals. If there’s one thing that miffs me about the Primal/Paleo diet, it’s the emphasis on eating animal protein.  

Yesterday we enjoyed a valeo meal of soup and salad…a Roasted Beet Borscht with Horseradish Cream (recipe coming soon) and this amazingly tasty, healthful Spinach, Cherry Tomato and Avocado Salad. Vivid colours and packed with goodness, eating valeo is light years away from the high-carb pasta, rice, bread, potato and legumes that most vegetarians and vegans rely on. 

As I’m a complete novice entering the world of veganism, I’m sailing in relatively unchartered waters. Therefore, I make no apology for seeking out the best vegan recipes from other authors that obviously don’t contain meat, fish, eggs or dairy as well as all the Primal ‘no-no' foods such as grains, potatoes, legumes, processed soy and fats etc. It’s a tall order! Nevertheless, this Spinach, Cherry Tomato and Avocado Salad with Spicy Sicilian Almonds, which I’ve borrowed from Annie Bell’s book Gorgeous Greens, immediately hit the culinary jackpot by ticking all the aforementioned boxes. Sod’s law that it’s been Primal Plate’s most popular posting on Instagram to date! 

Clearly this is not just a dish for Paleos or Vegans but also for meat-free Mondays, dairy free dieters and anyone that finds themselves somewhere in-between (me!). Full of punchy flavours, this hearty salad is a wake-up call for the senses that can be on the table in less than 30 minutes.  

Spinach, Cherry Tomato & Avocado Salad with Spicy Sicilian Almonds (serves 4)

Ingredients - for the nuts

100g organic whole, blanched (skinned) almonds

1 tbsp organic extra virgin olive oil

1 tsp organic Tamari

1 tsp, organic fresh thyme leaves

¼-½ tsp organic chilli pepper 


Ingredients - for the salad

2 organic avocados

125g organic baby spinach leaves, or torn young spinach leaves

2 tbsp organic extra virgin olive oil

a good squeeze of organic lemon juice

200g organic cherry tomatoes, halved

a small handful of organic fresh chives, finely chopped

sea salt (my favourite for serving at the table is fine Pu‘uwai Deep Ocean Hawaiian Sea Salt)

Instructions - for the nuts

Pre-heat the oven to 170℃ / 325℉ / Gas mark 3

Toss the almonds in a bowl with the olive oil and tamari, then toss in the thyme, scatter over the cayenne pepper and toss again.

Tip the nuts into a small roasting tin or baking tray and spread them out into a single layer. 

Toast in the oven for 15 to 20 minutes, until deep golden and crisp. 

Transfer the nuts to a plate lined with a paper towel and leave to cool.


Instructions - for the salad

Remove the avocados from the stone by cutting in two halves and picking the stone out. 

Peel the skin off the avocado halves, then slice each half into four long segments (8 segments per avocado).

Toss the spinach in a large bowl with the olive oil and lemon juice, then carefully fold in the halved cherry tomatoes and chopped chives.

Pile the salad on to four individual plates and scatter over the spiced nuts.

Serve straight away, leaving each diner to season their own salad with sea salt. 


Notes

Impossible to resist, the spicy, piquant almonds make a superb stand-alone snack. I chose premium, organic, ready-skinned almonds from sunny Sicily for their larger size and superior creamy, sweet taste but any raw, organic, blanched almonds are fine.

Readers will notice that I always create Primal Plate recipes from organic ingredients. For your health and wellbeing, it’s extremely important you do likewise. Many nuts have a high oil content, which means that they easily absorb pesticides. It is always best to purchase organic. For more information read why you need to buy organic nuts and seeds.


Carbohydrate 15g Protein 8g - per serving


Mango & Passion Fruit Fool

by Susan Smith in ,


When pondering what to eat for our Easter vegetarian feast last weekend, fruit fool - a light and creamy dessert simply made by combining fruit puree with softly whipped cream - was my dessert of choice. I’ve always loved fruit fools, particularly when made with stewed and pureed rhubarb or gooseberries, which back in my sugar-eating days (before I was older and much wiser) I liked to serve with homemade shortbread fingers for dunking. 

Albeit that the first homegrown rhubarb is now in season, this more exotic, fragrant Mango and Passion Fruit Fool is all about its bright daffodil-yellow colour and abstract beauty, which reminds me of springtime and eggs - set off beautifully by serving it in delicate, glass teacups. 

Don’t be alarmed by the extravagant amount of double cream used in the recipe. It’s deliberate. You could lighten things up a bit by substituting 100g of thick, natural Greek yogurt for the same amount of double cream before whipping them together and then folding in the fruit puree, but I like this gorgeous dessert just the way it is and consider it to be healthy.

Consuming saturated fat does not by itself make you fat. Weight watchers take note: A high-fat diet, makes it easier for people to lose weight, lower blood levels of triglycerides (the other circulating fat, besides cholesterol) and raises levels of heart-protective high density lipoprotein, or HDL, the “good” cholesterol (to read more, click here). Conversely, a low-fat diet is fattening and makes you sick. 

The low-fat / high carbohydrate dietary ‘Dementors’ have had their heyday and in the process they destroyed the health of millions of people along with their faith in eating natural (real) food. The truth is, the human body prefers ‘Fat for Fuel’ and furthermore, it’s healthy fats such as raw organic butter and cream that actually make food taste delicious. Way to go! 

More than this, switching your body’s energy supply from glucose to fat is vital for improving health and increasing longevity. It’s almost a case of: If it tastes good, eat it! But, and it is a big BUT, you can only be part of the dietary revolution going on all around you if you are willing to stop eating refined sugar and grains - including conventional breads, cakes, biscuits, breakfast cereals, white rice, pasta - as well as white potatoes, corn and all high sugar food and drinks. Are you ready?

I hope so, because the likes of this creamy, dreamy fruit fool awaits you. In the context of a carbohydrate-sparing diet, it is a healthy, quick and easy dessert that works on every level. Welcome to Primal Plate living. It’s the future.  

Mango & Passion Fruit Fool (Serves 4)

Ingredients

1 large, ripe organic mango

4 large ripe passion fruit (or 6 medium ones)

300ml organic double cream, preferably raw (unpasteurised)

3-4 drops organic liquid stevia


Instructions

Chill the cream and bowl at least 2 hours before you start.

Using a sharp serrated knife, prepare the mango by slicing the mango lengthways - about 5mm (¼ inch) either side of the stalk - to cut the flesh from the flat stone. Peel off the skin and cut the flesh into rough pieces. Remove as much of the flesh from around the stone as possible. 

Place the chopped flesh into a high powered blender and whizz to a puree. Set aside.

Cut the passion fruits in half and using a teaspoon, scrape out all the pulp, seeds and juice into a small bowl. Divide half of the passion fruit between 4 individual glass serving dishes or teacups. 

Using an electric whisk set at medium-high speed, whip the cream until it begins to thicken. Then turn to medium speed and beat only until the cream holds itself up in soft peaks. N.B. Don’t let the cream become too stiff or you won’t be able to fold in the fruit puree. 

Gently fold the mango puree together with 3 or 4 drops of liquid stevia into the whipped cream until it’s roughly incorporated - you don’t need to be too thorough, a marbled effect is quite nice!  

Divide the mango and cream mixture evenly between the 4 serving dishes, spooning it on top of the passion fruit. Then add the remaining passion fruit on top of each cup of fool.   

Cover and chill for at least 30 minutes before serving. 


Notes

Fruit fool is best served within 24 hours of making. Make sure it is well covered (airtight) before chilling, otherwise it can pick up the smells and flavours of other stored food in the refrigerator. 

Other soft fresh fruits, such as strawberries and raspberries can be used instead of mango to make delicious fruit fools. 

Harder fruits such as gooseberries, dried apricots and rhubarb (strictly speaking, the latter is a vegetable) will need cooking before being pureed. Remember, if your chosen fruit needs extra sweetener (I suggest a 50/50 combo of either organic acacia honey or maple syrup and organic liquid stevia - use minimally) it will add extra grams of carbohydrate to the finished dish.


Carbohydrate 18g Protein 3g - per serving


Beef Stroganov

by Susan Smith in ,


Because I didn’t get around to grinding-up Sushi The Cat’s finest, organic steak in time for her to enjoy last week, I was forced to put Beef Stroganov on our Saturday night dinner menu so that it didn’t go to waste. It’s come to something when our puss-cat is apparently more of a fussy eater than her health conscious owners, but there you have it. According to Sushi, if anything is left in the refrigerator for more than 3 days before mincing and freezing it down for cat food, it’s not fit for her to eat. Her loss. 

However, I hadn’t just been lackadaisical in prepping Sushi’s meals. Every week there is a last minute panic for me to create something fabulous that will use up all the previous week’s Riverford organic fruit and vegetables so we have enough fridge space to store the current week’s delivery. Inevitably, I get so excited when I’m placing my regular Riverford order that I double-up on fruit and veggies still not eaten from the week before. On this occasion, I had mushrooms, onions, a pack of salad leaves, organic cream, lemon and cauliflower leftovers. I suppose it’s a testament to the lack of air miles and their just-picked freshness, but I always marvel at how Riverford’s produce stays ‘alive’ for so long - especially their bags of organic salad leaves. Truly, the salad you see in the photos had been sat in my fridge for over a week! Anyway, I had everything I needed to put together, what is for us, a rare treat.

It must be in the 1960’s that I last made Beef Stroganov. Back then it was the height of sophistication to order this dish in a posh restaurant and have it cooked at your table in an elaborate chafing dish by the maître d’ (headwaiter). As rich-tasting and as luxurious as this meal is, if you don’t even need to be in the kitchen to cook it, it’s clearly not that difficult to make!

Beef Stroganov is named after Count Pavel Stroganoff (1774–1817) or should that be Count Pavel Alexandrovich Stroganov? I think it should, and named my recipe accordingly. The ridiculously wealthy, Europe-hopping, Russian Count Pavel Stroganov was born in Paris and later employed French chefs. For me, just one delicious mouthful of lightly sautéed, tender beef in its creamy, tangy sauce tells me that Beef Stroganov’s origins are clearly French. It was in fact gourmet Pavel’s renowned French chef who adapted a simple beef fricassee from a textbook recipe by adding Smetana (a type of soured cream from Eastern Europe), and then christened it Beef Stoganov after his Russian employer. Rich food for rich people! I like to think that Beef Stroganov was perhaps one of the first fusion foods to be invented.

Pure, simple and indulgent, don’t be tempted to make Beef Stroganov with anything other than prime, organic, grass-fed steak. Fillet steak is best, but the good news is that you need about a third less meat for this recipe than you do when cooking individual steaks, and the finished dish is so deeply satisfying that you won’t even notice that ‘less’ has remarkably transformed itself into ‘more’. Partnered up with cauliflower ‘rice’ and a fresh green salad drizzled over with the finest olive oil and balsamic vinegar, it’s a dish fit for Counts, Kings and all of us that are primally-orientated towards turning our bodies into fat-burning mode rather than sugar-burning.  

Enjoy with a decent bottle of organic no-added-sulphur red wine and you’ll soon see why this quick to make, full of flavour, ultimate comfort food earned itself the reputation of fancy-pants dining in restaurants in the 1960’s. Because it can be on the table in less than thirty minutes, I think it’s a classic that’s perfectly suited to make a comeback in our kitchens, with or without my kitty’s approval!

Beef Stroganov (Serves 4)

Ingredients

45g organic unsalted butter

3 organic onions, very thinly sliced

250g organic chestnut mushrooms, sliced

600g organic beef steak, cut into strips 

sea salt

organic black pepper, freshly ground

1 tsp organic whole grain or Dijon mustard

250ml organic full-fat creme fraîche, sour cream or fresh organic double cream soured with the juice of ½ an organic lemon

small handful of organic flat-leaf parsley, finely chopped

Instructions

Heat half the butter in a heavy frying pan and fry the onions slowly over medium-low heat for 10-15 minutes until soft and golden brown. Lift out with a slice and keep warm.    

Add the mushrooms to the pan and quickly fry over medium-high heat for 3-5 minutes. Keep warm with the onions.

Add the rest of the butter to the frying pan and turn the heat up to high. Very quickly stir-fry the steak for 1-2 minutes on each side until it is seared brown on both sides. N.B. Take care that the juices don’t run. To avoid this, fry the meat in two batches - overcrowding the pan will ‘steam’ the meat rather than fry it.

Return all the meat to the pan, season well, then add the mushrooms and onions. Shake everything together over a high heat, then pour in the soured cream and add the mustard, stirring it in well.   

When everything is bubbling, finally stir in the parsley and take off the heat. 

Serve with mounds of cauliflower ‘rice’ and a fresh green salad dressed with a little olive oil and balsamic vinegar drizzled over.


Carbohydrate 6g Protein 25g - per serving


Blueberry and Apple Jellies

by Susan Smith in ,


Want a fast and easy, make-ahead, low-carb, festive dessert to rival Christmas pudding? This is it! With a flavour profile that’s light, lively and as sweet as it is tart, I’ve stolen this recipe from Annie Bell’s book ‘Low Carb Revolution’ then made it suitable for vegetarians/vegans by using agar agar rather than gelatine to make deliciously fruity, firm set jellies. 

This is jelly come-of-age. Rich in vitamin C, vitamin K, manganese and other antioxidants it looks elegant, tastes delicious and is as close to health food as you can get. The perfect antidote to the groaning Christmas table and eating and drinking more than is strictly good for you!

Blueberry and Apple Jellies (Serves 4)

Ingredients

1 litre clear apple juice (I used Coldpress Golden Delicious apple juice)

150g organic blueberries

2 level tbsp Clearspring agar flakes (see Notes below)

Sprigs of organic mint - to garnish


Instructions

Pour the apple juice into a medium saucepan and bring to the boil. When at boiling point, turn the heat down and let the apple juice simmer away, uncovered, until it is reduced by half. 

Take off the heat, cover and leave to cool (I plunged the base of the pan into cold water to speed things up) 

When cold, sprinkle the agar flakes over the surface of the apple juice and then heat without stirring until boiling. Simmer, stirring occasionally until the agar flakes have completely dissolved, which takes about 5 minutes.

Take off the heat and allow the apple jelly mixture to cool down in the pan for 15 minutes. 

Meanwhile, divide the blueberries equally between four individual glasses.

Ladle or pour the apple jelly over the blueberries, which will float to the surface. Cover and chill until set.

Decorate with a sprig of fresh mint and serve.


Notes

Agar agar is a gelling agent, made from algae (extracted from seaweed) which is mainly used for setting jellies. It is a viable vegetarian alternative to gelatine, which is made from animal collagen. However, agar agar makes a distinctly firm-set jelly that won’t melt-in-the-mouth like gelatine-set puddings do. 

A very small amount of agar agar will set a large amount of liquid so you need to be very precise with your measuring. Clearspring recommend using 1 tablespoon of agar flakes to set 240ml of liquid. I used 2 tablespoons (slightly less) to set 500ml (i.e. the reduced quantity of apple juice in this recipe) and it still made a very firm jelly. When I re-create this dessert for our Christmas Eve celebrations I intend to use just 1½ tablespoons of agar flakes to see if this produces a slightly softer mouth-feel. If successful, I’ll update this blog accordingly.  

You can find agar flakes online (click the link above) in most health food shops and big supermarkets in the Japanese food section. 


Carbohydrate 33g Protein 0g - per serving


Happiness Soup

by Susan Smith in , , , ,


Here in the East Midlands you wouldn’t know we’re halfway through summer already. So much anticipation of balmy weather, so many disappointingly grey days. As a cook, I look forward to an abundance of seasonal summer produce that can be simply prepared and eaten outside. As part of team Mirror Imaging, we look to the skies for our most epic wedding shots and, as someone who hasn’t been on holiday for more than sixteen years, I am feeling bereft of summer sun this year. There’s no point in complaining, when summer doesn't deliver on its promise, it’s time to cook up the sunshine yourself.

For most people, yellow is a happy colour so it’s no accident that this bright, cheerful, sunshine-yellow, lemony broth has been entitled Happiness Soup. The inspiration and indeed its name is borrowed from Nigella’s recipe as featured in her book Nigella Summer. All I had to do was tweak the original version to make it grain-free and low-carbohydrate as well as something beautiful to behold. 

Easy to make and as gloriously golden-yellow as the midday sun, this light and lovely soup not only raises the spirits, it’s clean, fresh, citrus and anise flavour perks up the appetite too. 

If it doesn’t give you something to smile about on a dismal summer’s day, I don’t know what will!

Happiness Soup (Serves 4)

Ingredients

1 small organic onion, finely chopped

500 grams yellow courgette        

zest & juice of 1 organic lemon

40g organic butter (or for vegans 3 tbsp olive oil)

1 tsp turmeric

800 ml vegetable stock (or for non-vegetarians chicken stock) - see note below        

1 small cauliflower, florets only

Celtic sea salt

3-4 sprigs fresh tarragon, leaves only, finely chopped

Freshly ground black pepper


Instructions

The courgettes do not need to be peeled. Simply wash and trim the ends off before slicing them into 5mm (⅛ of an inch) rounds and then finely dicing them into very small confetti-like cubes. 

To make cauliflower ‘rice’, cut off the florets - you don’t need any of the stem - then blitz the florets in a food processor for about 30 seconds until it comes together into a powdery cauliflower ‘snow’. 

Melt the butter in a large saucepan over a medium/low heat. With the pan lid on, gently sweat the finely chopped onion in the butter for 8 minutes until soft and translucent but not coloured. 

Add the diced courgettes and the lemon zest to the pan and stir to coat. Cover with a circle of greaseproof paper (cut to fit the pan), put the pan lid back on, then cook on a gentle heat for about 5 minutes, stirring occasionally, until they've slightly softened.

Stir in the turmeric, the stock and 40ml of the lemon juice and then drop in the cauliflower ‘rice’. Cook, uncovered, for 6 minutes, or just until the courgettes and cauliflower ‘rice’ are tender. Taste for seasoning. Add a little more salt and lemon juice if it needs it. 

Leave to cool slightly before serving, then ladle into 4 pre-warmed soup bowls before adding a generous sprinkling of chopped tarragon on top of each bowl and a grinding of black pepper, if liked.


Notes

This soup is best eaten warm rather than hot.

For vegetable stock, I generally make up some Marigold vegetable bouillon concentrate with freshly filtered water. I then strain it - as I did here- to remove any re-hydrated bits of veg that would otherwise spoil the clean, good looks of my finished sauce or soup. Use homemade vegetable stock, if you prefer. 

For non-vegetarians, a chicken stock made from freshly filtered water and the concentrated juices leftover from roasting a chicken will add extra depth and flavour to the soup. 


Carbohydrate 12g Protein 5g - per serving


Lemon Courgetti With Summer Vegetables & Tomato Salad

by Susan Smith in , ,


Celebrate summer, when it shows up, with an ‘Italian-style’ meal of healthy, seasonal deliciousness. The shops are filled with a cheap and plentiful supply of courgettes in July and August, so now is the time to make them into the brilliant, low-carb, pasta substitute popularly dubbed “courgetti”. This fresh, healthy and surprisingly substantial dish accompanied by a selection of the most vibrant of summer fruits - sweet tomatoes - is an amazingly flavourful way to enjoy a taste of Italy without the high-starch hit you get from eating regular pasta.  

My eldest daughter Elizabeth provided the inspiration for Primal Plate's tomato salad recipe. Last weekend she served up something very similar at an impromptu family BBQ and it tasted so fresh and looked so colourful that I was reminded how versatile a simply prepared and beautifully presented plate of tomatoes can be. This salad is a great way to lighten-up all manner of dishes, or perhaps to eat on its own with some fresh goat's cheese with grain-free bread to mop up the juices.

Quick, light and super-easy to make, this lovely combo is my idea of summer on a plate!

Ingredients - for the Lemon Courgetti with Summer Vegetables

300ml organic double cream

1 organic lemon, juice and finely grated zest

80g organic full-fat cream cheese

100g Parmesan-style cheese, finely grated

200g frozen peas

200g frozen baby broad beans

200g fresh asparagus tips

4 medium-large, firm, flat (not curved) chunky courgettes - size and shape matters!

small bunch of basil

sea salt and black pepper


Ingredients - for the Tomato Salad

600g ripe vine tomatoes - for interest and sheer good looks, choose from a selection of red or yellow cherry tomatoes, heirloom golden-orange, red and green vine tomatoes, baby plum tomatoes or the beautiful red and green Tigerella varieties

2 tbsp organic cold-pressed olive oil

2 tsp best-quality Balsmanic of Modena vinegar

sea salt and freshly ground black pepper

fresh basil leaves - to decorate

Instructions

Boil a kettle-full of fresh water. Pre-heat 4 individual pasta bowls.

Measure the frozen peas and broad beans into two separate heat-proof jugs or bowls. Pour the boiling water from the kettle equally over the peas and broad beans and allow to stand until they’re defrosted. 

Prepare the courgettes by washing them and spiralising into long thin spaghetti-like shreds - alternatively, this can be done with a knife by cutting them into long, thin strips.

Drain the defrosted peas through a sieve and tip them into a clean bowl. When the broad beans have cooled down, drain them too before popping them out of their tough outer skins between your finger and thumb straight into the bowl with the peas. 

Trim the bottom of the asparagus tips - it’s not necessary, but I also like to peel the bottom third of the stems with a potato peeler. Boil a second kettle of water.

Heat the cream with the lemon zest in a medium-large saucepan over a medium heat until it comes to the boil. Turn the heat down to simmer and continue cooking for 3 minutes. Cover and set aside.

Meanwhile, pour the boiling water into the bottom of a steamer, then put the asparagus tips into the steamer basket, cover and steam for just 1 minute. Remove the asparagus tips from the steamer with a slotted spoon into a bowl of cold water (or put into a sieve and run under the cold tap) to ‘set’ their bright green colour. Drain and dry on kitchen paper. Cut the asparagus into 3 centimetre pieces (or in half) and then add them to the bowl of peas and broad beans.

Reserve 4 sprigs of basil then strip the leaves off the rest of the basil stems and tear them into small pieces. Set aside.

Whisk the cream cheese, 80g of Parmesan and 30ml of lemon juice into the lemon infused cream and then over a medium heat bring the sauce back to just below boiling point. Taste, then season with sea salt and a good grinding of black pepper. Taste again and add a little more lemon juice if you think it needs it. 

Add the asparagus, broad beans and peas to the cream sauce and then over a low/medium heat, allow the vegetables to gently warm through - make sure the sauce gets nice and hot but don't let it boil.

Bring the water in the steamer back to the boil, add the courgetti to the steamer basket, cover and steam for just 1½ minutes - no longer. They need to cook just long enough to lose their raw-edge and get hot but not so long that they become limp and soggy. 

Immediately tip the courgetti out of the steamer basket onto a dry, clean tea-towel. Wrap them up in the tea towel to absorb as much water as possible.

Divide the drained courgetti equally between the 4 pre-heated serving dishes. Stir the torn basil leaves into the cream sauce and vegetables then ladle or spoon this on top of the courgetti - distributing the vegetables and sauce evenly. Sprinkle the rest of the grated Parmesan-style cheese over each serving and finish with a good grinding of black pepper and a sprig of fresh basil.

Serve immediately with tomato salad.   


Instructions - to make Tomato Salad

No need to peel or remove the seeds from the tomatoes. Wash and slice the larger tomatoes, removing the core at the stem end by cutting out a small ‘v’ at the centre of the bigger slices with the point of a small, sharp knife. Halve the cherry tomatoes.

Layer all the tomatoes attractively on a large platter. Lightly season with sea salt and then drizzle over the olive oil and balsamic vinegar. Add a grinding of freshly ground black pepper and decorate with green and/or purple basil leaves. 

Serve at room temperature for a simply delicious way to enjoy all the nutritional benefits of sweet, fragrant tomatoes. Yum!

Notes

If you prefer, you can substitute the frozen vegetables with 500 grams each of fresh peas and broad beans (weight before podding). Pod them, then cook in boiling water (or steam) for 3 minutes before draining well and adding to the cream sauce to keep warm. 


Carbohydrate 14g Protein 19g - per serving of lemon courgetti with summer vegetables

Carbohydrate 7g Protein 1g - per serving of tomato salad


Mediterranean Sauce With Sea Bream

by Susan Smith in , , ,


Whilst Britain voted to leave the EU last Friday we are still inseparably European. I for one am proud to celebrate the fact with this brilliantly versatile, sunshiny flavoured, fresh-tasting Mediterranean Sauce that goes with just about everything. Marvellous with organic grass-fed steak, tender-cooked chicken breast, fresh fish or vegetables this hearty tomato and sweet pepper sauce with black olives, baby capers and fresh oregano cannot fail to transport you to sunny Provence. We love it.

I don’t know who to credit this recipe to. Although I found it at Delia Online, on this website it states that the recipe is taken from A Year In My Kitchen by Skye Gingell. No matter, Primal Plate has tried and tested this recipe several times over and it’s a really healthy, speedy, elegant-looking dish that can be on the table within forty-five minutes. I have increased the quantities of some ingredients, which I think makes for a better balance of flavours and also a more generous portion of vegetables.  

As with the original recipe, I chose to showcase this Mediterranean sauce with fresh sea bream but it can also deliver a glorious Primal vegetarian feast served with roasted cauliflower and lemon-herb dressing dolloped over - please see Notes below.

Summer sun here we come!

Mediterranean Sauce With Sea Bream (Serves 2)

Ingredients

2 whole sea bream, weighing 300g -352g each, de-scaled and gutted (get the fishmonger to do this for you)

1-2 tbsp extra virgin olive oil

Celtic sea salt and freshly milled black pepper

2 shallots, peeled and finely chopped

1 medium/large yellow pepper, de-seeded and sliced lengthways into strips

300g large organic vine tomatoes, skinned and chopped (see Note below)

1 heaped tablespoon fresh oregano, finely chopped  

30g pitted black olives (I used Kalamata), cut into slivers

1 heaped tablespoon baby capers, rinsed and dried

1 heaped tablespoon organic tomato puree

75g organic cherry vine tomatoes, unpeeled but cut into halves

Curly leaf parsley - to garnish


Instructions

Pre-heat the oven to 190℃ / 375℉ / Gas mark 5

Boil a kettle of water.

Wipe the fish with some kitchen paper, then make 3 diagonal cuts across the fish (on both sides) and brush lightly all over with a little olive oil. Season inside and out with sea salt and freshly milled black pepper.

Place the fish on a flat baking tray lined with non-stick foil and transfer to the centre of the pre-heated oven for 15-20 minutes.

Meanwhile, heat the olive oil in a deep sauté pan over a medium/low heat. Add the shallots and gently cook with the pan lid on for a couple of minutes. Add the yellow pepper strips to the pan then cover and continue to soften the vegetables over a medium heat for another 5 minutes.

Add the chopped tomatoes, tomato puree, olives, capers and oregano. Stir everything together, then season with sea salt and freshly milled black pepper. 

Simmer gently with the pan lid half-on / half off for a further 10 minutes, stirring occasionally. 

Add the cherry tomato halves - gently stirring them into the rest of the sauce - then turn the heat down to its lowest setting and continue cooking for a minute or so until the cherry tomatoes are just warmed through and retaining their shape i.e. not collapsed.

To serve, place the fish onto two warm serving plates and spoon the sauce alongside. Garnish with a sprig or two of fresh parsley, if liked.  

For vegetarians and vegans, the Mediterranean Sauce also goes well with roasted cauliflower, served here with lemon-herb dressing 

For vegetarians and vegans, the Mediterranean Sauce also goes well with roasted cauliflower, served here with lemon-herb dressing 

Notes

To skin the tomatoes, use the pointy end of a sharp knife to prick the tomatoes all over several times. Put them into a heatproof bowl and cover in boiling water. Leave them for about 25- 35 seconds - no longer or they’ll start to cook - then using a slotted spoon lift them directly into a bowl of ice-cold water. Remove from the cold water and peel the skins off before proceeding with the recipe.

For simplicity’s sake, the vegetarian version of this recipe, Mediterranean Sauce With Roasted Cauliflower and Lemon-Herb Olive Oil Dressing will feature as a separate Primal Plate blog post soon.


Carbohydrates 12g Protein 69g - per serving


Primal Pronto Drop Scones

by Susan Smith in , , ,


Light, versatile and so quick to make, these little fluffy cushions of loveliness can be served with either sweet or savoury dishes whenever you fancy something bready to eat. I like them for breakfast - either topped with a little raw honey, maple syrup, fresh berries or 100% fruit spread - though my real ‘soft-spot’ is for old fashioned marmalade, because it brings back memories of my childhood. 

Sent off to boarding school at five years old, I could never seem to get enough food to eat! It was here that I was introduced to Robertson’s Golden Shred marmalade with their (now politically incorrect) Golliwog branding, which included beautifully made enamel brooches to collect and pin to the lapel of my school blazer. Overly sweet and unsophisticated it may have been, but back then, much like Paddington Bear, marmalade was my hunger monster’s saviour! 

School breakfasts were usually our choice of pre-packaged cereal (Sugar Puffs for me please!) followed by plates stacked high with yesterday’s scantily ‘buttered’ (with Stork margarine, I fear), pre-sliced white bread. It seemed to me that magic marmalade could transform these half-stale offerings into something rather nice that temporarily filled me up. Teatimes were similarly skewed in favour of high carb foods. Bread with jam or chocolate spread, a banana and soft, sticky buns - the sort topped with glacé white icing. We didn’t mind! These are sweet treats as far as children are concerned and, for me, also a real source of comfort that helped me deal with the stress of being away from home.

Unfortunately, overloaded with wheat, gluten and sugar, young children are particularly vulnerable to tummy bloating, clogged-up systems and chronic constipation. Our guardians must have had an inkling because every morning they would check to see if we were ‘regular’ by keeping a 'poo log'! The ‘little me’ thought it most prudent to try and save face when asked the question, so I’d always answer in the affirmative. Unfortunately, I didn’t realise that no amount of toilet paper rammed down the loo would disguise the fact if I’d lied! I’d only know I’d been rumbled when I was given All-Bran for breakfast instead of my favourite cereal. My blushes weren’t spared either. An uninteresting bowl of roughage foisted on a child lets everyone know where their bowels are at. I was embarrassed and ashamed - as if it was my fault! Scarred by this early life experience, I was still eating what I thought was a mandatory bowl of All-Bran every morning up until my thirty-eighth birthday! 

Being regularly fed massive amounts of refined, processed, high carbohydrate foods not only caused my digestive discomfort, but also nagging hunger too. I was part of an experimental dietary disaster promulgated by the food industry in collusion with public health advisers, which in my view was, and still is, tantamount to child abuse because… 

Normally when you eat some food your blood sugar goes up and your insulin levels rise to get the nutrients into your body cells. Once this work is done, your blood sugar goes back to normal. All is as it should be and you’ll only get hungry again when you need more energy. However, when you eat certain foods that contain a lot of sugar and carbohydrates, your blood sugar sky-rockets. In response, your body releases inordinately high amounts of insulin to get the sugar inside your cells. Once your blood sugar spikes, the excess insulin, which is far more than your body needs, continues affecting your blood sugar way and beyond just normalising it. Consequently, your blood sugar continues to plummet much lower than it’s supposed to. At which point, your brain then tells you you’re still hungry! Unbelievably, as a child, in an attempt to satisfy these constant hunger cravings I resorted to eating Germolene after dormitory lights out! By the time I was eleven I was, unsurprisingly, quite porky!

Fast forward almost sixty years, and today’s recipe for Primal Pronto Drop Scones served with orange fruit spread is my idea of heaven. This is bread and marmalade revisited in satisfyingly good taste with no nasty consequences. As warm and as soft as a hug, these high protein, low-carb, nutritious Primal Pronto Drop Scones a.k.a Scotch pancakes served straight from the pan, showcase all the comfort factor of freshly baked or toasted bread with the crunch of pumpkin seeds. Grain-free and gluten-free, and loaded up with tangy, low-carb, organic orange ‘marmalade’ served with a plentiful supply of freshly brewed coffee, they are one of the things I most love about being a grown-up. Oh, and they are really filling too!  

Primal Pronto Drop Scones (make about 16)

Ingredients

150 g organic ground almonds

50 g organic tiger nut flour

2 tbsp organic coconut flour               

2 tsp baking powder

½ tsp sea salt

250 ml raw organic full-fat milk (or homemade, unsweetened almond milk)

3 eggs, beaten 

30 ml organic tiger nut oil (or coconut oil, melted)

2 drops organic liquid stevia

50 g organic pumpkin seeds

1 tbsp organic tiger nut oil (or coconut oil) - for frying

Instructions

In a large bowl, combine the ground almonds, tiger nut flour, coconut flour, baking powder and sea salt together with a whisk.

Measure out the milk into a jug then add the beaten eggs, liquid stevia, and tiger nut oil.

Make a well in the centre of the dry ingredients and slowly pour in the wet ingredients, whisking the mixture as you go. Keep whisking until the mixture becomes a thick, but still pourable, smooth batter - no lumps please! 

Set aside for a minute or two to allow the coconut flour to fully thicken out the mixture. If the batter then seems too thick to pour thickly from a spoon or ladle, add a little filtered water. When you’re satisfied that the batter is of a thick ‘dropping’ consistency, stir in the pumpkin seeds. 

Place a smidge of oil in a large, shallow non-stick frying pan and set over a medium heat. When hot (takes about 2 minutes), spoon small pools (heaped tablespoons) of the batter into the pan, spacing them well apart - no more than 2 or 3 pancakes at a time - making each pancake about 6 centimetres (2.5 inches) in diameter. 

Cook for about 1½ - 2 minutes until the underside is golden brown, then using a flexible, thin-edged silicon spatula to help you, carefully turn them over and cook for 1½ - 2 minutes on the reverse side. 

Turn onto warmed plates and serve immediately with either no-added-sugar 100% fruit spread, fruit puree, fresh berries, a drizzle of honey or maple syrup. 


Notes

Primal Pronto Drop Scones are every bit as good served alongside a cooked breakfast, a bowl of soup, or curry. Alternatively, spread lavishly with savoury toppings e.g. Carrot Hummus or a feisty tomato and avocado salsa for a filling snack or starter. Or, make them into small ‘blini-sized’ canapés and serve with drinks.  

Whilst these drop scones are very quick and easy to make, you may find you need to cook several batches before you get fully acquainted with the optimum temperature (medium/low not medium/high) and exact cooking times (keep checking their doneness' after 1½ minutes) to get them light, fluffy and perfectly golden on both sides. N.B. Let the drop scones firm up just enough for you to turn them over without the uncooked batter running off the top surface when you do. It takes a little practice!  


Carbohydrate 3g Protein 4g - per pancake


Mushroom & Three-Cheese Pizza

by Susan Smith in , , ,


Last week, when Sukrin tweeted the idea of making pizza with their ‘just add water’ Chia & Hemp bread mix I couldn’t resist giving it a go! 

Notwithstanding that low-carb practitioners and the gluten intolerant are particularly susceptible to temptation, we all seem to get cravings for pizza. Unfortunately, I also know far too many other people who complain they’re fat and unwell but won’t give up eating grains (bread, pasta, rice and pizza) and doggedly refuse to cook for themselves at home. In a last ditch effort to convince them that not everything that looks stylish and tastes delicious is laboriously difficult to prepare and cook, this Mushroom & Three-Cheese Pizza recipe should be universally appealing! 

Though probably not strictly Primal or indeed ‘proper’ pizza - because I’ve deliberately left homemade tomato sauce out of the equation to save you the bother of making one! - it is nevertheless an extremely low-carb, satisfyingly healthy, cheesy pizza ‘fix’ that everyone can enjoy. We love it with a glass of Chianti or icy-cold Pinot Grigio.  

Mushroom & Three-Cheese Pizza (Serves 4)

Ingredients - for the base

210 g pack of Sukrin Chia & Hemp Mix

250 ml cold filtered water

1 dsp fresh rosemary leaves, finely chopped


Ingredients - for the topping

225 g organic chestnut mushrooms

30 g organic unsalted butter

sea salt 

freshly ground black pepper

2 dsp fresh rosemary leaves, finely chopped

120 g soft goat’s cheese, without rind (I used Sainsbury’s Taste The Difference Goats Cheese and removed its rind before dicing into small pieces)

125 g organic vegetarian mozzarella

50 g vegetarian Parmesan-style cheese (I used Gran Moravia)


Ingredients - to serve

40 g organic wild rocket 

8 large fresh basil leaves 

1 dsp organic, cold pressed, extra virgin olive oil

Balsamic vinegar of Modena - for drizzling

The part-cooked, grain-free pizza bases, topped with mushroom and cheese, before returning to the oven 

The part-cooked, grain-free pizza bases, topped with mushroom and cheese, before returning to the oven 

Instructions

Cut the base of the stems off the mushrooms and wipe them clean with a damp paper towel. Cut the mushrooms into thick slices.

Warm the butter in a large non-stick frying pan over medium-high heat. Add the mushrooms and cook, stirring occasionally, until tender and tinged golden-brown and the majority of the juices in the pan have evaporated (about 5 minutes). Take off the heat, season the mushrooms to taste with sea salt and freshly ground black pepper. Cover and set aside.    

Preheat an oven to 200℃ /  400°F / Gas mark 6.

Tip the Chia & Hemp mixture into a medium sized bowl and add the filtered water and the finely chopped rosemary. Stir everything together well with a fork and allow to stand for 3 minutes (as directed on the packet)

Form into 4 x 15 cm / 6” ‘mini’ pizzas. The best way to do this is to divide the bread mixture into 4 equal portions (weighing approximately 105 g - 110 g each) before placing each piece of dough in the centre of a 15 cm / 6” non-stick baking parchment circle (4 baking parchment circles in total).

Using a sheet of cling film placed on top of the dough to stop it from sticking to you or the rolling pin, flatten it down - first with the palm of your hand and then rolling out evenly - into a round pizza shape that just comes to the edges of the parchment circle. Lift or slide the pizza, still on its parchment paper, onto a baking tray.  Repeat to make 4 pizzas.

Bake in the pre-heated oven for 15 minutes.

Meanwhile, grate the Parmesan-style cheese and crumble or cut the goat's cheese into small pieces. Lastly, drain the mozzarella cheese, then coarsely grate it onto a plate lined with paper kitchen towel (this soaks up any milky liquid that may ooze from the cheese when it’s left to stand). If not using immediately, keep the prepared cheeses covered and refrigerated on 3 separate plates. 

After the pizza bases have had their first baking, remove from the oven. Whilst they're still sat on the baking tray, top the pizzas evenly with grated mozzarella, goat’s cheese and mushrooms. Don’t take the topping right to the edges of the pizza bases - leave a 1.5 cm gap all the way round to allow the cheese to melt and spread out in the heat of the oven without it running off the top of the pizzas. Sprinkle over the rest of the chopped rosemary and finally, add an even layer of Parmesan-style cheese divided equally between each pizza.

Put the baking tray back into the oven and bake the pizzas for a further 10-12 minutes until the cheese is meltingly hot and bubbly and the edges of the pizza tinged golden-brown. 

During this final cooking time, finely slice the basil leaves and mix them with the rocket. Dress lightly with olive oil. 

Remove the pizzas from the oven. Wait for 1-2 minutes then, with the aid of a flat spatula, carefully remove the pizzas from their paper circles. Put the pizzas onto 4 warmed serving plates. 

Pile equal quantities of the dressed rocket and basil leaves on top of each pizza and drizzle over a little real Modena balsamic vinegar before serving. 


Carbohydrate 5.5 g Protein 16g - per pizza


Spicy Salmon Fishcakes / Halloumi & Toasted Cashews With Paleo Pad Thai ‘Slaw’

by Susan Smith in , , ,


East meets West in this Primal/Paleo culinary take on fishcakes and coleslaw. Without the potato, flour and breadcrumbs used in traditional fishcake recipes, these Asian inspired, fishcakes are so much simpler and quicker to make. 

Fresh and light - with no mayo or endless amounts of shredded cabbage to chomp your way through - the Pad Thai ‘Slaw’ is also a wonderful thing!

Put the two together for a surprisingly satisfying, clean-eating, Omega-3 packed family meal that’s high in protein and low in carbs.

Vegetarians can also make a meal of this punchy-flavoured Paleo Pad Thai ‘Slaw’ by topping it with 60g toasted cashew nuts and replacing the salmon fishcakes with slices of freshly griddled ‘vegetarian-friendly’ - i.e. not made with animal rennet - halloumi cheese - you’ll need to allow about 80g-100g of halloumi per person.

Tasty, pure and simple…job done! 

Spicy Salmon Fishcakes With Paleo Pad Thai ‘Slaw’ (Serves 4)

Ingredients - for the fishcakes

800 g wild Alaskan salmon, boned and skinned

3 spring onions, finely chopped

juice of 1 lime

1 tsp organic dried chilli flakes

1 tbsp tamari

1 dsp fresh ginger, peeled and finely grated (approx. 1 x 2.5 cm / 1inch piece)

4 tbsp finely chopped coriander leaves

1 organic egg, beaten 

1 tsp sea salt

freshly ground black pepper

75-100 g organic ground almonds

1-2 tbsp organic coconut oil - for frying the fishcakes


Ingredients - for the Paleo Pad Thai ‘Slaw’ 

2 medium courgettes, cut into thin slices, coarsely grated or spiralised (see Notes below)

3 medium carrots, cut into thin slices, coarsely grated or spiralised (see Notes below)

200g frozen baby broad beans, thawed and shelled (about 120g prepared weight)

1 tbsp chopped fresh chives

1 tbsp raw organic sesame seeds


Ingredients - for the dressing

40 ml fresh lime juice

40 g raw organic cashew nut butter

1 tbsp tamari (I used Clearspring)

40 ml Co Yo natural coconut milk yogurt

1-2 drops organic liquid stevia


Ingredients - to serve

1 tsp raw sesame seeds

coriander leaves and/or micro leaves


Instructions - to make the fishcakes

Put all the fishcake ingredients, except the ground almonds, into a food processor and pulse together until well blended. N.B. Be careful not to over-process - you want the mixture to retain a little of its chunky texture rather than turn into a mushy fish paste! 

Tip the fishcake mixture into a large bowl and add just enough of the ground almonds to ensure that it will hold together sufficiently well to form into fishcakes. The final mixture may still feel a little wet but should be easy enough to shape in your hands and will firm up in the refrigerator prior to cooking.

Divide into 8 fishcakes about 2.5 cm / 1 inch thick (weighing approximately 125g each). Transfer to a large plate, cover and refrigerate for at least 30 minutes.

Heat the coconut oil in a large, non-stick frying pan over a medium/high heat until the surface of the oil starts to shimmer (don’t allow it to smoke!). Cook the fishcakes for 3 minutes until crisp and golden on the underside, then flip them over and cook on the other side for another 3 minutes.

Serve with Pad Thai ‘Slaw’ and a squeeze of fresh lime juice.


Instructions - for the Paleo Pad Thai ‘Slaw’

Using a small hand whisk, combine all dressing ingredients together in a small bowl or cup until you have a smooth dressing that’s of pouring consistency.

To quickly defrost and remove the broad beans from their pods. Weigh out the frozen broad beans into a heatproof bowl or jug. Bring a kettle of water to the boil and pour over the beans. Let stand for 3-5 minutes. When the water has cooled down pop the tender, bright green beans out of their thick, leathery skins by squeezing gently between two fingers. 

In a large bowl, combine courgette, carrots and shelled broad beans. Add the chopped chives and sesame seeds, mix together gently and set aside.

Just before serving, pour over the dressing and gently toss all the ingredients together until the vegetables are evenly coated.

Transfer to plates and top with a sprinkling of sesame seeds, chopped coriander and/or micro leaves. 

Serve with either Spicy Salmon Fishcakes or Fried Halloumi and Toasted Cashews (see below).

The vegetarian option: Fried Halloumi and Toasted Cashews

The vegetarian option: Fried Halloumi and Toasted Cashews

Instructions to make Fried Halloumi & Toasted Cashews With Paleo Pad Thai 'Slaw' (V)

Firstly, toast the cashews in a large frying pan over a medium heat for about 5 minutes or until turning pale gold, then take off the heat and set aside. 

Cut the halloumi into 1 cm thick slices. Heat some coconut oil or olive oil in a pan until hot, then fry the halloumi for just 1-2 minutes on each side until golden and crispy around the edges. 

Arrange the Paleo Pad Thai ‘Slaw’ on 4 serving plates, top with the toasted cashews, sesame seeds and coriander leaves, then serve the fried cheese slices (3-4 per person) alongside, with wedges of fresh lime for squeezing over.

N.B. Be sure to plate-up the fried halloumi immediately after it’s cooked - it’s so much nicer warm! If you allow cooked halloumi to go cold, it will tend to become too hard and rubbery.


Notes

To make carrot and courgette julienne for the Paleo Pad Thai ‘Slaw’, I first cut the washed courgettes and peeled carrots in half horizontally, then finely sliced the halved vegetables vertically (on a mandolin) before using a small sharp knife to cut them into 6 cm long thin julienne strips. Coarsely grating them in a food processor would be a lot quicker!

The Paleo Pad Thai ‘Slaw’ is suitable for vegans.


Carbohydrate 17g Protein 66g - per serving (assuming 2 fishcakes per person)


Lemon Curd Ice Cream With Vodka Blueberry Compote

by Susan Smith in , , ,


Last week, in the run up to Easter, our Nespresso machine, main oven and microwave all conked out over three consecutive days. The repairs and/or replacement of the coffee machine and oven are still outstanding, but did you know that in this day and age you can actually order a microwave on Easter Saturday afternoon and have it delivered free of charge on Easter Sunday morning? Really? Does no one take time out any more for those ‘we-wanna-be-together’ happy-holiday, family occasions, which for us means coming together to share some exceptional food and drink. Ah well, their loss, our gain. Not that I need a microwave for anything other than warming plates, but still, when you’ve only a half-sized oven left to cook in, you simply can’t have empty plates occupying the space. 

As if nothing else could go wrong, it did! I’d already made our Easter lunch starter to feature on last week’s blog but to get even further ahead of our Easter celebrations (after all, I do have my third share of a bottle of LPR Champagne to drink before lunch is served!) I decided to make little lemon cream pots for dessert (think lemon tart filling without the pastry).

Usually, when I’m trying out a recipe for the first time, I deliberately override my natural instincts and do exactly what the recipe tells me to. Oftentimes, it’s a big mistake but, hey, I’m not always in the mood for original thought! On this occasion, at a quarter to midnight on Saturday night, I was spooning twelve ramekins worth of expensive ingredients into the waste bin! Nor did I realise, until I finally got to bed at 2:16 am, that the clocks had gone forward and it was now only 4 hours before I needed to get up again! 

It’s at times like these that I am so grateful for Primal Plate. I don’t know if there’s anyone else ‘out there’ cooking Primal Plate recipes, but that becomes secondary when I actually find my own food blog the most essential guide to eating well every day! On Easter Sunday morning, just using the site’s search facility for ‘lemon’ was enough to spark the idea of Lemon Curd Ice Cream. The rest is down to what’s in the fridge. Hence it was a case of making ice cream with Co Yo natural coconut milk yogurt and the remnants in a pot of crème fraîche, or making something else. Turns out, if you simply stir lemon curd, coconut milk yogurt and crème fraîche together in a bowl and freeze, the result is food alchemy - a deliciously bright, light, primrose-yellow, zingy, creamy-smooth ice cream.

Purplish-blue Vodka Blueberry Compote and sunshiny Lemon Curd Ice Cream - sweetened with raw organic honey - is the perfect match in this refreshing, tangy dessert. Lemon and blue always look good together and juicy blueberries and lemons are a heady, flavour pairing that’s cooling, floral, citrusy and fresh - reminiscent of springtime and all things bright and beautiful.

If, at first glance, you think the recipe below looks a little complex, look again. The lemon curd takes less than 15 minutes to make, the 3-ingredient ice cream about 10 minutes and the blueberry compote even less than that! Lemon Curd Ice Cream With Vodka Blueberry Compote is in fact a spectacularly easy, make-ahead, special occasion dessert.

Cool, sophisticated, delectable…there aren’t enough superlatives to do this enticing, Vitamin C packed fruit dessert justice!  

Lemon Curd Ice Cream With Vodka Blueberry Compote (Serves 6)

Ingredients - for the lemon curd

3 large organic eggs

120g raw organic ‘runny’ honey

100ml fresh lemon juice (2-3 lemons worth)

60g unsalted butter, at room temperature, cut into small pieces

1 heaped tbsp lemon zest, finely grated

2-3 drops organic liquid stevia


Ingredients - for the lemon curd ice cream

420g (approx) lemon curd i.e. the full quantity of lemon curd made with ingredients above

250g plain (unsweetened) Greek-style yogurt - I used Co Yo Natural Coconut Milk Yogurt

125g crème fraîche (I used Longley Farm)


Ingredients - for the vodka blueberry compote

300g fresh blueberries

100g organic ‘sugar-free’ blueberry spread (I used Clearspring)

30 ml freshly squeezed lemon juice

1 tsp organic arrowroot

2 tbsp organic vodka (I used Snow Queen vodka)


Instructions - for the lemon curd

In a stainless steel bowl, whisk together the eggs, honey and 80ml lemon juice until well blended. Cut the butter into small pieces. 

Place the bowl over a saucepan of gently simmering water. Do not let the bottom of the bowl come into contact with the water. 

Cook for approximately 6-8 minutes, whisking constantly with a balloon whisk (to prevent it from curdling) until the mixture becomes thick (like soured cream or hollandaise sauce). Don’t get distracted, the mixture can quickly and suddenly turn from thin to thick! 

Remove from heat and immediately pour into a clean bowl. 

Add the butter to the mixture and whisk until it has melted, then add the grated lemon zest, the rest of the lemon juice and 2 drops liquid stevia. Give everything a good stir then taste. If you think the lemon curd is still too tart, stir in another single drop of stevia. 

Take a sheet of plastic cling-film and immediately lay it directly onto the surface of the lemon curd to stop the air getting to it (to prevent a skin forming). Allow the mixture to cool completely. The lemon curd will continue to thicken as it cools. Keep covered and refrigerate until needed.


Instructions - to make lemon curd ice cream

Tip all the ingredients into a bowl and stir together well. Churn the ice cream in an ice cream maker until soft-set consistency, then quickly transfer to a plastic freeze-proof container and freeze until solid.

If you don’t have an ice cream machine, pour into a plastic freeze-proof container and freeze for about an hour-and-a-half until the sides start to get solid. Then mash with a fork to combine the solid ice cream at the sides of the container with the softer centre. Straightaway, put it back into the freezer and freeze until solid.

Take out of the freezer and put in the refrigerator 20-30 minutes before serving to allow the ice cream to soften slightly.


Instructions - to make the vodka blueberry compote

Combine the blueberries, lemon juice and the fruit spread in a medium saucepan over medium heat and cook for about 5 minutes or until the fruit spread dissolves, the blueberry juices start to run and the mixture becomes syrupy - don’t let the berries cook too long or they will become mushy and lose their beautiful shape. Take the pan off the heat. 

In a small bowl or tea cup, combine the arrowroot powder with a little of the vodka until a very thin paste is formed. Add a little of the hot blueberry juice to the slaked arrowroot to even out the temperature between the two mixtures, then quickly pour the arrowroot mix into the berry compote, stirring continuously as you do so. 

Put the pan back on the heat and keep stirring until the mixture thickens slightly (just below boiling point). Stir in the rest of the vodka. 

Remove from the heat. Tip into a bowl and lay a piece of cling film directly onto the surface of the compote to stop the air getting to it - i.e. to stop a skin from forming. 

Best served warm or at room temperature.


Notes

Blueberries are known as a super fruit; rich in antioxidants, high in vitamins and minerals. Read more about them here: 20 Science-Backed Health Benefits of Blueberries


Carbohydrate 19g Protein 7g - per serving of lemon curd ice cream

Carbohydrate 13g Protein 0g - per serving of vodka blueberry compote


Thai Green Curry With Prawns & Thai Green Garden Curry

by Susan Smith in , , , ,


Ever since I walked into the Royal Thai restaurant in Nottingham 20 years ago, I have been enchanted by Thai cuisine. Not so much the ‘farang' (Thai for Western foreigners of white descent!) version of Thai food, with our predilection for all things deep-fried - a sort of spring rolls with everything attitude - but the fresh and light, hot and spicy flavours brought together in a variety of harmonious dishes that seem to make every Thai meal a banquet.

Without dairy and hardly any emphasis on meat, Thai cooking is the embodiment of all the main flavour components - sweet, sour, spicy, salty and bitter - perfectly balanced in playful, imaginative dishes that are full of colour and texture. I’ll never forget the sheer joy and excitement of one gorgeous Thai girl called Tinkerbell (how endearing a nick-name is that?) as she ran out from the restaurant’s kitchen to proudly show us her first representation of a beautiful bird she’d painstakingly carved out of a carrot! 

Our first visit to the Royal Thai was an attempt to educate ourselves in anticipation of a month long business trip to Bangkok. At first they must have smiled at our naivety, but, prior to the journey we were generously afforded numerous ‘insider’ traveller’s tips and we quickly became one of their more regular customers…hungry for their companionship as much as the food! Subsequently, the amazingly beautiful, gracious and intelligent Thai girls running the business at that time welcomed us with open arms into the Thai community, and for many years it was as if we were part of their family. Sadly, the girl I most fell in love with died in a road traffic accident shortly after opening a second restaurant in Nottingham (formerly known as Siam Thani). Nang was the dearest of friends to me and the absolute epitome of all that I now associate with Thai people generally - kind, generous and incredibly friendly.

Now that we’re low-carb and Primal, it’s not so easy to eat out in Thai restaurants - you really do need lots of steamed rice to quieten down the chilli-heat - but for the home cook, authentic-tasting Thai food is simple and fast to prepare, and because you’re in control it doesn’t have to be the hottest of the hot. 

Prawns are synonymous with Thai cookery, but their popularity comes at a price. A violent, Asian slave trade exists to produce most of the prawns for sale in Western supermarkets, so please be careful that the prawns you buy are ethically and responsibly sourced. Choose organic king prawns from Waitrose or Honduran raw prawns from M&S. Thank you. Or you could forego the prawns altogether by opting for our vegan-friendly, equally flavoursome, Thai Green Garden Curry.

I’ve paired Primal Plate's tasty, just nicely spicy, warming green curry with pak-choi but Cauliflower Rice is good too. Vegans and vegetarians can simply substitute cherry tomatoes and asparagus tips for the prawns. Hand-carved vegetable flowers and birds are optional!

With food as delectable as this, no wonder Thailand is known as the “land of smiles”.

Thai Green Curry With Prawns (Serves 4) 

1 tbsp organic coconut oil

2 medium organic sweet red peppers, cored, de-seeded and cut into thin strips

4 medium/large organic spring onions, sliced diagonally into 5 or 6 pieces  

2 x 400ml tins organic coconut milk (full fat)

1 tbsp Marigold organic Swiss vegetable bouillon powder

4 tsp Thai green curry paste

1 tbsp organic tamari

450g raw peeled organic king prawns

200g frozen petits pois, defrosted  

½ tsp sea salt and freshly ground black pepper

20-30ml freshly-squeezed lime juice

2-3 drops organic liquid stevia

20g fresh coriander leaves, chopped

Thai Green Garden Curry

Simply follow the instructions given below - omitting the prawns and substituting with:

300g organic cherry tomatoes, halved

300g asparagus tips, trimmed and cut in to 5cm (2”) pieces

To Serve

2 x 235g packs pak choi, washed, prepared (*see below) and lightly steamed for 3 minutes. 

*If using very young pak choi they can be left whole or cut into halves or quarters. However, larger stems of pak choi will cook more evenly and are much easier to manage on the plate if you cut the leafy tops off their white stems. If the outer stems and leaves are still too large, split them in half down the middle. Place the white stems into the bottom of the steamer, then pile the green leaves on top and steam for 3 minutes with the pan lid on.


Instructions

Fill and boil a kettle of water. Pre-heat 4 large serving dishes/bowls. 

For making the Thai Green Garden Curry: Pour some of the boiling water from the kettle in to a medium saucepan. Bring back to the boil, throw in the asparagus and cook for just 2 minutes (do not overcook them, they should still have some ‘bite’). Drain and refresh the blanched asparagus in cold water (or place under a cold running tap) to stop the cooking process and set their bright green colour. Drain again and set aside.

To quickly defrost the petits pois: Put the peas in a heatproof jug, pour over the boiling water then drain and set aside.

Melt the coconut oil over a medium/high heat in a large, deep sauté pan. Add the pepper strips and spring onions to the pan and stir-fry for about 2 minutes or until just beginning to soften. 

Add the bouillon powder and the green curry paste and continue to stir-fry for a further 30 seconds - try to avoid breathing in the fumes at this stage, they’re quite pungent!

Pour the coconut milk into the pan and bring the mixture to the boil whilst stirring constantly. Once it comes to the boil turn the heat down to medium, then add the tamari, half the lime juice and a single drop of liquid stevia. Taste. Add a pinch of sea salt and a good grinding of black pepper - plus an extra drop of stevia, if you think it needs it. 

Let the sauce gently bubble away over a medium heat for 5 minutes to allow it to reduce down slightly.

Meanwhile fill a steamer with the rest of the boiling water from the kettle. Place the pak choi in the top of the steamer and cook with the pan lid on for 3 minutes.

Whilst the pak choi is cooking, tip the prawns (or, if making Thai Green Garden Curry, the cherry tomatoes and blanched asparagus tips) and the petits pois into the curry sauce and cook for a further 2 minutes or until the prawns turn pink and are completely opaque - or if making the Thai Green Garden Curry, just until the tomatoes, asparagus and peas are warmed through. 

Take the pan off the heat and stir in half the chopped coriander. Check the seasoning again and adjust to taste - also add a little more lime juice and/or another drop of stevia, if needed.

Pile the cooked and drained pak choi in the centre of the four pre-warmed serving bowls. Carefully ladle the green curry over the top dividing the prawns and vegetables equally between each bowl.

Sprinkle over the rest of the coriander and serve immediately. 


Notes

N.B. To keep the Thai green curry fresh and vibrant you need to be careful not to over-boil it in the final two minutes of cooking time. Gently heat through until just below boiling point. If you over-cook it at this stage, you’ll end up with tough prawns, collapsed tomatoes and dirty-looking, more-khaki-than-green, vegetables. Not very nice!


Carbohydrate 21g Protein 25g - per serving (with prawns)

Carbohydrate 26g Protein 10g - per serving (with cherry tomatoes & asparagus)