Primal Pancakes

by Susan Smith in ,


It’s Shrove Tuesday today and traditionally the day for eating pancakes!

According to Christian tradition this day is all about being ‘shriven’ (to confess and be absolved of your sins) before a period of penance (oh for heaven’s sake!).

Otherwise known as “Fat Tuesday”, (much more realistic terminology, I think) in Catholic and Protestant countries outside of the UK, Ireland, Australia and Canada - presumably because it’s an excuse for a day of feasting on rich food before a period of fasting.

Since I neither desire to be “shriven” from my sins nor get fat, I can’t see why it can’t be pancake day every day once you’ve got the knack of making them grain and gluten-free! These crêpes are so close to the real thing no one will tell the difference.

According to Historic UK a pancake is a thin, flat cake, made of batter and fried in a frying pan - so are ours! Traditional English pancakes (and French crêpes) are very thin and are served immediately - so are ours! Golden syrup or lemon juice and caster sugar are the usual toppings for pancakes - okay we’ll pass on the golden syrup in favour of real maple syrup, the caster sugar in favour of coconut sugar or, better still, no sugar at all if we choose oranges instead of lemons!

I’ve kept this recipe simple and made them child-friendly as well as healthy - though I suppose we should still limit ourselves to just two pancakes each!  I hope you enjoy.

Basic Pancake Batter Ingredients (V) (Makes 8 pancakes for 4 servings)

Ingredients

225ml (8 fl oz) raw whole milk (or almond milk, if preferred)

3 large eggs

30g (1 oz) organic ground almonds

45g (1½ oz) coconut flour

40g (1½ oz) arrowroot flour

15g (1 tbsp) coconut oil

1 tbsp clear, preferably raw (unheated) organic honey

½ tsp apple cider vinegar

½ tsp baking powder


To Serve

Orange or lemon juice

Orange or lemon wedges

Organic maple syrup or raw coconut palm sugar (the latter crushed fine in a pestle and mortar or alternatively with the end of a rolling pin in a pudding basin)


Instructions

Place all the ingredients for the batter into a blender and blend thoroughly until it is smooth and the consistency of pouring cream - add a little more milk or water if it seems too thick.

Heat a 20cm (8 inch) non-stick pancake pan until it is hot. Lightly oil or butter the pan, then ladle in just enough of the batter (about 3 tablespoons) to coat the base thinly. Working quickly, immediately tilt and turn the pan in a clockwise direction to spread the batter evenly - the pancakes should be as thin as possible.

Fry over a medium-high heat for 30-60 seconds until just set. Flip over with a palette knife and continue to cook for a further 30 seconds. Serve immediately.

Or to make a batch, slide the pancake onto a large warm plate (set over a pan of just simmering water) and cover loosely with cling film. Repeat this process until all the batter has been used to make 8 pancakes.

When you are ready to eat, sprinkle each pancake with freshly squeezed lemon or orange juice and maple syrup (or coconut sugar), fold in half, then in half again to form triangles.

Serve sprinkled with a little more juice, extra sweetener and wedges of lemon or orange if liked.


Notes

Use a ladle (or jug) to pour all the batter into the pan in one go so it doesn’t set before it has chance to spread out evenly.

The side of the pancake fried last never looks as nice, so make sure that it’s this side that becomes the inside of the pancake when you fold it into a triangle.


Carbohydrate 10g Protein 6g - per pancake

Carbohydrate 14g Protein 0g  - per serving of orange/lemon juice/maple syrup per pancake


Souffléd Cauliflower with Gruyère Cheese Sauce

by Susan Smith in , , , , ,


Back in the 1970’s, due to a lack of money and much to my husband’s irritation, cauliflower cheese, along with jacket potato and tuna bean salad used to be the mainstay of our diet. It was the repetitive appearance of cauliflower cheese that offended him the most. We’re not together now but I do wonder if he’s carried his grudge against cauliflower with him for the past thirty-five years!

If so, it would be a pity because today’s recipe for Souffléd Cauliflower with Gruyere Cheese Sauce is a far cry from the boiled cauliflower with the flour-based béchamel cheese sauce of our yesteryears, which I confess (too late as far as my ex is concerned!) was a truly monotonous thing to eat no matter how liberally I attempted to mask it in cheesiness.

This no-grain, low-carb version is really an elegant deconstruction of boring old cauliflower cheese that I think is simply brilliant as an imaginative vegetarian main course or as an accompaniment to fish, chicken or meat. It’s amazing what a little bit of height and lightness can do for cauliflower jaded appetites and with the silky-smooth Gruyere cheese sauce poured over, it’s totally transformed into something enticingly delish.

Do not be intimidated by the thought of making a soufflé - they’re really not as difficult or as temperamental as you might think. You’ll need a 6-inch diameter top (No.2 size) soufflé dish for this recipe. 

Souffléd Cauliflower with Gruyère Cheese Sauce (V) (Serves 4)

Ingredients - for souffléd cauliflower

I medium size cauliflower

1 fresh bay leaf - optional

10g-15g (½oz) ground almonds and softened butter (for souffle dish)

Grain-free béchamel sauce (made with 30g/1oz of butter, 20g/¾oz ground almonds, 1 tsp arrowroot powder, ¼ tsp dry English mustard powder, 142ml/¼ pint milk)

Sea salt and freshly ground black pepper

3 large egg yolks 

4 large egg whites

1 tbsp ready-grated Parmesan (for dusting)


Ingredients - for Gruyère cheese sauce

250ml (8fl oz) créme fraîche

125g (4½oz) Gruyère cheese, finely grated (I used the Co-op’s Truly Irresistible Premier Cru Gruyère cheese - it is the best Gruyère I’ve ever tasted!)

½ tsp Dijon mustard


Instructions

Pre-heat the oven to 190℃ / 375℉ / Gas mark 5. Boil a kettle of water.

Butter the soufflé dish and dust with the ground almonds. To allow the soufflé to rise above the dish, tie a deep band of non-stick baking parchment or greaseproof paper around the outside of the dish to come 2-3 inches higher than the top of the dish.

Cut the florets off the head of cauliflower - you don’t need much stalk so just use the florets. Put the florets in a single layer in the top of a steamer, sprinkle over with salt and tuck the bay leaf in-between. Pour the boiling water from the kettle into the bottom half of the steamer and steam the florets until they’re tender (about 7 minutes).

Refresh the cauliflower in cold running water, remove the bay leaf (if used) then drain well and tip the cauliflower on to a clean tea towel to dry. Pulse the cauliflower in a food processor into a puree (alternatively, push the cauliflower through a strainer). Put the cauliflower puree into a bowl.

Prepare the béchamel sauce. In a medium pan set over a low to moderate heat melt the butter, when the butter is melted add the ground almonds, the mustard and arrowroot powders and stir everything together really well.

Keep stirring continuously whilst you gradually add the milk to the pan a little at a time. Make sure after each addition of milk that it is evenly and smoothly incorporated into the butter and flour mix before adding more milk. When all the milk has been added to the pan, bring the sauce up to the boil to allow it to thicken - continuously stirring until it does.

Take the pan off the heat and mix the béchamel sauce in with the cauliflower. Season well with salt and freshly ground black pepper.

Separate the egg yolks and whites. Thoroughly beat the yolks and add them to the cauliflower mixture. With a clean whisk whip the egg whites to a firm snow.

Using a large metal spoon, quickly fold a third of the egg whites into the cauliflower mixture to loosen it, then gently fold in the rest of the egg whites being very careful not to knock the air out of the mixture.

Turn into the prepared soufflé dish, dust with the Parmesan cheese and stand it on the centre shelf of the oven. Bake for about 30-35 minutes until it is well risen and brown. The soufflé should be a little soft in the centre.

Whilst the soufflé is baking, prepare the Gruyère cheese sauce. Heat the creme fraiche in a saucepan without letting it boil. Add the cheese and Dijon mustard and whisk continuously until the cheese melts.

Remove the pan from the heat and set the sauce to one side until you need it.

Just before the soufflé is ready, gently re-heat the sauce and tip into a warm sauceboat.

When the soufflé is cooked, serve it immediately with the Gruyère cheese sauce handed separately. 


Carbohydrate 12g Protein 12g  - per serving of souffléd cauliflower

Carbohydrate 1g Protein 10g - per serving of Gruyere cheese sauce


Wild Smoked Salmon & Prawn Pâté

by Susan Smith in , , ,


The deliciously deep rosy colour of this Wild Smoked Salmon & Prawn Pâté with its soft texture and sweet flavours that hint of the sea, is food to fall in love with. Quick and easy to make, it is a truly indulgent starter for any special occasion.

Spread it lavishly on slices of crisp crostini (see the recipe for perfect crostini here) and serve with a glass of chilled Champagne and I think you could literally have your lover eating out of your hand!

I specifically chose wild Alaskan smoked salmon for this recipe because by going wild you get a firmer less fatty fish with a natural intense colour. Besides, it just doesn’t seem very loving to feed my man farmed fish that’s been fed on pellets containing antibiotics, growth hormones and artificial colour!

To make this seafood pate even more luxurious (and a little less salty) I combined the smoked salmon with some big juicy Canadian cold water prawns.

If this little number doesn’t impress your Valentine, I don’t know what will!

Wild Smoked Salmon & Prawn Pâté (Serves 2)

Ingredients

50g (2oz) wild Alaskan smoked salmon 

25g (1oz) large Canadian cold water prawns, defrosted

100g (3½oz) full-fat soft cream cheese

50g (2oz) unsalted butter, melted and cooled

½ small lemon, juiced

Large pinch cayenne pepper

2 lemon slices

8 whole prawns, defrosted

Flat leaf parsley 


Instructions

Cut the salmon and the prawns into small pieces (I used kitchen scissors). Place the salmon and prawns in a blender with the cream cheese, melted butter, cayenne pepper and lemon juice.

Pulse the ingredients until mixed together well but not completely smooth - you need to retain a little texture. Taste the pâté and add a little more lemon juice if needed.

Spoon the mixture into two small ramekin dishes. Level the surface, cover with cling film and chill for 2 hours.

When you’re ready to serve, cut a thin slice from a whole lemon, cut it into two halves (remove any pips) then slice each half from its centre to the rind (don’t cut through the rind) then turn both ends in opposite directions to make a ‘twist’ and place one lemon twist on top of each pâté. Arrange two prawns on each side of the lemon slices (4 prawns per person) and garnish both with a small sprig of flat leaf parsley.


Notes

Wrapped tightly in cling film, this pâté will keep for for several days stored in a refrigerator.

Don’t add any salt as the smoked salmon has enough salt to sufficiently flavour the pâté without.

If you don't have time or don't feel confident enough to make crostini, whole red Belgian chicory leaves are a fresh and flavourful accompaniment to the pâté. They're also virtually carb-free and the pale red leaves look very pretty!

You could also add some finely chopped fresh chives or dill to this pâté but I much prefer its unadulterated rosy pink colour. For the same reason, I used cayenne pepper rather than freshly ground black pepper because I think black flecks running through the mix would spoil its appearance. 


Carbohydrate 2g Protein 10g - per portion


Chocolate Mousse

by Susan Smith in ,


A chocolatey climax to a romantic Valentine’s dinner, what’s not to love?

Sarah actually wanted me to write about her all-time favourite chocolate mousse, which is a Raymond Blanc recipe (not the one with lemon juice!) but frankly, I prefer all my ingredients to be fully used up rather than having to store an excess in the refrigerator, where there’s always the risk of it getting pushed to the back and being forgotten. So, sorry Sarah but the disparity between using one egg yolk to ten egg whites in that recipe, sends me into a tail spin whilst I try to figure out what to do with the remaining glut of yolks! I suppose I could have blogged mayonnaise and hollandaise sauces but since I’m focused on cooking for two people this week, I wanted an altogether more streamlined chocolate mousse recipe that has no need for added sugar.

The one I finally settled on is an Elizabeth David recipe, which really appealed to me because, at its simplest, you only need an ounce of quality dark chocolate, a tablespoon of water and an egg per person. My chocolate mousse calls for the same ingredients except I’ve swapped the water for a ‘shot’ of strong espresso coffee and added a smidge of salted butter for a little more sophistication. I think it  is the perfect finale to an intimate celebration meal for low-carb, Primal diet aficionados.

Surprisingly quick and easy to make, the taste and texture are in my view balanced to perfection - not too sweet, light as a feather and deeply chocolatey.

Quality ingredients are vital. Being short on the number of ingredients it’s not expensive to make, so buy the very best 70% dark chocolate (no more than 70% cocoa solids, as this can turn your mousse ‘grainy’), decent quality butter and the freshest organic free-range eggs you can find. I used a Nespresso Kazaar coffee pod to make a fresh strong espresso to further enhance the chocolate flavour.

The result is a divinely unctuous dessert that provides mouthfuls of pure pleasure. I really can’t think of anything more appropriate for the occasion! 

Chocolate Mousse (V) (Serves 2)

Ingredients

60g (2oz) fine quality dark chocolate, chopped - I used Callebaut Finest, Satongo dark chocolate chips (saves the time and hassle involved in breaking or chopping up a chocolate bar!) available from an amazing website called Chocolate Trading Co

2 large eggs, separated

10g salted butter

2 tbsp strong espresso coffee


Instructions

Put the chocolate in a heatproof bowl and set it over a pan of barely simmering water. (alternatively, you can put the bowl of chocolate in an oven switched down to it’s lowest setting). Leave it to melt.

When the chocolate is melted, remove it from the heat. Stir in the espresso coffee and the butter.

Separate the egg yolks and whites into two separate bowls. Beat the egg yolks thoroughly, then stir them into the chocolate mix.

With a clean whisk beat the egg whites until they are white and thick but still fluffy. Don’t overbeat them and let them get too stiff or they will be difficult to combine with the chocolate.

Stir a third of the egg whites into the chocolate to loosen it, then immediately fold in the rest. Be very gentle with cutting and folding in the egg whites but be thorough - if you’re too heavy-handed youll knock the air bubbles out and end up with a flat mousse, but if you dont combine the egg whites into the chocolate completely youll have white streaks running through it.

Pour the mousse into two individual glasses or ramekin dishes and refrigerate for 3 to 4 hours. The longer it’s left the more dense it becomes.


Notes

There are a few tricks to making good chocolate mousse:

  • The eggs and butter should be at room temperature before you start
  • Don’t stir the chocolate whilst it’s melting because it may seize up
  • Use a large metal spoon (not a wooden one) to fold the egg whites into the chocolate

N.B. If you have any concerns about eating raw eggs (to the extent that you won’t eat a soft boiled egg) sadly, this recipe is not for you.


Carbohydrate 9g Protein 8g  - per portion


Carrot & Ginger Timbales with Tomato Sauce

by Susan Smith in ,


This recipe for Carrot & Ginger Timbales is very close to my heart, so as it’s Valentine’s day this Saturday, I’m thinking it’s not only a good time for me to share it with you but that it might also be just the thing to ‘ginger-up’ that special someone in your life.

Nineteen years ago it was part of a menu I devised for Sarah to compete in Junior Masterchef. She made it to the televised series but as Loyd Grossman drawled to me afterwards, “You must be really disappointed but we’ve already had a vegetarian menu go through to the finals in this morning’s cook-off!”

Sarah’s heat wasn’t scheduled for filming until the afternoon and as there was no room for two vegetarian finalists, that as they say, is show biz! They even had to edit out Rick Stein’s comment for the benefit of television viewers because during the judging (overheard in the green room because the film crew had inadvertently left the audio link ‘live’) he’d said to Julia Sawalha and Loyd Grossman “Taste that, just taste that! That’s the best vegetarian food I’ve ever eaten!!”

Sarah cooked this to perfection in-front of a camera crew at age 15, so it should be feasible for anyone to cook at home for the man or woman they most want to impress on Valentine’s day.

During this coming week I hope to put together a complete menu for dinner à deux that should give your romance an added edge. These elegant Carrot & Ginger Timbales with Tomato Sauce are the main event and should definitely dazzle with some gorgeous greens such as sugar snap peas and wilted spinach served alongside.

Carrot & Ginger Timbales with Tomato Sauce (V)

Ingredients for the timbales (Serves 2)

25g (1 oz) butter

1 small onion, finely chopped

1 inch fresh ginger, skinned and finely grated

350g (12 oz) carrots, coarsely grated

60ml (2 fl oz) filtered water

Sea salt

Freshly ground black pepper

1 drop liquid stevia - optional

1 tbsp fresh coriander leaves, chopped

2 large organic free-range eggs, beaten

60g Gruyere cheese, finely grated

Butter for greasing

Extra coriander leaves, to garnish


Ingredients - for the tomato sauce (Serves 4)

25g (1 oz) butter

1 small onion, finely chopped

1 x 400g (14 oz) plum tomatoes (Mr Organic is my preferred choice)

1 tsp tomato puree

1-2 drops liquid stevia

Sea salt

Freshly ground black pepper

1 dsp tomato ketchup (Mr Organic is my preferred choice)


Instructions for making the timbales

Pre-heat the oven to 190℃ / ℉ / Gas mark. 

Grease two ramekin dishes and line the bottom of each with a disc of baking parchment.  

Melt the butter in a medium pan over a moderate heat and cook the onion and ginger for about 5 minutes with the pan lid on until the onion is transparent but not coloured (I also use a disc of parchment paper - cake tin liner - pressed down on top of the vegetables to help keep the steam in and to stop them from browning).

Add the carrots to the pan and cook a further 5 minutes until tender.

Add a drop of liquid stevia, salt and pepper. Stir to combine the seasonings, then add the water and continue cooking until all the water has evaporated. Take off the heat and allow to cool slightly.

Boil a kettle of water.

When the carrot mixture has cooled, add the eggs, cheese and coriander.

Stir everything together thoroughly, then check the seasoning. 

Spoon the mixture equally into the two buttered ramekin dishes.

Cover the tops with non-stick foil and place in a small roasting pan.

Pour the hot water from the kettle around the ramekins so it comes halfway up the sides of the dishes.

Bake for 30 minutes until firm.


Instructions - for making the tomato sauce

Melt the butter in a medium pan over a moderate heat.

Add the finely chopped onion, cover with the pan lid and cook gently for about 5 minutes.

Add the can of tomatoes, breaking them up slightly with a wooden spoon.

Add the tomato puree, 1 to 2 drops of liquid stevia, sea salt and pepper.

Cover and cook gently for about 20 minutes, stirring from time to time.

Pour into a food processor and liquidise. Pass through a strainer into a clean pan.

Add tomato ketchup, check seasoning and gently re-heat.


To serve

Unmould the carrot and ginger timbales on to warmed dinner plates (don’t forget to remove the paper disc!)

Spoon a pool of the tomato sauce next to each timbale. Garnish with fresh coriander.


Timbales - Carbohydrate 16g Protein 17g

Tomato Sauce - Carbohydrate 5g Protein 2 g


Simply Salad

by Susan Smith in , , , ,


I’ve heard that professional chefs can always tell the calibre of a prospective new member of their brigade by getting them to cook scrambled eggs. Personally, I feel that putting together a nicely dressed bowl of fresh salad leaves might reveal a whole lot more.

It’s no use pretending that lifeless, pre-washed salad leaves (often rinsed in a chlorine wash and then handled by multiple pairs of hands and preserved with a blast of gas before being bagged!) or the familiar shrink-wrapped iceberg lettuce is going to cut it, if you want to make a decent salad.

Nothing compares to truly fresh salad leaves, so start with the freshest greens you can find, preferably organically grown. Find whole lettuce that has a ‘just-picked’ appearance such as romaine or little gem, or a head of leaves like soft, tender English lettuce or green, red, bronze oak leaf lettuce.

Build your salad from there by adding a variety of other salad greens. Perhaps some mild tender mâche (lambs lettuce), rocket, bright peppery watercress (ideally bought by the bunch) or in winter, chicories. Add to these some young sweet ‘living’ leaves, pea shoots, fresh growing herbs or mustard and cress.

Packed with essential nutrients and virtually carb-free, a generous daily portion of raw healthy salad greens is the most gratifying accompaniment to any meal. In my view, a perfect tossed green salad that’s well balanced and well dressed is also the hallmark of a great cook.

Simply Salad (V)

Ingredients - Salad

This isn’t so much of a recipe with pre-determined ingredients as it is a general guide to salad making. Primarily let the season, what's looking at it’s best and what you fancy determine your choice. If you’re willing to shop and cook in a way that nourishes your body and satisfies your soul, the possibilities are endless!

The only proviso is that for a tossed green salad, keep it simple - it really doesn’t need anything more than a well-balanced classic French Dressing.

Alternatively, you can create your own ‘house’ salad by adding a riotous colour of different fruits and vegetables, together with your favourite dressing.

When you’re trying to judge portion sizes, allow a large rounded handful of green leaves per person (my hands are small, so it’s more like both hands cupped together!)

The salad pictured here was a mixture of Romaine and Little Gem lettuce hearts, wafer thin slices of fennel, wild rocket, watercress, red and white Belgian chicories, thinly sliced red and yellow peppers, Sundream vine tomatoes, flat leaf parsley and avocado.

Ingredients - For the French dressing

120ml (4½ fl oz) olive oil (I used half organic cold pressed olive oil and half organic cold pressed avocado oil)

40ml (1 ½ fl oz) organic raw apple cider vinegar

1 tsp sea salt

Freshly ground black pepper

1 tsp Dijon mustard

1 tsp clear ‘runny’ raw organic honey, or maple syrup


Instructions

First make the vinaigrette dressing. Mix the vinegar, sea salt, pepper, honey and mustard together in a medium sized bowl and give it a good whisk. Add the oil a small dash at a time, whisking well between each addition. Continue adding the oil until it is all amalgamated into vinaigrette. Check and adjust the seasoning if necessary (if it tastes a little tart, a single drop of liquid Stevia will help compensate).

Remove the base of the stalk and any roots attached to your lettuce together with any tough, yellowing or damaged outside leaves. If the leaves are small, leave them whole. Larger leaves should be torn along their central rib into bite-sized pieces. Remove any thick stalks from the likes of fresh watercress or spinach.

Many leafy salad greens are grown in sandy soil so to avoid grit ending up in your salad, you’ll need to wash them well. Fill a sink or large soaking bowl full of cold water then gently submerge and swish the leaves around in the water to dislodge any dirt. Handle your leaves lightly, if they get bent small cracks on the surface will cause them to wilt.

When lifting them out of the sink or soaking bowl, don’t just grab them. Spread your hands out underneath the leaves in the water and gently lift them out using your loosely splayed fingers to support them. Lay them out on a clean tea towel and gently pat dry with paper towels.

A salad spinner makes light work of washing and drying. I bought the older model of the iconic OXO Good Grips salad spinner several years ago and it’s an invaluable kitchen-aid that spin dries salad leaves and herbs in seconds without bruising them. First, fill the bowl of the spinner with cold water and submerge the leaves in the spinner basket into the water. Gently swish around in the water to allow any sand to drop through the basket into the bottom of the bowl. Repeat several times with fresh clean water until there’s no sand left in the bottom of the bowl. Pour away the last batch of water then simply put spinner lid on and pump several times to dry. Don’t go mad with the spinning action or you might crush the leaves. Just give it a couple of good spins, then rearrange the leaves, drain the bowl and spin again. Don’t over-fill the spinner basket either, it’s best to spin the leaves in batches rather than cram too much in.

Arrange the dry leaves prettily in a bowl (much larger than you think you need if you intend to dress your salad) together with any other salad ingredients you’re using  Cover and keep chilled until you’re ready to serve.

Just before you want to serve your salad, add a few tablespoons of your chosen dressing to the bowl then gently turn the salad over and around with your hands (you can use a couple of large spoons, if you prefer) until everything is evenly and lightly coated in the dressing. Serve immediately.

Notes

Don't overdo the dressing on your salad. You want just enough vinaigrette to lightly and evenly coat the leaves rather than drown them out - too much dressing will simply make them go unpleasantly soggy.


Primal Perfect Shortbread

by Susan Smith in ,


These Primal Perfect Shortbread biscuits are wonderful with a cup of tea but when I was making them I transported myself in my mind to a quintessential Best of British afternoon tea party, where they could be rightfully celebrated dolled up with the first strawberries of the season and cream. No doubt this idea will manifest as a future recipe on Primal Plate!

For now, they are a simple pleasure to share and enjoy without spiralling into a sugar and starch overload. Classic shortbread contains just three ingredients: flour, white sugar and butter. Grains and refined sugar are both strictly off-limits for low carbers, so I’ve fiddled and diddled around with various ingredients (good quality butter is still compulsory!) and I think that this Primal Perfect Shortbread comes very close to the real thing.

True, it is much darker in colour than the pale gold of Scottish shortbread due to the coconut palm sugar (my shortbread is only that pale gold before it goes into the oven!) but at the same time it’s this coconut sugar that gives a slight gritty texture, synonymous with shortbread recipes that suggest adding polenta for extra crunch. Also, coconut sugar combined with my ‘secret’ ingredient Ndali vanilla essence makes for a truly scrumptious butterscotch flavour to this shortbread, which in our house has proven to be quite addictive.

You might think, judging by the recipes I’ve posted to date, I have a sweet tooth, which in fact I don’t. What I want to demonstrate is that eating no grains, no refined sugar and low carb foods does not mean missing out. Nor does it mean that if you indulge yourself sensibly, you’re going to get fat or sick.

I get a buzz from sharing these delicious, nutritionally sound, low-carb versions of everyone’s favourite foods, knowing that they are the key to effortless weight loss and better health. Equally, I like to confound expectations that something, somehow, must get lost in translation if you’re eating low-carb, relatively high fat food (no hydrogenated/trans fats here please!) and baking without flour and refined sugar!

In my view, you can forget about Walkers because nothing comes close to a real-food version of plain home-baked shortbread. Not too naughty, just very, very nice.

Primal Perfect Shortbread Recipe (V) (Makes 12 pieces)

Ingredients

90g (3 oz) salted butter (if you’re not using salted, add a pinch of salt)

160g (6 oz) ground almonds 

40g (1½ oz) raw coconut palm sugar

25g (1oz) organic coconut flour

15g (½ oz) arrowroot powder

½ tsp baking powder

1 tsp vanilla extract


Instructions

Preheat your oven to 130℃/ 250℉/ Gas mark ½

In a small saucepan, melt the butter over a low heat.

In a medium bowl, mix together the ground almonds, coconut sugar, coconut flour, arrowroot and baking powders (and pinch of salt, if using).

Make a well in the centre of the dry ingredients and add the melted butter and vanilla essence. Stir thoroughly so everything is mixed together really well. Then using your hand, squash it together into a soft, cohesive dough. 

Lay a sheet of non-stick baking parchment on top of a baking tray then put the dough directly on top of the paper and pat it down flat. 

Continue to pat or lightly roll it out until it’s an even 1 cm thick round circle (I use an 8 inch cake tin liner placed under the parchment paper to get the right size and shape and a piece of cling film laid on top to save my hands or the rolling pin getting too greased up) - if the dough splits or tears just press it back together with your fingers but don’t overwork it, the less you handle it, the better.

Once it’s the shape you want, use the prongs of a fork to mark the outside edge and score lines across the shortbread so it can be broken into individual biscuits later. Rest the dough by chilling in the fridge for 15 minutes. 

Put the baking tray in the oven and cook for about an hour.

Let it cool completely before serving. These biscuits will be delicious for several days stored in an airtight tin or container, though I suggest you hide the tin if you want them to last that long!

Notes

I make the coconut sugar a little bit finer for this recipe by grinding it down in a pestle and mortar. If you don't have one of these you could try passing the sugar through a coarse metal sieve instead.


Carbohydrate 6g Protein 3g - per  biscuit

IMG_4035 copy.jpg

Little Ham and Egg Pies

by Susan Smith in , , , ,


Unusually, for someone who embraces Primal living, I don’t eat much meat. When I do it’s a) because 'fast' meat dishes like steak and salad are my go-to easy option when I'm just too busy or b) I believe it’s the best or only option available to me when I’m eating out. Either way, in spite of enjoying the taste of meat and knowing that it can in fact be a nutritionally sound choice, I’m usually at odds with my decision. 

I was in fact vegetarian for over a decade because I believe that the animal cruelty involved in factory farming of around two in every three farm animals today (that’s over 50 billion animals a year!) is an abomination; a testament to man's stupidity. Not only is our insatiable appetite for cheap food causing so much suffering to farm animals, it’s trashing the environment and fuelling climate change too. Quite apart from the stress and disease that cramming farm animals together causes, it seems obvious to me, and somehow only fair in the face of ‘farmaggedon’, that human health is also at risk. By eating meat from animals that have been routinely injected with drugs such as antibiotics and growth hormones and animals given unnatural animal feed - grains grown with pesticides, herbicides and fungicides - we’re exposing ourselves to disease too. So if you want to protect your health, the answer is to only eat pasture raised meat - namely, meat from animals that have been allowed to roam freely on lush grass. I recommend Green Pastures Farm

That said, these Little Ham and Egg Pies (original recipe from Simple Food by Jill Dupleix) have been a life-saver when I’m on the move and I’ve needed something quick and easy to eat. Tasty and sustaining, they really come into their own when we’re working flat-out at a Mirror Imaging wedding. Travelling between venues, Sarah drives whilst I feed these little protein packed morsels into both our mouths at the same time!

Also handy for a school lunch box, picnic fare, a high protein snack after a work-out, breakfast on the run, to serve with drinks, or served warm for a light supper or brunch. I’ve even converted the recipe into making ‘tiny’ ham and egg pie canapés using quails eggs and Parma ham! Little Ham and Egg Pies are all-rounders. They’ll keep for up to three days in a refrigerator. 

Little Ham and Egg Pies (Makes 12)

Ingredients

1 tsp olive oil or butter

12 slices best quality ham

12 large organic free range eggs, preferably pastured

2 tbsp double cream

Sea salt 

Freshly ground black pepper

2 tbsp chopped parsley

4 tbsp Parmesan Reggiano, freshly grated


Instructions

Heat the oven to 180℃ / 350℉ / Gas mark 4

Lightly oil a 12 hole muffin tray with melted butter or olive oil

Line the base and most of the sides of each mould with a slice of ham. Break an egg into each hollow.

Drizzle a little cream over each 'pie' and scatter with sea salt, pepper, parsley and parmesan.

Bake for 15 to 20 minutes until the egg is just set and starting to shrink away from the sides of the tin.

Leave to cool for 5 minutes, then run a small knife around the mould to loosen the ham and egg. Remove to a wire tray.

If there are any straggly pieces of egg white left on the bottom of the ham just wipe away for a neater appearance.

Eat warm or at room temperature.


Notes

Buy the best quality ham you can afford, preferably organic and free-range.

Your average slice of processed meat does not come from a grass-fed pastured animal so don’t base your diet around cured meats such as bacon, ham charcuterie etc.  A little eaten occasionally is okay but treat cured meats as an adjunct to vegetables, fruits and fresh meat.

Also, go easy on the salt when you’re seasoning these ham and egg pies because often processed ham is heavily salted already. 


Carbohydrate 0g Protein 13g - per serving


Mellanzane Parmigiana

by Susan Smith in , ,


The recent weather’s cold snap, which in our Edwardian property has to be endured even when the central heating is on 24/7, got me fantasising about a different kind of a life lived in the Mediterranean - specifically Italy. 

I’ve had several Italian friends (still do!) and am drawn by their unbridled warmth and generosity. They are my sort of people; the sort who love to relax, celebrate and socialise with family and friends. My understanding is that these celebrations most often centre around the table and an abundance of traditional Italian food. 

Since a trip to Naples is not do-able, today’s recipe injects a bit of that Italian sentiment and sunshine into an otherwise bleak January day (though it works just as well eaten ‘al fresco’ on a balmy summer’s evening).

A layered bake of aubergines, tomatoes and cheese is something of an Italian classic. My version has more than it’s fair share of cheese - I have used Cheddar as well as  the more usual mozzarella and Parmesan. The texture and richness make for a glorious vegetarian bake that will keep you warm from the inside out.

There was a time when bringing this dish together seemed somewhat onerous. So many processes…slicing and salting the aubergines, rinsing and drying them before pan-frying in batches in copious amounts of olive oil, making the tomato sauce, grating the cheese - all of which was required before assembling the final dish. It seemed like an awful lot of ‘faff’.

Anyway, necessity being the mother of invention I was forced to streamline the prep to something more manageable. In fact, because everything can be prepared in advance, this delicious bake is ideal for entertaining. 

We think if there was ever a meal that’s able to build a bridge between committed carnivores and ardent vegetarians, this gorgeous bubbling aubergine bake is definitely it.

Mellanzane Parmigiana (V) (Serves 4)

Ingredients

4 medium aubergines

80ml (3fl oz) olive oil

1 large onion, peeled and finely chopped

2 x 400g (2 x14oz) good quality tinned whole plum tomatoes (I favour Mr Organic)

200g (7oz) strong Cheddar cheese, coarsely grated (I used Davidstow's vintage Cheddar cheese from Waitrose)

60g (2oz) Parmesan Reggiano, freshly grated

150g (5oz) buffalo mozzarella, sliced

Sea salt

Freshly ground black pepper

Large handful of fresh basil leaves, roughly chopped

2-3 drops liquid stevia (optional)


Instructions

Trim the aubergines and cut across into 1cm thick slices. Layer them up in a colander sprinkling each layer with salt as you go. Put a plate underneath the colander (to catch the juices) and another plate on top, weighted down with something heavy (I use a kettle filled with water) Set aside to drain for 30 minutes.

Meanwhile, put two tablespoons of olive oil into a medium pan on a medium heat. Add the onion and cook for 10 minutes until it is soft but not coloured. 

Add the tinned tomatoes, breaking them up with a flat edged spatula into chunky pieces. Season with salt and pepper, give the mixture a good stir and bring to the boil. Cover and simmer over a gentle heat for 20 minutes.

Pre-heat the oven to 220℃ / 425℉ / Gas mark 7. Line two large baking trays with silicon baking mats or non-stick foil.

Wash the aubergine well under a running cold tap, then drain and dry on a clean tea towel.

Brush the aubergine slices on both sides with the remaining olive oil (I find it easiest to lay them all out on the two trays before oiling, I then brush oil over the uppermost side first before turning them over and doing the other side).

Roast the aubergine slices in the oven for 15 minutes, then turn them over and cook for another 10-15 minutes or until they’re nicely browned on both sides.

Meanwhile, reheat the tomato sauce, adjusting the seasoning if necessary. Add 2 or 3 drops of liquid stevia if it tastes too tart, then add the chopped basil.

When the aubergines are ready, take them out of the oven and turn onto a plate.

Switch the oven temperature down to 195℃. 

Get yourself an oven-to-table lasagne type dish (mine is 30cm x 24cm x 5½cm).

Spoon a little of the tomato sauce in the bottom of the dish, top with a layer of aubergines, some of the sliced mozzarella torn into smallish pieces and some of the Cheddar cheese. 

Continue with the layers until you’ve used up all the ingredients, finishing with the Cheddar. Sprinkle over the Parmesan cheese and bake for 30 minutes until crispy, bubbling and golden.

Serve with a crisp salad.


Carbohydrate 11g Protein 30g - per serving


Grilled Goats Cheese & Beetroot Salad

by Susan Smith in , , , ,


My first awakening to Chèvre Blanc goat’s cheeses’ melting, bubbly, golden goodness dates back to the early 1990’s, when we discovered a brilliant bustling French brasserie in Covent Garden called Le Palais Du Jardin (now closed). At the time, they served a salad of this fresh-tasting meltingly soft cheese with slices of poached pear and a balsamic dressing. 

The lively tang of goat's cheese served hot from the grill works equally well here with the earthy sweetness of beetroot, the peppery freshness of rocket (or watercress) and the piquancy of a simple vinaigrette. The whole dish coming together to great effect with the addition of some freshly chopped chives. I really like the contrast between the warm richness of cheese and cool vegetables.

The pink beetroot makes this salad as pretty as it is inviting. Since the 90’s, toasted goat’s cheese has become an enduring favourite for both vegetarians and non-vegetarians alike. We had it today for a light lunch, but I also like to serve it as a starter to impress hungry dinner guests, which it always does! 

Grilled Goats Cheese & Beetroot Salad (V) (Serves 4)

Ingredients - For the salad

4 x 100g (3½ oz) Chèvre Blanc goat’s cheese (I like Waitrose’s Mild Chèvre Blanc)  

250g (9oz) ready-cooked organic beetroot, without vinegar

70g (2½oz) bag of rocket, washed and picked over


Ingredients - For the vinaigrette dressing

120ml (4½ fl oz) olive oil (I used half organic cold pressed olive oil and half organic cold pressed avocado oil)

40ml (1 ½ fl oz) organic raw apple cider vinegar

1 tsp sea salt

Freshly ground black pepper

1 tsp Dijon mustard

1 tsp clear ‘runny’ raw organic honey, or maple syrup

1 tbsp fresh chives, chopped  


Instructions

Pre-heat the grill to high. 

First make the vinaigrette dressing. Mix the vinegar, sea salt, pepper, honey and mustard together in a medium sized bowl and give it a good whisk. Add the oil a small dash at a time, whisking well between each addition. Continue adding the oil until it is all amalgamated into vinaigrette. Check and adjust the seasoning if necessary (if it tastes a little tart, a single drop of liquid Stevia will help compensate). Alternatively, make my Fast & Easy Vinaigrette and shake in a lidded container.

Set aside 6 tablespoons of the vinaigrette dressing until you’re ready to serve the salad.

Thinly slice the beetroot (a mandoline slicer gives the quickest and neatest result).

Lay the beetroot slices so they overlap each other to form a circle in the centre of four plates. Drizzle a teaspoon of vinaigrette over each beetroot circle - keeping the plate clean. 

Line a baking tray or your wire grill rack with some non-stick foil. Place the goats' cheese rounds onto a baking sheet and place under the grill (about 3-4 inches from the heat) for 4-5 minutes, or until the cheese has melted and turning golden brown.

Whilst the goat’s cheese is grilling, lightly dress the rocket leaves in a tablespoon of vinaigrette in a medium bowl. Divide the dressed salad leaves between the four plates piling it up neatly on top of the beetroot.

When the cheese is ready, place one in the middle of each plate on top of the dressed leaves.

Add the chives to the remainder of the dressing and drizzle around the outside of each plate.


Notes:

For this recipe, you require slices of Chèvre Blanc goat’s cheese about 2.5 - 3cm thickness, rind-on, cut from a log. 

Keep the goat’s cheese rounds refrigerated in their original wrapping until you’re ready to grill them. You do not want them to disintegrate into a messy ‘pool’ before they’ve had chance to brown!

I’ve used the classic 3 parts oil to 1 part vinegar for this vinaigrette but you can adjust amounts according to your taste. If the finished vinaigrette tastes too tart, try adding more oil (or a drop of liquid Stevia); if it tastes too greasy, add a little more vinegar (or lemon juice). As an alternative to hand-whisked french dressing, make a vinaigrette by putting all the ingredients into a lidded jar and then shake the whole lot vigorously together until they’re combined, adding the chives afterwards. See my recipe for Fast & Easy Vinaigrette.

Store the unused vinaigrette in a lidded container for future use. It will happily keep at room temperature for several days without spoiling, although it will eventually separate - in this case, just re-whisk or give it a good shake before using.


Carbohydrate 7g Protein 21g - per serving


Walnut & Banana Bread

by Susan Smith in ,


If you think that over-ripe bananas are just too unappetising to eat and are really only fit for throwing away, then this scrumptious recipe should make you think again!

Walnut & Banana Bread seemed an obvious choice for our breakfast today as I had several brown and mottled bananas in my fruit bowl that were crying out to be converted into a banana bread. Not only is this recipe a pleasure to make, the smell, reminiscent of treacle toffee, which pervades the air as it cooks, is fantastic. 

Eat whilst still warm from the oven, generously buttered. A mug of hot spicy Organic Three Cinnamon Tea works well for me. It is the perfect antidote to a cold winter’s day.

Walnut & Banana Bread (makes 16 servings)

Ingredients

75g (3 oz) organic coconut flour (I use Tiana)

100g (3½ oz) ground almonds

60g (2½ oz) walnuts, roughly chopped into smallish pieces

45g (1½ oz) raw coconut palm sugar

1 tsp ground cinnamon

1 tsp baking powder

½ tsp sea salt

400g (14oz) unpeeled weight, over-ripe bananas, mashed well with a fork

100g (3½ oz) butter melted + extra butter for greasing 

4 large eggs

1 tsp vanilla extract


Instructions

Preheat the oven to 180C degrees.

Grease a 8.5 x 4.5 loaf pan with butter then place a cut strip of parchment paper to fit along the bottom of the loaf pan and up the short sides.

In a medium-sized bowl combine the coconut flour, almond flour, chopped walnuts, coconut sugar, cinnamon, baking powder and salt and mix with a fork to reduce any clumps.

In a separate bowl whisk eggs, vanilla extract and melted butter together. Add the mashed banana and whisk more until well combined.

Pour the liquid ingredients into the dry and stir with a rubber spatula until thoroughly combined.

Spoon the batter into the loaf pan and spread it out evenly with a spatula.

Bake for 45 minutes or until a toothpick placed in the centre comes out clean.

Take out of the oven and let it cool for 10 minutes or so. 

Run a knife around the edges of the loaf tin to make sure nothing is sticking, then cautiously invert it onto a wire cooling rack, peel off the parchment paper and carefully turn it over so the bottom of the loaf lies flat against the rack. 

Let it cool for another 20 minutes or so before slicing. 


Notes

I’ve used raw coconut palm sugar as a sweetener because unlike most sugar it’s real food that offers solid nutritional benefits i.e. it’s not just sugar. See more information here. Nevertheless, sugar is sugar and, in my view, all sugar should come with a health warning! Enjoy this walnut and banana loaf as a sweet treat in moderation.

To store, wrap in a paper towel and keep refrigerated.

Although this still eats well at room temperature, you can enjoy any leftovers by slicing and gently frying in butter. Also, lovely toasted.


Carbohydrate  9g Protein  5g - per slice


Smoked Salmon & Cream Cheese Canapés

by Susan Smith in , ,


I like cheese and biscuits but unfortunately most of the crisp-breads and crackers you can buy are made from grains and therefore totally incompatible with Primal eating. Here is an excellent alternative to starch-based crackers that we actually prefer to anything shop-bought. 

The starch-free, gluten-free, melt-in-the-mouth almond pastry used for today’s recipe is the brainchild of Jackie Le Tissier, author of Food Combining For Vegetarians. It has become almost legendary in our household. 

Using ground almonds instead of starch-based flour makes for an almost no-carb pastry that really is a brilliant substitute when making savoury or sweet tarts, canapés and crackers for cheese.

There are many variations of nut and seed pastry you can bake using different ground nuts and seeds - walnuts, pecans, poppy, caraway and sunflower seeds are some alternatives. However, this is our favourite ‘combo’.

Sarah is a dab hand at making these moreish mouthfuls and, since she espied some smoked salmon and Champagne in my fridge this morning, volunteered to get cooking. There is method in her madness, after photographing them for Primal Plate, she hopes to get to eat some of them later with a customary glass of fizz!  

It’s Burn’s night tonight, so why not? I’ll happily forego ‘neeps and tatties’ in favour of these traditionally peat-smoked Scottish salmon delicacies.

Smoked Salmon & Cream Cheese Canapés - Makes 20 canapés (with approx 30 crackers-for-cheese leftover)

Ingredients

200g (7oz) ground almonds

1 tsp baking powder

½ tsp almond essence

25g (1oz) butter, melted

2-3 tbsp diluted milk (to dilute the milk, mix 2 tbsp milk & 2 tbsp water together) 

200g cream cheese (I like Waitrose’s Organic Creamy Cheese because it’s soft enough to use it straight from the fridge)

150g best quality smoked salmon 

Fresh dill

Freshly ground black pepper


Instructions

Pre-heat the oven to 190℃ / 375℉.

Combine the ground almonds, baking powder and almond essence in a bowl.

Mix in the melted butter and diluted milk, stir everything in together with a fork. 

Bring the mixture together with your hand to achieve a firm but moist dough (the warmth of your hand will help to do this by releasing the oil in the nuts).

To stop the pastry from sticking to your work surface or rolling pin, roll out half the dough thinly between two sheets of cling film to 2-3mm thickness. Cut into rounds with a 1½ inch scone cutter and lift carefully onto a non-stick baking sheet. Gather up the offcuts and add them to the rest of the mix. Roll out the remaining dough and repeat as above.

Bake the biscuits for 8-12 minutes or until golden and firm in texture. Some of the crackers may be ready before others so remove these first onto a wire cooling rack, then put the rest back into the oven for another minute or two until they are all lightly and evenly browned.

Transfer to the wire rack and allow to cool completely. 

When you are ready to serve the canapés, pipe or spoon about 1 tsp of cream cheese onto each cracker. Divide the smoked salmon into 20 even pieces and top each canapé with a twirl of smoked salmon. For a final flourish garnish with a sprig of fresh dill and a twist of freshly ground black pepper.

Serve immediately with drinks.


Carbohydrate 1g Protein 3g - per canapé


Leek, Stilton & Walnut Stuffed Mushrooms

by Susan Smith in , , , ,


There is something so British about leeks in winter. I love their green sweet oniony softness, juxtaposed against the salty tang of blue Stilton cheese and the savoury earthiness of mushrooms. This is a happily vegetarian dish that’s as deeply umami flavoured as a beef steak and as warm and soothing as my Celtic sheepskin house boots!

It’s also a doddle to prepare.

Leek, Stilton & Walnut Stuffed Mushrooms (Serves 1 as a main course or 2 as an appetiser) (V)

Ingredients

2 large Portabello mushrooms (approximately 80g each)
1tbsp olive oil
1 medium to large leek (about 89g prepared weight), washed and thinly sliced
15g butter
30g walnuts, chopped or broken into smallish pieces
50g Stilton cheese, cut into small dice
40g creme fraiche
Sea salt and freshly ground black pepper

Instructions

Pre-heat the oven to 200℃, gas mark 6

Wipe the mushrooms with a damp paper towel and remove the bottom of the stalk with a small sharp knife so it’s level with the gills.

Place the mushrooms stalk side up on a silicon baking mat (or a sheet of non-stick foil) on a baking tray. Brush with olive oil and season with salt and pepper

Cook in the pre-heated oven for about 6 minutes, or until the natural mushroom juices just start to appear on the surface of the mushroom. Take out of the oven and set aside.

In a lidded frying pan, melt the butter over a moderate heat. When it is foaming add the sliced leeks. Give the leeks a good stir to make sure they are evenly coated in the butter, then put the lid on the pan and gently cook the leeks for 5 minutes until they are soft but not coloured.

Take the frying pan off the heat and add the walnuts, the creme fraiche and the Stilton cheese to the leeks. Mix everything together well. Season with a pinch of salt (don’t go overboard as Stilton cheese is already quite salty) and a generous grinding of black pepper. Stir again and re-check the seasoning.

Divide the stuffing equally between the mushrooms (don’t worry about piling it too high, the mixture is quite well-behaved and won’t collapse in the heat of the oven).

Bake the stuffed mushrooms in the oven for a further 10 minutes until they are heated through and turning golden on the surface.

Serve immediately with a simple watercress or rocket salad, perhaps dressed with a little walnut oil and the finest balsamic vinegar you can find.

Yum!


Notes:

Without the walnuts, the creamy leek and mushroom sauce would make a delicious accompaniment to grilled chicken or steak

This recipe easily adapts to feeding more or less people by increasing or reducing the ingredients proportionately.


Carbohydrate 10g Protein 12g - per stuffed mushroom


Perfect Poached Eggs

by Susan Smith in , ,


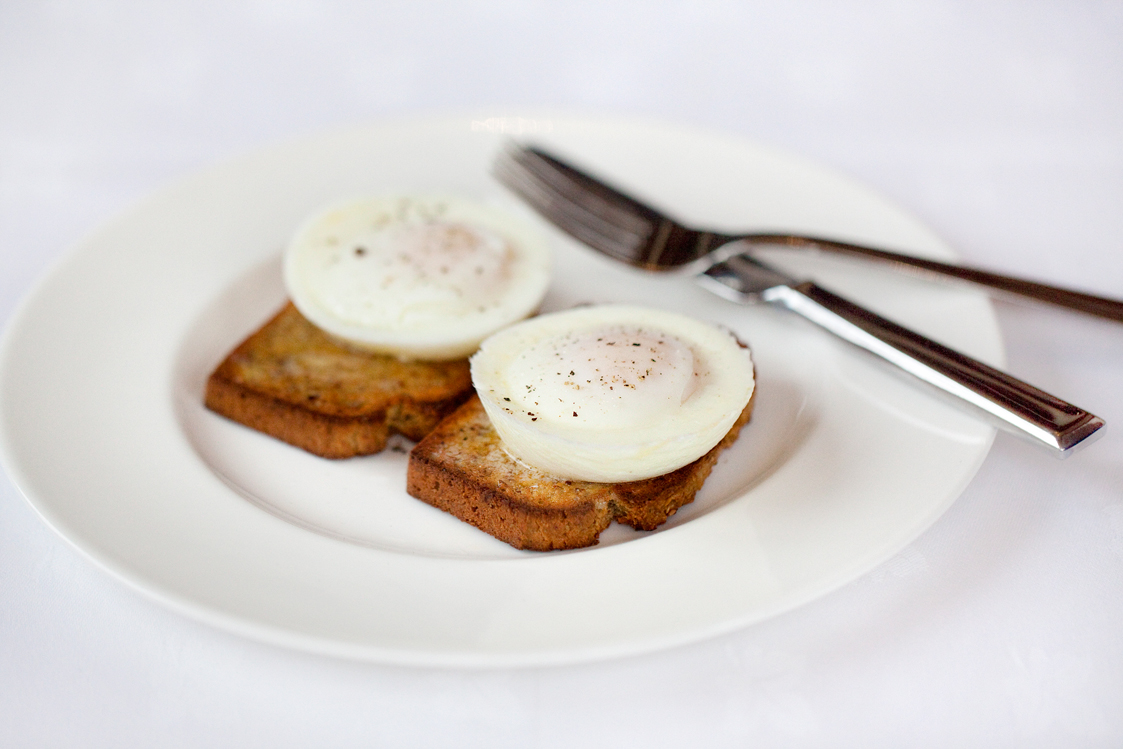
There are days when I hanker after the simple pleasure of a perfectly cooked poached egg - soft in the middle and perfectly formed like a mozzarella ball.

Sometimes I just want to eat it with some generously buttered toast for breakfast. Other times I want it to sit proudly atop poached smoked haddock, root vegetable rösti or some griddled asparagus - it’s runny yolk forming an instant dressing. Or for something even more indulgent, drizzled over with hollandaise sauce à la Eggs Benedict style and served with slices of smoked salmon.

However, producing beautifully cooked poached eggs is tricky and, for all my cooking experience, I can never say with confidence that I am able to manage more than one or two at a time. It doesn’t matter if I use the freshest eggs, add vinegar or swirl the water, if I’m trying to cook more than two I inevitably end up with straggly looking eggs and a very messy pan!

Enter the Poach Pod - a reusable silicon egg poacher that delivers identical, consistent and lightly poached eggs every time. No guesswork, no mess. And even though it doesn’t produce the organic shape of a traditionally poached egg that I like, it is nonetheless a genius solution to the problem of cooking more than two eggs at the same time.

Perfect Poached Eggs (V)

Instructions

Lightly oil the pods before use (I brush mine inside with a little melted butter).

Half fill a lidded pan (I use a large shallow casserole style pan with a glass lid) with boiling water from the kettle to a depth of about 1.5 inches. Note: It wants to come about halfway up the side of the Pod as it floats in the water - if it’s too deep it may go over the side of the Pod, if it’s too shallow the Pod just sits on the bottom of the pan.

Crack a fresh egg into each Pod and carefully lower into the boiling water.

Cook for 4-5 minutes with the lid on (my large eggs took exactly 5 minutes).

When cooked, remove the Pods from the pan. Carefully tip off any excess liquid (condensed steam) if there’s any sitting on top of the eggs. Run a spoon around the edge of the eggs before easing out. I prefer not to invert them (as Poach Pod suggest) because I like to see the egg yolk in contrast to the white.

IMG_3635 copy.jpg

If you still want to try the traditional method of poaching an egg, here are the most significant points to remember:

  • Make sure your eggs are really fresh.
  • Add a small dash of vinegar and some sea salt to a pan of lightly simmering water.
  • Crack the eggs individually into a ramekin or cup.
  • Create a gentle whirlpool in the water to help the egg white wrap around the yolk.
  • Then gently lower the eggs, one at a time into the water, white first.
  • For a soft runny yolk that’s just hardening at the edges cook for about 4 minutes. For a more runny yolk, 3 minutes should suffice.
  • To test when they’re done, lift one out with a slotted spoon onto a plate lined with a paper towel and give a gentle poke with a spoon. If it feels too soft put it back in the water for a minute or two more to firm up.
  • Remove the egg with a slotted spoon and serve immediately with a sprinkling of sea salt and black pepper.

More information on Poach Pods:

You can buy Poach Pods from Waitrose, Ocado and Lakeland. Lakeland also sell a PoachPod Lift to enable you to place in and remove the Pod from the boiling water more easily. Poach Pods can also be used as individual jelly moulds.


Carbohydrate 0g Protein 8g - per large egg


Cream Of Celery Soup

by Susan Smith in , , , ,


Eaten raw, the crunchy, nutty-sweet flavour of fresh celery hearts can brighten up many a salad or, cut lengthways into sticks, offer a refreshing hand-to-mouth snack when loaded up with a creamy dip. 

However, I think celery really comes into it’s own when it’s cooked and transformed into something altogether more stylish, such as silky smooth celery soup. 

This Cream of Celery Soup is intensely savoury and the very thing to keep out the winter chill. Using the outer stems from a large head of Cook’s Celery stripped bare of fibrous stringy bits, this sophisticated soup is the prettiest shade of pale apple green and so unctuous that if you closed your eyes, you could be forgiven for thinking you’re eating a cream of chicken soup rather than vegetables!

I buy whole heads of celery because I prefer to prepare it myself. I use the outer stalks for cooking and the more tender inner stalks for eating raw. Usually, I buy organic celery for flavour but for this recipe I purchased some Limited Selection Cook’s Celery from Waitrose because it looked so fresh and green and, as the packaging said ‘grown for flavour’, there was no reason not to! 

Celery is thought to have a calming effect on the central nervous system and to promote a good night’s sleep, so this soup might be just the right thing for a light supper. It works equally well for lunch, a heart warming snack or as a starter for an elegant dinner party.

Cream Of Celery Soup (4 servings) (V)

Ingredients

1 large leek, cleaned and finely sliced

1 medium onion, finely chopped

600g (6 cups) celery stalks, chopped 

40g (3 tbsp) butter

600 ml (2½ cups) vegetable stock (made with Marigold Organic Bouillon Powder)

200 ml (⅞ cup) whole milk

60 ml (¼ cup) double cream

½ tsp nutmeg

1-2 tsp sea salt and freshly milled black pepper


Instructions

In a large pan melt the butter over a low heat.

To clean the leeks, trim the roots and inedible parts off the leek, then slit it up one side and fan it out under a running cold tap to make sure there's no soil left lurking between the leaves. Cut it in half lengthways, then in half again before slicing it across into thin pieces.

To prepare the celery, cut the top and bottom off the celery sticks, wash off any dirt, then thinly peel off any stringy bits from the outside of the stalks with a potato peeler before chopping into smallish pieces

When you've chopped the celery, onion and leeks, add them to the pan. Stir well, to evenly coat the vegetables with butter, then cover them with a circle of baking parchment or greaseproof paper - make sure the paper reaches the sides of the pan and push it down so it sits directly on top of the vegetables (this helps to keep the steam in, so the vegetables are less likely to brown) Cook very gently for about 15 minutes until the vegetables are translucent and soft. Do not let them brown.

Add the vegetable stock. Bring to simmering point, cover once more and cook gently for a further 10 minutes, or until the vegetables are really tender. Take the pan off the heat and add the milk. 

Puree the soup by blending it in batches, then return to the pan and stir in the cream. Season with salt, pepper and freshly grated nutmeg.

Bring the soup back to the boil. Re-check the seasoning and adjust if necessary.

Just before serving, roughly chop the reserved celery leaves and sprinkle on top of the soup. 


Carbohydrate 16g Protein 4g - per serving


Italian Style White Fish in Tomato Basil ‘Broth’

by Susan Smith in ,


Ever since I started to teach my daughter Sarah to cook a knock ‘em dead tomato sauce for the televised Junior Master Chef finals, I have been searching for tinned tomatoes without citric acid. Tinned tomatoes with citric acid do exactly what they say on the tin. They taste ‘acid’, which means having to add sugar to balance out their flavour, which isn’t ideal.

Sainsbury’s So Organic tinned tomatoes used to be good to go until quite recently when, without warning, the labelling changed showing that they too had succumbed to adding what I consider the unwelcome ‘acidity regulator’ used by most brands.

So, I say hurrah for Mr Organic! Although their tinned tomatoes cost a little more, they have no additives and are much the better for it. I buy mine in bulk from Ocado and have them delivered to my door.  

This dish can be prepared, cooked and on the table within half an hour. 

Italian Style White Fish in Tomato Basil ‘Broth’ (Serves 2)

Ingredients

2 x 225g (2 x ½ pound) sustainably sourced white fish fillets, skinned and boned - e.g. haddock, hake, cod 

125g (4½ oz - drained weight) buffalo mozzarella, thinly sliced 

1 small onion, finely chopped

1 tbsp olive oil

400g (⅔ cup) tinned organic whole plum tomatoes

10g (2 tbsp) fresh basil leaves, finely shredded

Sea salt and freshly ground black pepper, to taste

1-2 drops liquid Stevia* - optional

Sprigs of whole leaf basil, to serve


Instructions

If not already done by your fishmonger, remove the skin and bones from the fish fillets (I prefer tail-end fillets because they don’t have any bones to remove!) then season each piece of fish generously with a pinch of salt and a good grinding of black pepper.

Heat the olive oil in a large lidded oven-proof frying pan over a medium heat. Add the finely chopped onion to the pan and give it a quick stir to distribute the olive oil evenly, then cover the pan and cook for 8 minutes over a low heat until the onions are soft but not coloured.

Add the tinned tomatoes to the pan, roughly breaking them up with a wooden spoon into a sauce-like consistency. Season with salt and pepper. Taste, then add a drop or two of liquid Stevia if you think it tastes too tart. Finally, add the shredded basil, stir well, then put the lid back on the pan and simmer over a low heat for 10 minutes. 

Re-check the seasoning of the sauce at the end of this cooking time and adjust as necessary. 

Take the pan off the heat, remove the pan lid and lay the fish fillets skinned side down, on top of the tomato sauce. Note: If you’re using fish tail fillets tuck the ends under so that the pieces are of uniform thickness for cooking. Cover with the pan lid.

Put the fish and tomato sauce back on a low heat and simmer gently for 6 minutes.

Meanwhile, heat your oven grill to high.

After the 6 minutes, take the pan off the heat and lay the mozzarella slices over the top of each fillet of fish to cover. 

Place the pan under the grill for 2-3 minutes until the the mozzarella is meltingly soft.

Using a couple of fish slices, carefully place the fish fillets in the middle of 2 warmed plates, spooning the tomato broth all around. Top each with a sprig of basil and serve.  


Carbohydrate 15g Protein 51g - per portion


*Although I generally favour natural unprocessed sweeteners such as raw organic honey, maple syrup and raw coconut palm sugar for baking, pure liquid stevia is a useful zero carb / zero calorie sweetener for sauces, tea and green smoothies. I buy mine from here. It may seem expensive, but because you’re only using a drop or two at a time, one bottle lasts for ages. 


Luxury Fish Pie

by Susan Smith in , ,


I think a good fish pie is one of the greatest comfort foods there is.

Our no potato, no pastry, no grain Luxury Fish Pie is an adaptation of Jamie Oliver’s recipe and it’s what we’ll be having for a late lunch or early supper this weekend, perhaps with a glass of cold Riesling.

This recipe features celeriac mash instead of mashed potato and crème fraîche instead of bechamel sauce and is all the better for it. In fact, because celeriac mash is slightly softer than potato it is easier to spread on top of the pie. A finishing touch of grated parmesan crisps it up nicely. What’s not to love?

Simple to make (the quickest way to grate the vegetables and cheese is with the grater attachment on a food processor), it can be prepared in advance and cooked in a pre-heated oven half an hour or so before you want to sit down and eat.

All you need as an accompaniment are some cooked peas (frozen are fine) and/or a green salad. It really is luxurious enough for special occasions too. This is a perfect make-ahead recipe for relaxed entertaining.

Luxury Fish Pie (Serves 6)

Ingredients

250g (9 oz) salmon fillets (skinless weight)

250g (9 oz) undyed smoked haddock fillet (skinned, bones removed)

250g (9 oz) white fish fillets - e.g hake, haddock or cod (skinned, bones removed)

200g (1 ⅓ cup) raw peeled king prawns

2 medium to large carrots, coarsely grated

2 outer sticks of celery, coarsely grated

1 tbsp olive oil 

15g (2 tbsp) fresh parsley, finely chopped

150g (1 ½ cup) good quality strong cheddar cheese, coarsley grated

Lemon, juice of ½ and grated zest of whole, finely grated

225g (⅞ cup) full-fat crème fraîche

1.4 kg celeriac (3 lb) - unpeeled weight

50g (4 tbsp) butter

Sea salt and freshly ground black pepper

25g (¼ cup) ready-grated parmesan cheese


Instructions

Pre-heat the oven to 200℃ Gas Mark 6.

First prepare the celeriac for the fish pie topping. Boil a kettle of water. Peel and chop the celeriac into 1 inch pieces. Place the cubes of celeriac in the top of a large steamer, pour boiling water from the kettle into the base pan of the steamer, cover with the pan lid and steam the celeriac for 15 minutes or until it is completely soft and cooked through (stick a sharp pointed knife in to check).

Whilst the celeriac is cooking, heat the olive oil in a large non-stick lidded pan over a medium heat. Add the grated carrot and celery to the pan and cook with the pan lid on for 5 minutes until softened but not coloured. Remove from the heat and stir in the chopped parsley.

Take off the celeriac off the heat and drain the water from the bottom of the steamer into a jug - this makes a really good vegetable stock for later use. Tip the cooked celeriac into the now empty base pan of the steamer and place back on a medium heat for a couple of minutes to drive off any excess moisture. Shake the pan from time to time or stir the celeriac with a wooden spoon to prevent it from sticking to the bottom of the pan. Do not allow it to colour.

When the water from around the celeriac has evaporated, tip the celeriac into a food processor with the butter and process it to a smooth puree. Season generously with salt and pepper. If you don’t have a food processor a hand-held stick blender will do nicely, as will a bog-standard potato masher if you’re feeling energetic! Re-check the seasoning and then set to one side whilst you assemble the pie.

Cut the fish into bite size chunks and season all but the smoked haddock with salt and pepper.

In an oven-to-table ceramic dish (mine is 12” x  9” x  2”) layer up the fish pie ingredients in the following order making sure that everything is evenly distributed: 

  1. Grated vegetable & parsley mix
  2. Fish chunks and prawns
  3. Lemon zest and juice
  4. Grated cheese
  5. Spoonfuls of crème fraîche dotted over
  6. Celeriac mash, spread evenly over the top of the fish pie, then roughed-up with a fork
  7. Ready-grated parmesan, sprinkled evenly on top of the celeriac mash
fish.jpg

Place in the pre-heated oven for 20 minutes. 

At the end of this cooking time, switch the oven grill to high and cook for a further 5 minutes under direct heat for a golden, crispy topping


Carbohydrate 9g Protein 42g - per serving


Nut & Seed Granola à la Paleo Trail-Mix

by Susan Smith in , ,


The headlines in yesterday’s papers caught my eye. A lack of exercise could be killing over 600,000 people a year in Europe and, according to the 12 year study by Cambridge University researchers, inactivity is proven to be twice as deadly as obesity! Furthermore, inactive thin people have a higher risk of health problems,  which suggests to me that obese people who exercise are in a better state of health than thin people who do not!

Don’t panic! You simply need to put on a pair of walking shoes and go for a walk! Walking became an integral part of my ‘get well soon’ strategy just over a year ago, which was when I first discovered Mark Sisson’s Primal Blueprint.

I believe that it’s the little things done often that can have the most impact on your life. Last year, walking at a moderate pace for 30-40 minutes five times a week on average, I clocked up 626 miles (1000 kilometres), which is the equivalent of walking from Penzance to Dundee! And I burned 39,500 calories in the process! How fabulous is that for minimal effort? Fat or thin, regular walking at a moderate pace (not the same as a gentle stroll!) is the easiest way to keep yourself fit.

Anyway, my husband is already ahead of the game. Even before this latest scientific revelation from Cambridge University, he had upped the anti for my exercise regime to 800 miles in 2015. Sounds good to me.

Probably one of the most frequent questions I’m asked about my diet is “What do you have for breakfast?” I assume what they mean is that most people choose cereal or toast, if only for convenience. If this is true for you, the recipe today is a breakfast ‘cereal’ without the cereal. Namely, a Paleo version of granola that is made entirely from nuts, seeds, raw honey and coconut oil.

I like mine for breakfast with raw milk, which I buy from Gazegill Organics. But it’s also great to eat by the handful when you’re on the move. Pack some into a ziplock bag when you’re going to be out and about and you don’t know where your next meal’s coming from. It is a satisfyingly crunchy, sweet and healthy snack, which eaten on its own boasts a mere 14 grams of carbohydrate per adult serving.

You can use any combination of nuts and seeds you like but we find this recipe particularly pleasing…

Nut & Seed Granola à la Paleo Trail-Mix (18 servings) (V)

Ingredients

55g Brazil nuts, chopped into rough pieces
75g raw whole almonds
100g flaked almonds
110g cashew nuts
150g raw pistachio nuts
75g pecan nuts
70g walnuts
70g macadamia nuts
50g hazelnuts
30g chia seeds
70g sunflower seeds
70g pumpkin seeds
75g flaked coconut

25g coconut oil
50g organic honey


Instructions

Pre-heat the oven to 140℃ Gas Mark 1.

Line two large baking trays with a silicon baking mat or non-stick baking parchment.

Weigh out all the dry ingredients into a large mixing bowl - you should have a total weight of 1 kg of nuts and seeds.

Melt the coconut oil and honey in a small saucepan over a low heat until just liquid.

Pour the liquid coconut oil and honey over the nuts and seeds and mix together well with a large spatula.

Spread the nuts and seeds out evenly between the two baking trays - they should be in a single layer.

Bake in the oven for 15 minutes. Take both trays out of the oven and, using a couple of flat wide spatulas turn the nuts and seeds over and around to ensure even cooking.

Return to the oven for another 15 minutes. Repeat the above process, making sure the more golden coloured nuts are moved to the centre of the tray and the less so to the outer edge.

Return to the oven for a final 15 minutes cooking time. Take out of the oven (total cooking time 45 minutes) and allow the mixture to cool on the trays.

When the granola is cooled, break up any big clumps into smaller pieces with your hands.

Store in an airtight container.


Carbohydrate 14g Protein 10g - per serving


Creamy Mushrooms on Toast

by Susan Smith in , ,


Naturally low in calories, fat-free and packed with important nutrients (a mushroom has almost as much potassium as a small banana) Ancient Egyptians believed mushrooms were the ‘plant of immortality’. They are certainly hearty and filling, so eating mushrooms on our grain-free toast for breakfast is a double-whammy of goodness that can easily keep you going until lunch time and beyond.

The creamy mushroom tarragon sauce also works well with roast chicken. Alternatively, cook a selection of fresh vegetables (such as baby carrots, baby turnips, baby cauliflowers, broccoli florets, baby courgettes, sugar snaps peas or mange-tout) until they’re just tender and serve with the mushroom sauce for a light and healthy supper.

I think the very best crème fraîche for cooking is Rodda’s Cornish Crème Fraîche because it doesn't curdle at high temperatures. This makes Rodda’s Cornish Crème Fraîche a fantastically versatile ingredient for enriching sauces and soups. But that’s by no means all. It’s deliciously creamy texture and slightly tangy flavour eaten straight from the pot makes a very luxurious accompaniment for fresh fruit as well as our Spiced Fruit Pancakes with Orange & Apricot Syrup.

Creamy Mushrooms on Toast (Serves 4) (V)

Ingredients

680g fresh mixed mushrooms, e.g. button, chestnut, crimini and portabello

15g (1 tbsp) organic butter - plus extra for buttered toast

1 tbsp olive oil

200g (⅞ cup) full-fat crème fraîche

Large handful of fresh tarragon, finely chopped

Sea salt and freshly ground pepper

1-2 day old Grain-Free Bread, cut into 8 slices (about 1 cm thick)


Instructions

Clean and slice the mushrooms. 

In a large non-stick frying pan melt the butter with the olive oil until foaming. 

Fry the mushrooms on a medium-high heat until soft and the juices have begun to run. Turn down the heat and cook a few moments more until the mushrooms are cooked through.

Take the pan off the heat and stir in the crème fraîche. Return to the heat and simmer gently until thickened and the sauce has reduced.

Add the seasoning and most of the chopped tarragon. Keep warm over a low heat whilst you make the toast. 

Slice the bread and toast on both sides. Butter one side only and place two pieces of toast on four warmed plates.

Gently reheat the sauce through, spoon onto the toast and sprinkle with the remaining tarragon. Serve immediately.


Carbohydrate 20g Protein 16g - per serving


Creamy Mushroom Sauce, without toast 

Carbohydrate 7g Protein 6g - per serving


Tangy Mushroom Crostini

by Susan Smith in , , ,


One of my best childhood memories was foraging for mushrooms with my Dad. Both field mushrooms and my father’s favourite, field blewitts, with their blue-lilac stems that we often found clumped together in ‘fairy rings’, used to be quite common in the pastureland and meadows of yesteryear. However, for me, nothing quite beat the excitement of finding pure white domes of edible goodness peaking out from under dew-laden grass, even if it meant the occasional slug finding it’s way inside my shoe! We even called our family cat “Gilly” because his fur was an unusual pinkish brown - almost the exact colour of the gills of a young mushroom.

 Chemical spraying and loss of habitat has all but destroyed the opportunity to discover, cook and enjoy the more flavourful wild mushrooms and most people now rely on cultivated mushrooms found on supermarket shelves instead. I suppose there is some compensation for the less than mushroomy flavour of cultivated mushrooms insofar that, alongside the more common white or chestnut varieties, more exotic looking fungi, Oyster, Shitake, Enoki, Crimini, Portabello and Beech Mushrooms, are all readily available too.

To add more flavour to sauces and soups, you can reconstitute dried mushrooms by soaking or simmering them in water before adding them to your chosen dish. For Vegetarians, the umami deliciousness of mushrooms can help fill the savoury flavour gap of vegetables and other non-animal based foods. Mushrooms are also officially recognised as a Superfood. Hence I reasoned that the next two Primal Plate recipes should both be for mushrooms on toast!

To prepare, don’t peel or soak mushrooms. If you soak mushrooms they absorb the water like a sponge and will then turn mushy when cooked. A quick light rinse under the tap is okay but ideally, if they’re not too grubby, simply cut off the bottoms of the stems and wipe them clean with a damp paper towel. Many herbs work well with earthy flavour of mushrooms but I particularly like the grassy accent of anise (tarragon) and parsley.

Tangy Mushroom Crostini is first up. This is an elegant interpretation of mushrooms on toast, suitable for entertaining. Coming soon... Creamy Mushrooms on Toast is more down-to-earth and makes for a relaxed breakfast, light lunch or filling snack at anytime.

Tangy Mushroom Crostini (Makes 8) (V)

Ingredients

1-2 day old refrigerated Grain-Free Bread, cut into 8 thin slices (no more than ½ cm thick)

4 tbsp olive oil

15g (1 tbsp) organic butter

225g (2 cups) mushrooms, wiped. I used a selection of chopped chestnut mushrooms and exotic mushrooms, either chopped or hand-teared into individual fronds.

1 tbsp brandy

1 generous tsp Dijon mustard

160ml (⅔ cups) crème fraiche

Sea salt and freshly ground black pepper

Handful of flat leaf parsley, finely chopped


Instructions

Pre-heat oven to 200℃ Gas Mark 6

Brush the bread slices on both sides with 2 tablespoons of olive oil. Put the slices of on a baking sheet - actually, I prefer to use the wire rack of my oven grill to get lovely looking professional griddle stripes!

Bake for 12-15 minutes until golden brown. Allow to cool.

Heat the remaining oil together with the butter in a large non-stick frying pan.

Cook the mushrooms for 4 minutes over a high heat until golden.

Add brandy and cook for a few seconds more. Remove from the heat.

Mix the mustard and crème fraiche together and stir into the mushrooms. Season well with salt and pepper.

Spoon the mushrooms onto the crostini and sprinkle with parsley


Carbohydrate 5g Protein 3g - per crostini