Mellanzane Parmigiana

by Susan Smith in , ,


The recent weather’s cold snap, which in our Edwardian property has to be endured even when the central heating is on 24/7, got me fantasising about a different kind of a life lived in the Mediterranean - specifically Italy. 

I’ve had several Italian friends (still do!) and am drawn by their unbridled warmth and generosity. They are my sort of people; the sort who love to relax, celebrate and socialise with family and friends. My understanding is that these celebrations most often centre around the table and an abundance of traditional Italian food. 

Since a trip to Naples is not do-able, today’s recipe injects a bit of that Italian sentiment and sunshine into an otherwise bleak January day (though it works just as well eaten ‘al fresco’ on a balmy summer’s evening).

A layered bake of aubergines, tomatoes and cheese is something of an Italian classic. My version has more than it’s fair share of cheese - I have used Cheddar as well as  the more usual mozzarella and Parmesan. The texture and richness make for a glorious vegetarian bake that will keep you warm from the inside out.

There was a time when bringing this dish together seemed somewhat onerous. So many processes…slicing and salting the aubergines, rinsing and drying them before pan-frying in batches in copious amounts of olive oil, making the tomato sauce, grating the cheese - all of which was required before assembling the final dish. It seemed like an awful lot of ‘faff’.

Anyway, necessity being the mother of invention I was forced to streamline the prep to something more manageable. In fact, because everything can be prepared in advance, this delicious bake is ideal for entertaining. 

We think if there was ever a meal that’s able to build a bridge between committed carnivores and ardent vegetarians, this gorgeous bubbling aubergine bake is definitely it.

Mellanzane Parmigiana (V) (Serves 4)

Ingredients

4 medium aubergines

80ml (3fl oz) olive oil

1 large onion, peeled and finely chopped

2 x 400g (2 x14oz) good quality tinned whole plum tomatoes (I favour Mr Organic)

200g (7oz) strong Cheddar cheese, coarsely grated (I used Davidstow's vintage Cheddar cheese from Waitrose)

60g (2oz) Parmesan Reggiano, freshly grated

150g (5oz) buffalo mozzarella, sliced

Sea salt

Freshly ground black pepper

Large handful of fresh basil leaves, roughly chopped

2-3 drops liquid stevia (optional)


Instructions

Trim the aubergines and cut across into 1cm thick slices. Layer them up in a colander sprinkling each layer with salt as you go. Put a plate underneath the colander (to catch the juices) and another plate on top, weighted down with something heavy (I use a kettle filled with water) Set aside to drain for 30 minutes.

Meanwhile, put two tablespoons of olive oil into a medium pan on a medium heat. Add the onion and cook for 10 minutes until it is soft but not coloured. 

Add the tinned tomatoes, breaking them up with a flat edged spatula into chunky pieces. Season with salt and pepper, give the mixture a good stir and bring to the boil. Cover and simmer over a gentle heat for 20 minutes.

Pre-heat the oven to 220℃ / 425℉ / Gas mark 7. Line two large baking trays with silicon baking mats or non-stick foil.

Wash the aubergine well under a running cold tap, then drain and dry on a clean tea towel.

Brush the aubergine slices on both sides with the remaining olive oil (I find it easiest to lay them all out on the two trays before oiling, I then brush oil over the uppermost side first before turning them over and doing the other side).

Roast the aubergine slices in the oven for 15 minutes, then turn them over and cook for another 10-15 minutes or until they’re nicely browned on both sides.

Meanwhile, reheat the tomato sauce, adjusting the seasoning if necessary. Add 2 or 3 drops of liquid stevia if it tastes too tart, then add the chopped basil.

When the aubergines are ready, take them out of the oven and turn onto a plate.

Switch the oven temperature down to 195℃. 

Get yourself an oven-to-table lasagne type dish (mine is 30cm x 24cm x 5½cm).

Spoon a little of the tomato sauce in the bottom of the dish, top with a layer of aubergines, some of the sliced mozzarella torn into smallish pieces and some of the Cheddar cheese. 

Continue with the layers until you’ve used up all the ingredients, finishing with the Cheddar. Sprinkle over the Parmesan cheese and bake for 30 minutes until crispy, bubbling and golden.

Serve with a crisp salad.


Carbohydrate 11g Protein 30g - per serving


Grilled Goats Cheese & Beetroot Salad

by Susan Smith in , , , ,


My first awakening to Chèvre Blanc goat’s cheeses’ melting, bubbly, golden goodness dates back to the early 1990’s, when we discovered a brilliant bustling French brasserie in Covent Garden called Le Palais Du Jardin (now closed). At the time, they served a salad of this fresh-tasting meltingly soft cheese with slices of poached pear and a balsamic dressing. 

The lively tang of goat's cheese served hot from the grill works equally well here with the earthy sweetness of beetroot, the peppery freshness of rocket (or watercress) and the piquancy of a simple vinaigrette. The whole dish coming together to great effect with the addition of some freshly chopped chives. I really like the contrast between the warm richness of cheese and cool vegetables.

The pink beetroot makes this salad as pretty as it is inviting. Since the 90’s, toasted goat’s cheese has become an enduring favourite for both vegetarians and non-vegetarians alike. We had it today for a light lunch, but I also like to serve it as a starter to impress hungry dinner guests, which it always does! 

Grilled Goats Cheese & Beetroot Salad (V) (Serves 4)

Ingredients - For the salad

4 x 100g (3½ oz) Chèvre Blanc goat’s cheese (I like Waitrose’s Mild Chèvre Blanc)  

250g (9oz) ready-cooked organic beetroot, without vinegar

70g (2½oz) bag of rocket, washed and picked over


Ingredients - For the vinaigrette dressing

120ml (4½ fl oz) olive oil (I used half organic cold pressed olive oil and half organic cold pressed avocado oil)

40ml (1 ½ fl oz) organic raw apple cider vinegar

1 tsp sea salt

Freshly ground black pepper

1 tsp Dijon mustard

1 tsp clear ‘runny’ raw organic honey, or maple syrup

1 tbsp fresh chives, chopped  


Instructions

Pre-heat the grill to high. 

First make the vinaigrette dressing. Mix the vinegar, sea salt, pepper, honey and mustard together in a medium sized bowl and give it a good whisk. Add the oil a small dash at a time, whisking well between each addition. Continue adding the oil until it is all amalgamated into vinaigrette. Check and adjust the seasoning if necessary (if it tastes a little tart, a single drop of liquid Stevia will help compensate). Alternatively, make my Fast & Easy Vinaigrette and shake in a lidded container.

Set aside 6 tablespoons of the vinaigrette dressing until you’re ready to serve the salad.

Thinly slice the beetroot (a mandoline slicer gives the quickest and neatest result).

Lay the beetroot slices so they overlap each other to form a circle in the centre of four plates. Drizzle a teaspoon of vinaigrette over each beetroot circle - keeping the plate clean. 

Line a baking tray or your wire grill rack with some non-stick foil. Place the goats' cheese rounds onto a baking sheet and place under the grill (about 3-4 inches from the heat) for 4-5 minutes, or until the cheese has melted and turning golden brown.

Whilst the goat’s cheese is grilling, lightly dress the rocket leaves in a tablespoon of vinaigrette in a medium bowl. Divide the dressed salad leaves between the four plates piling it up neatly on top of the beetroot.

When the cheese is ready, place one in the middle of each plate on top of the dressed leaves.

Add the chives to the remainder of the dressing and drizzle around the outside of each plate.


Notes:

For this recipe, you require slices of Chèvre Blanc goat’s cheese about 2.5 - 3cm thickness, rind-on, cut from a log. 

Keep the goat’s cheese rounds refrigerated in their original wrapping until you’re ready to grill them. You do not want them to disintegrate into a messy ‘pool’ before they’ve had chance to brown!

I’ve used the classic 3 parts oil to 1 part vinegar for this vinaigrette but you can adjust amounts according to your taste. If the finished vinaigrette tastes too tart, try adding more oil (or a drop of liquid Stevia); if it tastes too greasy, add a little more vinegar (or lemon juice). As an alternative to hand-whisked french dressing, make a vinaigrette by putting all the ingredients into a lidded jar and then shake the whole lot vigorously together until they’re combined, adding the chives afterwards. See my recipe for Fast & Easy Vinaigrette.

Store the unused vinaigrette in a lidded container for future use. It will happily keep at room temperature for several days without spoiling, although it will eventually separate - in this case, just re-whisk or give it a good shake before using.


Carbohydrate 7g Protein 21g - per serving


Leek, Stilton & Walnut Stuffed Mushrooms

by Susan Smith in , , , ,


There is something so British about leeks in winter. I love their green sweet oniony softness, juxtaposed against the salty tang of blue Stilton cheese and the savoury earthiness of mushrooms. This is a happily vegetarian dish that’s as deeply umami flavoured as a beef steak and as warm and soothing as my Celtic sheepskin house boots!

It’s also a doddle to prepare.

Leek, Stilton & Walnut Stuffed Mushrooms (Serves 1 as a main course or 2 as an appetiser) (V)

Ingredients

2 large Portabello mushrooms (approximately 80g each)
1tbsp olive oil
1 medium to large leek (about 89g prepared weight), washed and thinly sliced
15g butter
30g walnuts, chopped or broken into smallish pieces
50g Stilton cheese, cut into small dice
40g creme fraiche
Sea salt and freshly ground black pepper

Instructions

Pre-heat the oven to 200℃, gas mark 6

Wipe the mushrooms with a damp paper towel and remove the bottom of the stalk with a small sharp knife so it’s level with the gills.

Place the mushrooms stalk side up on a silicon baking mat (or a sheet of non-stick foil) on a baking tray. Brush with olive oil and season with salt and pepper

Cook in the pre-heated oven for about 6 minutes, or until the natural mushroom juices just start to appear on the surface of the mushroom. Take out of the oven and set aside.

In a lidded frying pan, melt the butter over a moderate heat. When it is foaming add the sliced leeks. Give the leeks a good stir to make sure they are evenly coated in the butter, then put the lid on the pan and gently cook the leeks for 5 minutes until they are soft but not coloured.

Take the frying pan off the heat and add the walnuts, the creme fraiche and the Stilton cheese to the leeks. Mix everything together well. Season with a pinch of salt (don’t go overboard as Stilton cheese is already quite salty) and a generous grinding of black pepper. Stir again and re-check the seasoning.

Divide the stuffing equally between the mushrooms (don’t worry about piling it too high, the mixture is quite well-behaved and won’t collapse in the heat of the oven).

Bake the stuffed mushrooms in the oven for a further 10 minutes until they are heated through and turning golden on the surface.

Serve immediately with a simple watercress or rocket salad, perhaps dressed with a little walnut oil and the finest balsamic vinegar you can find.

Yum!


Notes:

Without the walnuts, the creamy leek and mushroom sauce would make a delicious accompaniment to grilled chicken or steak

This recipe easily adapts to feeding more or less people by increasing or reducing the ingredients proportionately.


Carbohydrate 10g Protein 12g - per stuffed mushroom


Perfect Poached Eggs

by Susan Smith in , ,


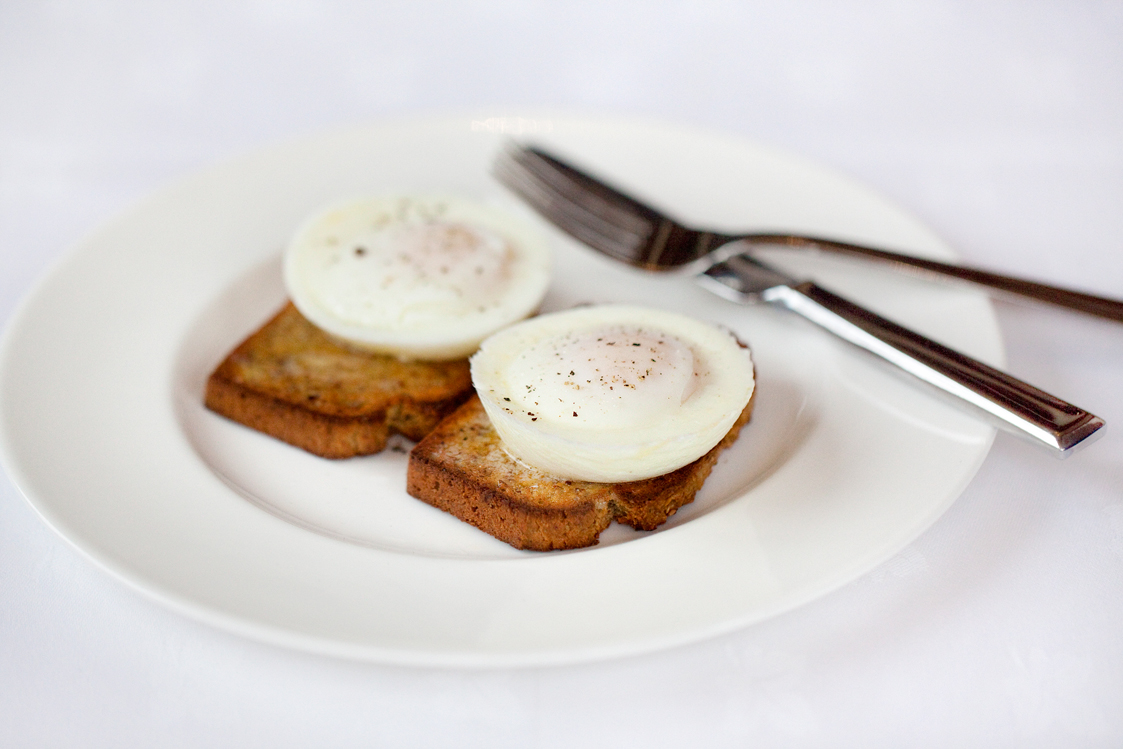
There are days when I hanker after the simple pleasure of a perfectly cooked poached egg - soft in the middle and perfectly formed like a mozzarella ball.

Sometimes I just want to eat it with some generously buttered toast for breakfast. Other times I want it to sit proudly atop poached smoked haddock, root vegetable rösti or some griddled asparagus - it’s runny yolk forming an instant dressing. Or for something even more indulgent, drizzled over with hollandaise sauce à la Eggs Benedict style and served with slices of smoked salmon.

However, producing beautifully cooked poached eggs is tricky and, for all my cooking experience, I can never say with confidence that I am able to manage more than one or two at a time. It doesn’t matter if I use the freshest eggs, add vinegar or swirl the water, if I’m trying to cook more than two I inevitably end up with straggly looking eggs and a very messy pan!

Enter the Poach Pod - a reusable silicon egg poacher that delivers identical, consistent and lightly poached eggs every time. No guesswork, no mess. And even though it doesn’t produce the organic shape of a traditionally poached egg that I like, it is nonetheless a genius solution to the problem of cooking more than two eggs at the same time.

Perfect Poached Eggs (V)

Instructions

Lightly oil the pods before use (I brush mine inside with a little melted butter).

Half fill a lidded pan (I use a large shallow casserole style pan with a glass lid) with boiling water from the kettle to a depth of about 1.5 inches. Note: It wants to come about halfway up the side of the Pod as it floats in the water - if it’s too deep it may go over the side of the Pod, if it’s too shallow the Pod just sits on the bottom of the pan.

Crack a fresh egg into each Pod and carefully lower into the boiling water.

Cook for 4-5 minutes with the lid on (my large eggs took exactly 5 minutes).

When cooked, remove the Pods from the pan. Carefully tip off any excess liquid (condensed steam) if there’s any sitting on top of the eggs. Run a spoon around the edge of the eggs before easing out. I prefer not to invert them (as Poach Pod suggest) because I like to see the egg yolk in contrast to the white.

IMG_3635 copy.jpg

If you still want to try the traditional method of poaching an egg, here are the most significant points to remember:

  • Make sure your eggs are really fresh.
  • Add a small dash of vinegar and some sea salt to a pan of lightly simmering water.
  • Crack the eggs individually into a ramekin or cup.
  • Create a gentle whirlpool in the water to help the egg white wrap around the yolk.
  • Then gently lower the eggs, one at a time into the water, white first.
  • For a soft runny yolk that’s just hardening at the edges cook for about 4 minutes. For a more runny yolk, 3 minutes should suffice.
  • To test when they’re done, lift one out with a slotted spoon onto a plate lined with a paper towel and give a gentle poke with a spoon. If it feels too soft put it back in the water for a minute or two more to firm up.
  • Remove the egg with a slotted spoon and serve immediately with a sprinkling of sea salt and black pepper.

More information on Poach Pods:

You can buy Poach Pods from Waitrose, Ocado and Lakeland. Lakeland also sell a PoachPod Lift to enable you to place in and remove the Pod from the boiling water more easily. Poach Pods can also be used as individual jelly moulds.


Carbohydrate 0g Protein 8g - per large egg


Cream Of Celery Soup

by Susan Smith in , , , ,


Eaten raw, the crunchy, nutty-sweet flavour of fresh celery hearts can brighten up many a salad or, cut lengthways into sticks, offer a refreshing hand-to-mouth snack when loaded up with a creamy dip. 

However, I think celery really comes into it’s own when it’s cooked and transformed into something altogether more stylish, such as silky smooth celery soup. 

This Cream of Celery Soup is intensely savoury and the very thing to keep out the winter chill. Using the outer stems from a large head of Cook’s Celery stripped bare of fibrous stringy bits, this sophisticated soup is the prettiest shade of pale apple green and so unctuous that if you closed your eyes, you could be forgiven for thinking you’re eating a cream of chicken soup rather than vegetables!

I buy whole heads of celery because I prefer to prepare it myself. I use the outer stalks for cooking and the more tender inner stalks for eating raw. Usually, I buy organic celery for flavour but for this recipe I purchased some Limited Selection Cook’s Celery from Waitrose because it looked so fresh and green and, as the packaging said ‘grown for flavour’, there was no reason not to! 

Celery is thought to have a calming effect on the central nervous system and to promote a good night’s sleep, so this soup might be just the right thing for a light supper. It works equally well for lunch, a heart warming snack or as a starter for an elegant dinner party.

Cream Of Celery Soup (4 servings) (V)

Ingredients

1 large leek, cleaned and finely sliced

1 medium onion, finely chopped

600g (6 cups) celery stalks, chopped 

40g (3 tbsp) butter

600 ml (2½ cups) vegetable stock (made with Marigold Organic Bouillon Powder)

200 ml (⅞ cup) whole milk

60 ml (¼ cup) double cream

½ tsp nutmeg

1-2 tsp sea salt and freshly milled black pepper


Instructions

In a large pan melt the butter over a low heat.

To clean the leeks, trim the roots and inedible parts off the leek, then slit it up one side and fan it out under a running cold tap to make sure there's no soil left lurking between the leaves. Cut it in half lengthways, then in half again before slicing it across into thin pieces.

To prepare the celery, cut the top and bottom off the celery sticks, wash off any dirt, then thinly peel off any stringy bits from the outside of the stalks with a potato peeler before chopping into smallish pieces

When you've chopped the celery, onion and leeks, add them to the pan. Stir well, to evenly coat the vegetables with butter, then cover them with a circle of baking parchment or greaseproof paper - make sure the paper reaches the sides of the pan and push it down so it sits directly on top of the vegetables (this helps to keep the steam in, so the vegetables are less likely to brown) Cook very gently for about 15 minutes until the vegetables are translucent and soft. Do not let them brown.

Add the vegetable stock. Bring to simmering point, cover once more and cook gently for a further 10 minutes, or until the vegetables are really tender. Take the pan off the heat and add the milk. 

Puree the soup by blending it in batches, then return to the pan and stir in the cream. Season with salt, pepper and freshly grated nutmeg.

Bring the soup back to the boil. Re-check the seasoning and adjust if necessary.

Just before serving, roughly chop the reserved celery leaves and sprinkle on top of the soup. 


Carbohydrate 16g Protein 4g - per serving


Creamy Mushrooms on Toast

by Susan Smith in , ,


Naturally low in calories, fat-free and packed with important nutrients (a mushroom has almost as much potassium as a small banana) Ancient Egyptians believed mushrooms were the ‘plant of immortality’. They are certainly hearty and filling, so eating mushrooms on our grain-free toast for breakfast is a double-whammy of goodness that can easily keep you going until lunch time and beyond.

The creamy mushroom tarragon sauce also works well with roast chicken. Alternatively, cook a selection of fresh vegetables (such as baby carrots, baby turnips, baby cauliflowers, broccoli florets, baby courgettes, sugar snaps peas or mange-tout) until they’re just tender and serve with the mushroom sauce for a light and healthy supper.

I think the very best crème fraîche for cooking is Rodda’s Cornish Crème Fraîche because it doesn't curdle at high temperatures. This makes Rodda’s Cornish Crème Fraîche a fantastically versatile ingredient for enriching sauces and soups. But that’s by no means all. It’s deliciously creamy texture and slightly tangy flavour eaten straight from the pot makes a very luxurious accompaniment for fresh fruit as well as our Spiced Fruit Pancakes with Orange & Apricot Syrup.

Creamy Mushrooms on Toast (Serves 4) (V)

Ingredients

680g fresh mixed mushrooms, e.g. button, chestnut, crimini and portabello

15g (1 tbsp) organic butter - plus extra for buttered toast

1 tbsp olive oil

200g (⅞ cup) full-fat crème fraîche

Large handful of fresh tarragon, finely chopped

Sea salt and freshly ground pepper

1-2 day old Grain-Free Bread, cut into 8 slices (about 1 cm thick)


Instructions

Clean and slice the mushrooms. 

In a large non-stick frying pan melt the butter with the olive oil until foaming. 

Fry the mushrooms on a medium-high heat until soft and the juices have begun to run. Turn down the heat and cook a few moments more until the mushrooms are cooked through.

Take the pan off the heat and stir in the crème fraîche. Return to the heat and simmer gently until thickened and the sauce has reduced.

Add the seasoning and most of the chopped tarragon. Keep warm over a low heat whilst you make the toast. 

Slice the bread and toast on both sides. Butter one side only and place two pieces of toast on four warmed plates.

Gently reheat the sauce through, spoon onto the toast and sprinkle with the remaining tarragon. Serve immediately.


Carbohydrate 20g Protein 16g - per serving


Creamy Mushroom Sauce, without toast 

Carbohydrate 7g Protein 6g - per serving


Tangy Mushroom Crostini

by Susan Smith in , , ,


One of my best childhood memories was foraging for mushrooms with my Dad. Both field mushrooms and my father’s favourite, field blewitts, with their blue-lilac stems that we often found clumped together in ‘fairy rings’, used to be quite common in the pastureland and meadows of yesteryear. However, for me, nothing quite beat the excitement of finding pure white domes of edible goodness peaking out from under dew-laden grass, even if it meant the occasional slug finding it’s way inside my shoe! We even called our family cat “Gilly” because his fur was an unusual pinkish brown - almost the exact colour of the gills of a young mushroom.

 Chemical spraying and loss of habitat has all but destroyed the opportunity to discover, cook and enjoy the more flavourful wild mushrooms and most people now rely on cultivated mushrooms found on supermarket shelves instead. I suppose there is some compensation for the less than mushroomy flavour of cultivated mushrooms insofar that, alongside the more common white or chestnut varieties, more exotic looking fungi, Oyster, Shitake, Enoki, Crimini, Portabello and Beech Mushrooms, are all readily available too.

To add more flavour to sauces and soups, you can reconstitute dried mushrooms by soaking or simmering them in water before adding them to your chosen dish. For Vegetarians, the umami deliciousness of mushrooms can help fill the savoury flavour gap of vegetables and other non-animal based foods. Mushrooms are also officially recognised as a Superfood. Hence I reasoned that the next two Primal Plate recipes should both be for mushrooms on toast!

To prepare, don’t peel or soak mushrooms. If you soak mushrooms they absorb the water like a sponge and will then turn mushy when cooked. A quick light rinse under the tap is okay but ideally, if they’re not too grubby, simply cut off the bottoms of the stems and wipe them clean with a damp paper towel. Many herbs work well with earthy flavour of mushrooms but I particularly like the grassy accent of anise (tarragon) and parsley.

Tangy Mushroom Crostini is first up. This is an elegant interpretation of mushrooms on toast, suitable for entertaining. Coming soon... Creamy Mushrooms on Toast is more down-to-earth and makes for a relaxed breakfast, light lunch or filling snack at anytime.

Tangy Mushroom Crostini (Makes 8) (V)

Ingredients

1-2 day old refrigerated Grain-Free Bread, cut into 8 thin slices (no more than ½ cm thick)

4 tbsp olive oil

15g (1 tbsp) organic butter

225g (2 cups) mushrooms, wiped. I used a selection of chopped chestnut mushrooms and exotic mushrooms, either chopped or hand-teared into individual fronds.

1 tbsp brandy

1 generous tsp Dijon mustard

160ml (⅔ cups) crème fraiche

Sea salt and freshly ground black pepper

Handful of flat leaf parsley, finely chopped


Instructions

Pre-heat oven to 200℃ Gas Mark 6

Brush the bread slices on both sides with 2 tablespoons of olive oil. Put the slices of on a baking sheet - actually, I prefer to use the wire rack of my oven grill to get lovely looking professional griddle stripes!

Bake for 12-15 minutes until golden brown. Allow to cool.

Heat the remaining oil together with the butter in a large non-stick frying pan.

Cook the mushrooms for 4 minutes over a high heat until golden.

Add brandy and cook for a few seconds more. Remove from the heat.

Mix the mustard and crème fraiche together and stir into the mushrooms. Season well with salt and pepper.

Spoon the mushrooms onto the crostini and sprinkle with parsley


Carbohydrate 5g Protein 3g - per crostini