Celeriac Dauphinoise

by Susan Smith in , ,


If I could have one 'mardy' about my Primal diet it’s that I just can’t seem to tactically allow potatoes back into my life…not ever! Having initially lost one and a half stones by eating low-carb, high fat (LCHF), I have on more than one occasion subsequently pined for the simplicity and density of potatoes. Carby they may be, but potatoes are in a league of their own and their virtues are not easily replicated. As well as being a naturally nutritious whole-food, simple spuds need no more than the application of heat to make them into something very, very tasty indeed (is there anyone that doesn’t love golden, crispy roasties?). When pre-cooked and chilled (think yummy potato salad) potatoes are also an alluring dietary source of resistant starch - which is top-notch food for ‘good’ gut bacteria, and thus your overall health. Or so I debate with myself…

Unfortunately, neither my nostalgia for potatoes or their nutritional profile is of any help to me. As far as my metabolism is concerned it’s not playing! I cannot ignore the fact that previously, within an hour or so of eating potatoes, my feet and ankles would swell alarmingly. No doubt potatoes had also long been playing havoc with my blood glucose levels, but after the age of fifty the almost immediate inflammatory response (edema) not only made me look like a frump, it actually made me feel quite queasy. I may forever mourn their loss, but for me it’s a case of R.I.P. potatoes! 

Another thing that peeves me is cheese! It’s virtually impossible to be a non-meat eater on compassionate grounds and still follow Primal principles without eating eggs and cheese. Unfortunately, almost all vegetarian recipes seem to ignore the fact that the most wonderful-tasting, beautifully-textured, traditionally-made cheeses, such as Parmesan, Gruyere and Mozzarella, are totally unsuitable for vegetarians. Whilst I’ve found good-enough substitutes for Parmesan and Mozzarella, I have still not found a copy-cat vegetarian version of Gruyere D.O.P. that’s available to retail customers, which can emulate anything like Gruyere’s unique melting quality and depth of flavour. Even if you can get past the ‘no-no’ of cheese made with calf rennet, there’s still the massive cruelty involved in milk production generally, and the nutritional degradation that occurs with pasteurised milk taken from grain-fed cows. Given that not all cheese is created equal, there is one family-run traditional cheese dairy that I am happy to be acquainted with because they share Primal Plate’s ethos - a passionate commitment to animal welfare and human health. This family run business makes award-winning, artisan, vegetarian cheeses from the raw milks of free-range, grass-fed cows, goats and ewes. In this day and age of intensive factory farming, small enterprises such as The Traditional Cheese Dairy make my heart sing. Not only because they fly in the face of extreme human exploitation of animals inherent in the dairy industry, but also because their end-products taste so good and are naturally healthful to animals and humans alike. I know it isn’t always practical, but please try to seek out and support all farmers that treat their animals as animals - not just a commodity for ‘growing’ meat or as 24/7 milking machines. Raw milk from free-range, grass-fed cows is not only better for the animals it is far, far better for you.  

Wherever you shop, substitute any mature, organic, vegetarian Cheddar in recipes that call for Gruyere. You may need to ask for advice at the Deli counter. It is often a case of trial and error when you’re trying to find a decent tasting vegetarian Cheddar cheese that doesn’t disintegrate into an oil-slick when baked or grilled! I will keep you posted if and when I find the perfect one!

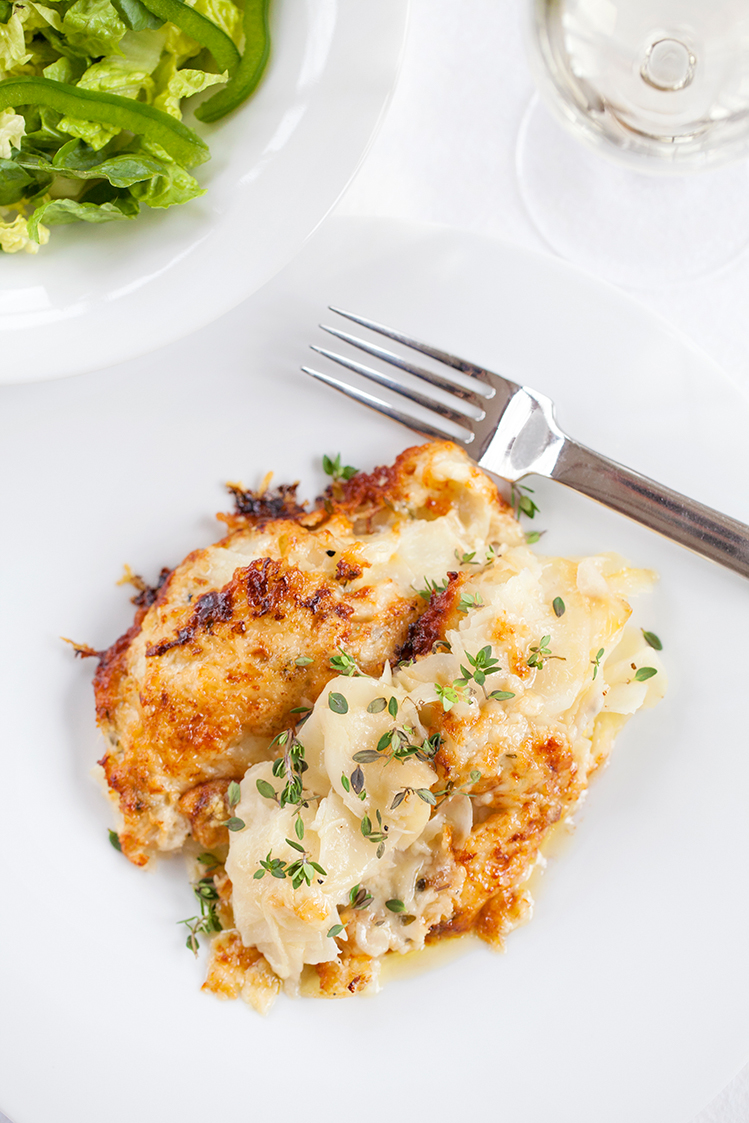
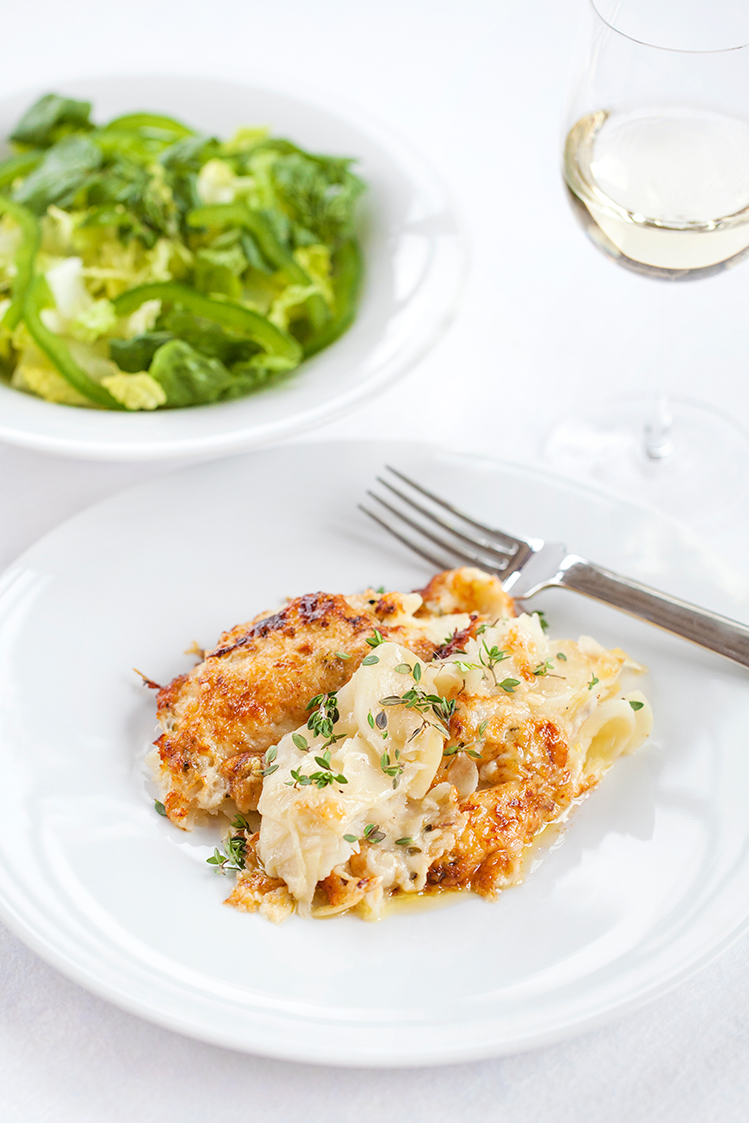
Rant over, I have stopped arguing with reality long enough to create a potato-like dauphinoise using that great potato ‘pretender’…celeriac. Whilst the finished result isn’t as pillow-soft as cooked potatoes, cheesy gratins and bakes always have the yummy, comfort factor that low-carbers sometimes crave - and this cheese-topped Celeriac Dauphinois is no exception. I’ve lightened-up the full-on fat experience of double cream and cheese (oftentimes called for in traditional dauphinoise recipes), by substituting dry white wine for most of the cream. The crispy, crunchy cheesy topping speaks for itself. All in all, much tastier and less rich, Celeriac Dauphinois is an excellent low-carbohydrate main course for a light family supper or when entertaining vegetarians. It’s equally delicious served as a vegetable accompaniment.  

Ingredients

3 medium/large shallots, finely sliced

2 small celeriac, total weight about 900g

½ lemon, juiced

2 tbsp fresh lemon thyme, leaves only

2 tbsp olive oil

40g butter

sea salt and freshly ground black pepper

¼ tsp freshly grated nutmeg

150 ml dry white wine (I used a dry, white Spanish Rioja)

60 ml organic double cream

165g Gruyere (or mature, vegetarian Cheddar), finely grated              

60g Parmesan (or Parmesan-style cheese), freshly grated                 


Instructions

Pre-heat the oven to 190℃ / 375℉ / Gas mark 5

Fill a large bowl with cold fresh water and add the lemon juice.

Cut the top and bottom off the celeriac and then stand flat on a chopping board. With a sharp knife cut off the thick skin working all the way around the celeriac from top to bottom.

Cut each peeled celeriac into 4 quarters.

Using the thinnest slicer on a food processor, a hand-held mandolin slicer or a very sharp knife, cut the celeriac into 3mm thin slices. Put the celeriac slices into the lemon water to prevent them discolouring.

If not done already, finely slice the shallots. 

Heat the butter and olive oil together in a large pan until the butter has melted.

Drain the celeriac then either spin in a salad spinner or dry on a clean tea-towel. 

Add the shallots and drained celeriac to the pan. Continue to cook over a medium heat for about 5 minutes, turning the vegetables over now and again to make sure that everything is well coated in the olive oil and butter. 

Season with salt, freshly ground pepper and nutmeg then pour in the wine and continue to cook for about 10-12 minutes more with the pan lid on, stirring occasionally, until the celeriac is just tender.  

Tip the contents of the pan into a gratin dish. Scatter half the thyme leaves over the top then drizzle over the double cream and flatten the slices of celeriac down so they’re submerged as much as possible under the liquid.

Mix the two grated cheeses i.e. Gruyere & Parmesan (or vegetarian substitutes) together, then sprinkle on top of the celeriac in a thick even layer. Cover the dish with tin foil.

Place in the pre-heated oven and cook for 20 minutes. 

Remove the foil, then place back in the oven for a further 20-25 minutes until bubbling and golden brown. 

Remove from the oven and allow to stand for 2 minutes. 

Scatter over the rest of the thyme leaves before serving with a fresh green salad.


Notes

Cheese has a tendency to break down when cooked at high temperatures. The maximum temperature you should bake this dauphinoise - and any other cheesy casserole - is 190℃ / 375℉ / Gas mark 5, or below. If the cheese does separate and you’re left with a layer of fat sat on the surface of your Celeraic Dauphinoise, lightly dab off the excess oil with sheets of paper towel before allowing to stand for a couple of minutes prior to serving. It will still taste good!

If you like your cheese topping really brown and crozzly a couple of minutes under a very hot grill at the end of the cooking time should do the trick.  

Only buy small heads of celeriac - larger specimens can lack flavour, tend to be a bit woody and are much more unwieldy to peel and slice.


Carbohydrate 23g Protein 17g - per serving


Tiger Nut Horchata

by Susan Smith in


In the heat of summer our thoughts are often wont to turn to ice cream. However, with my new found friend the tiger nut, otherwise known as chufa (pronounced Choo-fah), I’ve discovered a serious contender when making my first batch of ice-cold Tiger Nut Horchata. There can simply be nothing more refreshing, or good for you, than downing a glass of this Spanish-style refreshment on a hot day.

Tiger Nut Horchata a.k.a. tiger nut milk is a delicious creamy, milk-like drink that can be best described as ‘liquid gold’ for the health conscious. Tasting so good and loaded with resistant starch, raw tiger nut milk (and whole organic tiger nuts eaten as a snack) are a veritable powerhouse of nutrients (see my last two blog posts for more information). Suffice to say, tiger nuts are an original Paleo superfood with a ratio of carbohydrates, fats and protein so similar to human breast milk it almost beggars belief. Tiger nuts are, after all, just a brown, wrinkly vegetable tuber!

In spite of its name, tiger nut milk is both nut and dairy free, which is an absolute boon for people who are lactose intolerant or who suffer from a nut allergy. It’s also gluten-free so coeliacs needn’t go without either. You can use Tiger Nut Horchata as a milk replacement in tea, coffee, poured over our Nut & Seed Granola for breakfast, and pretty much for everything that calls for normal milk. Naturally sweet, tiger nut milk is non-allergic, safe for diabetics and, since tiger nuts do not contain inflammatory omega-6 fats, Tiger Nut Horchata makes for a much healthier alternative to dairy milk or other nut milks.

Most recipes I’ve found for Tiger Nut Horchata (Horchata de Chufa) are full of refined sugar (up to 200g of sugar per 250g of tiger nuts) but because tiger nuts are intrinsically sweet-tasting, I think it’s debatable whether tiger nut milk actually needs any added sugar at all. In the end I decided to stay true to Spanish tradition (I confess my tiger nut milk did taste a little ‘thin’ without) but I have so moderated the amount and type of sweetener in my Tiger Nut Horchata, it still faithfully follows Primal and Paleo dietary guidelines. My sweeteners of choice in this unique recipe are small amounts of raw organic honey and liquid stevia, which both make the grade (to see why, please read The Definitive Guide To Sugar on Mark’s Daily Apple). The end result is a slightly thickened, rich, creamy, sweet (but not too sweet), seriously satisfying vegetable milk that’s fit for the gods.

Using heathy sweeteners rather than refined sugar, I can well imagine Tiger Nut Horchata justifiably becoming the world’s next healthy-drink ‘craze’. And, with that thought, I drink to your good health. Salud!

Tiger Nut Horchata (makes 1000ml / 1 litre)

Ingredients

250g organic tiger nuts, covered with cold water by 5cm (2”) and left to soak overnight at room temperature

1000ml (1 litre) fresh, filtered water

40ml raw organic liquid honey (I used mild-tasting Raw Health organic acacia flower honey)

2 drops liquid stevia (*see note below for Vegan Tiger Nut Horchata) 

Organic ground cinnamon

Fresh ice cubes

Whole cinnamon stick(s), if liked


Instructions

Take your Nut Milk Bag and set it over a deep bowl. 

Drain the tiger nuts, rinse them well under cold water then drain again and tip into the blender container. Add the filtered water, the honey and 2 drops of liquid stevia, then secure the lid and blend on high speed until completely homogenised and smooth - this will take about 3-4 minutes (depending on your blender). After blending, if the mixture seems a little too hot to handle, allow it to cool down before proceeding to the next step.

Carefully pour the blended tiger nut mixture into the nut milk bag, tighten the tie at the top of the bag to hold everything inside, then using your hands firmly squeeze out all the liquid until you’re left with only dry tiger nut pulp.

Cover the bowl containing the tiger nut milk and cool completely, then transfer to a glass bottle or lidded container and store in the refrigerator for up to 4 days. 

To serve, third-fill a glass with ice (small ice cubes are best), shake or stir your chilled horchata well then pour over the ice and sprinkle a large pinch of organic ground cinnamon on top (**see note below) 

For a final flourish, add a whole cinnamon stick to each glass and use as a swizzle stick to distribute the cinnamon flavour throughout your drink.  

Notes

You’ll need a powerful blender and a strong Nut Milk Bag to ensure this simple Tiger Nut Horchata recipe is a breeze for you to make on a regular basis. You can use 2 or 3 layers of wet cheesecloth or cotton muslin to strain your tiger nut milk through but the Nut Milk Bag sold by Love Tree Products is strong, re-usable and easy to clean. it also produces a silky-smooth milk with no bits in it. I personally wouldn't want the mess, the faff or the unpredictability of making a DIY version!

*To make Tiger Nut Horchata vegan, simply leave out the raw honey and double the drops of liquid stevia (to 4) for the same level of sweetness.

It’s recommended you don’t discard the tiger nut pulp, instead dry it out in an oven and use as a substitute for desiccated coconut. Alternatively, convert into nutritious Tiger Nut Energy Balls

** I actually prefer to put my refrigerated horchata into a blender with half dozen ice cubes and whizz together for about 10 seconds to break up the ice for a super-cold drink that doesn’t smack you around the mouth with ice cubes every time you take a sip (it was Sarah that insisted I put a single ice cube in the glass for the photographs!) You can also put the horchata into the freezer for about an hour to turn it into a ‘slushy’. Which suggests to me that I should be creating a tiger-nut-milk-based recipe for ice cream, sooner rather than later!

To calculate the carbohydrate content of this recipe I’ve referenced whole tiger nuts, not tiger nut milk. Although carb grams per serving looks relatively high, there is a significant amount of tiger nut sediment that’s discarded after squeezing out the milk. Also, some of the carbohydrate content in raw tiger nuts is in the form of a unique fibre known as resistant starch, which cannot be absorbed by the body in the process of digestion. This means it passes through your system without deleterious effects on blood sugar or insulin levels. Similarly, you don’t obtain significant calories from resistant starch either.

However, resistant starch is a highly beneficial pre-biotic that feeds the friendly bacteria in your gut, which in turn provides numerous health benefits that can ultimately assist in weight loss. Your healthy gut flora actually need this ‘food’ to survive and thrive, Thus, Tiger Nut Horchata is recommended for even the most carb sensitive individual. Even if you are trying to lose weight, it’s more important to focus on eating real, nutritious food than to worry unduly about counting grams of carbohydrate or calories. The message is: ditch all grains, legumes, refined sugar and unhealthy processed seed oils and fats, and your carbohydrate and calorie intake will happily take care of itself!

Caution: Tiger nuts and tiger nut flour have very high amounts of resistant starch which, if you’re not used to, can cause discomfort and bloating when eaten in large amounts. It is therefore advised that you slowly introduce resistant starch into your diet (less than a teaspoon per day) and gradually increase your tolerance to your particular comfort level, which will hopefully be about 15-30 grams a day. 


Carbohydrate 55g Protein 5g - per 250ml serving of Tiger Nut Horchata (without ice)


Tigernut ‘Hob-Nobs'

by Susan Smith in


Last week Sarah and I went clothes shopping. We both stared in disbelief at the clothes tag, which read Size 4. The garment we’d picked up looked the right size but in unison we both exclaimed ”I’m never a Size 4!” Well, at least as far as Whistles is concerned, we both are, and so we ended up fighting over a single pair of trousers (Sarah’s sense of Birthday Girl entitlement meant she won!)

The surprising thing is, now I’m developing Primal-friendly recipes for this blog, we eat far more guilt-free baked and sweet treats than ever before, yet we continue to drop dress sizes or, at the very least, 'stay put' at our optimum weight. True, we have recently cut back on our alcohol intake (one bottle of Champagne between three of us is now our idea of binge drinking!) but still…way to go! I am absolutely convinced that an eating strategy that’s highly nutritious, low in carbohydrates and much higher in fat than you’ve been told is good for you, is decidedly the best if you want to lose excess weight.

The downside? For a full-on, enjoyable experience whilst you shed unwanted inches, you actually have to cook! I think It’s a crying shame that most people seem to prefer ready-meals, eating out, microwaving, meal-replacement shakes and other fast food options rather than getting into the kitchen with their family and cooking fresh, nutritious food for themselves. Consequently, they then either have to resort to extreme bouts of exercise or workouts in the gym in the hope they can ‘burn’ off their foodie indiscretions (how much time does that take up in the “I’m too busy to cook’ lifestyle?), or allow themselves to get fat. People need reminding that a good diet isn’t just about weight loss and being thin, it’s about being healthy and giving your body all the nutrients it needs so it doesn’t fall prey to debilitating disease.

To get you started on your real food adventure (if you haven’t already), Tigernut Hob-Nobs are where it’s at! These crunchy, crumbly biscuits are child’s play to make, moreishly delicious to eat and are full of goodness. Perhaps it’s most useful to begin by saying what these biscuits don’t contain:

  • No grains
  • No gluten
  • No sugar
  • No dairy
  • No eggs 

What you do get from taking the time to bake Tigernut ‘Hob-Nobs’ are some remarkable health benefits:

  • Tiger nuts have a high content of soluble glucose and oleic acid, along with high energy content (starch, fats, sugars and proteins)
  • They are rich in minerals such as phosphorous and potassium, calcium, magnesium and iron necessary for bones, tissue repair, muscles, the blood stream and for body growth and development. 
  • They are rich in vitamins E and C. Vitamin E delays cell ageing, improves elasticity of skin and helps to clear the appearance of wrinkles, acne and other skin issues.
  • Sugar-free tiger nut milk (Primal Plate recipe for Horchata coming soon) is suitable for diabetic people and also helps in weight control. It is recommended for those who suffer from indigestion, flatulence and diarrhoea because it contains digestive enzymes like catalase, lipase and amylase. 
  • The high content of oleic acid has positive effect on cholesterol, thereby preventing heart attacks and thrombosis. 
  • Tiger nuts reduce the risk of colon cancer and prevent constipation. 
  • Tiger nuts also contain a good quantity of vitamin B1, which assists in balancing the central nervous system and helps to encourage the body to adapt to stress. 
  • The health benefits reflect a reduction of low density lipoprotein-cholesterol, which is good for sports’ men and women and those intending to lose weight.

In summary, I really can’t imagine any other snack food that would nutritionally support anyone (including gym bunnies and athletes) better than my Tigernut ‘Hob-Nobs' Nor a better way to indulge in some childhood nostalgia than with delicious raw whole milk and biscuits. Scrumptious!

Go nuts for tiger nuts! You can buy them online from The Tiger Nut Company

Our Tigernut Hobnobs are perfect with a glass of raw whole milk

Our Tigernut Hobnobs are perfect with a glass of raw whole milk

Tigernut ‘Hob-Nobs' (Makes 16 biscuits)

Ingredients

75g coconut butter (not coconut oil)                            

2 tsp vanilla essence

150g tiger nut flour

¼ tsp sea salt                

1 tsp baking powder

75g macadamia nuts, chopped (for ease, I pulse the nuts several times in a food processor - however, don’t process them too long or you’ll end up with nut butter!)

50g cup unsweetened shredded coconut 

3 tbsp cold coconut water


Instructions

In a large bowl combine tiger nut flour, salt and baking powder.

Use your fingertips to rub the coconut butter into the flour, salt and baking powder until you have a mixture that resembles coarse breadcrumbs with no large lumps of coconut butter remaining.

Using a fork, stir in the vanilla essence, chopped macadamia nuts and desiccated coconut.

Stir in the coconut water then abandon the fork and knead the mixture with your hand until it all comes together to form a firm dough.

Roll the dough out between two sheets of cling film to 6mm/ ¼ inch thickness. Using a 6cm / 2½ inch biscuit cutter, cut out 16 biscuits. As you go, you’ll need to gather up the off-cuts and press them back together before re-rolling out to make more biscuits N.B. because tiger nut flour is gluten-free, you can work the dough several times over and it won’t get tough.

Lay the biscuits 2cm apart onto a parchment lined baking sheet. Cover the biscuits loosely with cling film then place the baking sheet in the fridge to chill for 20 minutes. 

Preheat oven to 160℃ / 325°F / Gas mark 3

Transfer the baking sheet to the pre-heated oven and bake for 20 minutes until light golden brown. Turn the tray around halfway through the cooking time to ensure the biscuits brown evenly.

Remove from the oven and transfer the biscuits to a wire cooling rack - they’ll crisp up even more as they cool, so try to distract yourself from eating them until they do!


Carbohydrate 12g Protein 2 g - per biscuit


Cucumber and Lettuce Vichyssoise

by Susan Smith in ,


Continuing on from my last blog post extolling the virtues of resistant starch, I’ve been thinking about different ways to incorporate resistant starch into Primal Plate recipes. Vichyssoise nicely fits the bill because it’s not only a delicious summer soup to beat the imminent heatwave we’ve been promised for next week, it’s also a natty way to introduce more resistant starch into everyday food.

Now that the wedding season is upon me (oh boy, wedding photography is one of the toughest jobs!) and one of my rental properties has just become vacant and needs to be re-let (so many applicants to sift and sort), the inside of my head and fridge are stuffed full of food-related items that, although originally intended for several blog ‘works in progress’, still remain unused for lack of time.

I was therefore grateful to find this interesting Hugh Fearnley-Whittingstall recipe from his book River Cottage Veg for Cucumber and Lettuce Vichyssoise, which not only neatly uses up some recent food purchases that would otherwise spoil and be thrown away, but also has been easily adapted to include resistant starch - both in its raw state and in the form of cooked and chilled white potato (retrograded). 

Although this soup is made from relatively cheap ingredients, do not be fooled - nor let the idea of cooked cucumber and lettuce dissuade you! It’s a classic. A really beautiful pale green, cooling and luxurious soup to be enjoyed in the garden at the height of summer. Fresh looking and tasting, it’s also perfect picnic fare.

Cucumber and Lettuce Vichyssoise (Serves 6)

Ingredients

2 tbsp (60g) butter

2 large leeks, trimmed (use white and pale green parts only) and sliced

1 large, starchy potato (about 250g / 8oz), peeled and cut into large chunks

2 pints vegetable stock (I used 5 level teaspoons of Marigold organic bouillon powder to 1 quart freshly boiled water) 

2 cucumbers, peeled and cubed

2 Little Gem or butterhead lettuces, shredded

2 level tbsp green banana flour

3 tbsp heavy cream

Sea salt and freshly ground black pepper

To finish:

Crème fraîche or double cream

Chopped chives


Instructions

Melt the butter in a large saucepan over medium-low heat. Add the leeks, cover, and sweat gently for about 10 minutes, until soft. 

Add the potato and stock. Bring to a boil, then simmer for about 10 minutes, until the potato is almost cooked. 

Add the cubed cucumbers and shredded lettuce, return to a boil, and simmer for a further 4 minutes. Take off the heat and allow the mixture to cool for 10 minutes or so.

Scoop out the potato chunks and press them through a metal sieve into a large mixing bowl, using the back of a wooden spoon (whizzing these in a blender would make the soup gluey).

Using a large soup ladle, transfer the rest of the simmered mixture into a blender container and blitz to a smooth puree. You will probably need to do this in several batches. 

As each batch is processed, pass the pureed soup through a metal sieve into the mixing bowl containing the potato puree. 

When you get to the final batch, add 2 level tablespoons of green banana flour, then blitz and pass through a sieve as before. Stir the entire contents of the mixing bowl together to incorporate the potato puree, then add the double cream and season with sea salt and freshly ground black pepper.

Leave to cool completely, then chill for a couple of hours, 

Serve the chilled soup topped with a swirl of cream or crème fraîche and some chopped chives. 


Carbohydrate 20g Protein 3g - per serving


Raw Chocolate Banana Milkshake

by Susan Smith in


Oh heck! I never meant to get into nutritional science but fear I have to in order to persuade you to eat your carbohydrates!

A food blogger that champions all things ‘low-carb’ and then, on the face of it, appears to do a u-turn by subsequently suggesting you eat high-carb, starchy foods might seem to have gone a bit ‘bananas’. Which is, as I shall reveal later in this post, quite literally true!

There are three increasingly popular buzz-words flying around at the moment that are relatively new as far as my understanding goes - probiotics, prebiotics and resistant starch - all three are absolutely essential for a healthy digestive system and long-term health. Here’s why…

Probiotics are types of ‘living’ friendly bacteria, like those that inhabit your gut. They’re found in cultured and fermented foods such as yogurt, buttermilk and sauerkraut. Probiotics help control the bad bacteria in your gut and allow the good bacteria to proliferate.

Prebiotics are ‘non-living’ carbohydrates that feed probiotics. They’re found in legumes (non-Primal) whole-wheat products (non-Primal) Jerusalem artichokes, chicory root, onions, cabbage, asparagus and leeks - although you’d need to eat a significant amount of these prebiotic foods in their raw state to achieve the recommended daily amount of prebiotic fibre. Not the easiest, nor the most pleasant, thing to accomplish!

Resistant starch is a prebiotic that has unique health benefits. Basically, it is the undigested part of starchy carbohydrate food that passes through the digestive tract unchanged, which is why it’s called ‘resistant starch’. It is good news for people following a low-carbohydrate diet or those trying to lose weight, because resistant starch can’t be digested and absorbed as glucose (like other carbohydrates are), instead it becomes food for bacteria. Nevertheless, it does increase a sense of fullness, which helps people eat less. It also improves insulin sensitivity, lowers blood sugar levels and improves metabolism. 

To be perfectly honest though, it’s taken me a while to get to grips with the idea that starch of any description can be good for you. Having eschewed all high-carbohydrate food for almost two years I was borderline paranoid in my resistance to resistant-starch - such is my fear of carbohydrates and the havoc they have wreaked on my body over the years. 

Sarah still has to be persuaded, though I’m hoping that this blog post might convince her that it’s not only okay, but actually advisable to eat resistant starch. There are 4 types:

RS Type 1 – is found in beans, grains, and seeds, which can’t be digested because the starch is bound-up within fibrous cell walls. 

RS Type 2 – found in raw potatoes and unripe bananas, which in their raw state are intrinsically indigestible.

RS Type 3 – found in cooked and cooled white potatoes and white rice, the cooling process (called retrogradation) changes the structure of the food so that digestible starch becomes resistant starch - that’s a green light for home-made potato salad and sushi then!

RS Type 4 – an unnatural, man-made chemically modified resistant starch (sounds unpleasant!)

I originally thought combining cooked and chilled potato (chilled = refrigerated) and green banana flour would be a clever way to get a double-whammy of resistant starch in a Primal/Paleo-friendly potato gnocchi recipe. However, I’m still in the process of working this through. Subjecting resistant starch to temperatures exceeding 130℉ degrades it. On the other hand, retrograded starch (the cooked and chilled type) is supposedly maintained if it’s subsequently re-heated - at least when re-heated gently. Whilst all the banana flour nutrients including potassium are retained during cooking, I don’t want to risk nullifying the resistant starch in my potato gnocchi so, until it’s tried and tested, the jury’s still out. If it does work - meaning my gnocchi cooks and stays intact in less than barely simmering water - I’ll be posting the recipe soon!

Meanwhile, supplementation is the easiest way to reliably get enough resistant starch into your diet. To this end I have developed a totally moreish Raw Chocolate Banana Milkshake - a delicious milk smoothie that contains a healthy quota of green banana resistant starch, and tastes so good that it has quickly earned its place as my preferred breakfast. Must be addictive, because it’s the thing I most look forward to before falling asleep at night! 

I have been trialling green banana flour for the past week. I started with a full tablespoon (about 10g -15g) as a supplement from Day 1. Caution: If you are suffering with any digestive issues such as gas, bloating, cramping, diarrhoea or constipation, build your tolerance slowly - start with half a teaspoon and gradually increase the amount up to the optimum (15g to 30g) over a few weeks. 

After several days, I get a sense that everything is functioning better and moving more efficiently - although I have developed one side-effect, which is rather loud, persistent tummy ‘gurgling’. I like to think that this is my hitherto half-starved friendly bacteria expressing relief at being properly fed, rather than my gut protesting!

Whatever, I intend to persist with my resistant-starch-enhanced smoothie regimen because, in a nutshell, resistant starch is a superfood for the digestive system. It ends up in the large intestine where, as far as the friendly bacteria are concerned, it's like manna from heaven. As they use the resistant starch for energy they release small carbohydrate molecules, which feed other bacteria, which in turn excrete butyrate. Ta dah!  Butyrate is where it’s at! The preferred fuel for the cells lining the colon, butyrate is a potent anti-inflammatory that encourages blood flow and helps keep the cells healthy, which in turn reduces the risk of colorectal cancer.  

Not only does resistant starch and it’s by-product butyrate promote healthy gut flora and optimise digestive health, any surplus butyrate not used by the cells in the colon is carried by the bloodstream to the liver and other parts of the body, where it has other beneficial effects including enhanced immunity, increased metabolism, weight loss, satiety, decreased inflammation and improved stress resistance. 

Sounds good to me, especially when all these health benefits are contained in an indulgent chocolately drink! Who knew that feeding your hungry microbiomes could be such fun?

Raw Chocolate & Banana Milkshake (Serves 1)

Ingredients

180ml whole milk (preferably raw), very chilled

1 under-ripe banana, peeled and cut into several pieces (about 200g unpeeled weight)

1½ tbsp raw cacao powder

1 tbsp green banana flour

1 dsp pure vanilla essence

Large handful of fresh ice cubes (about 60g)

Liquid stevia, to taste


Instructions

Put the milk, banana, cacao, banana four and vanilla essence into a blender jug. Blend until well combined - my Vitamix (*see note below) takes about 30 seconds to do this.

Add the ice cubes and blend again until smooth, cold and creamy - another 15 to 20 seconds. 

Taste, then add 2-4 drops of organic liquid stevia to sweeten. 

Pour into a tall glass and decorate with whipped cream and a sprinkling of chocolate curls, if liked.


Carbohydrate 48g Protein 12g - per glass


Notes

I am happy using up one-third to a half of my daily carbohydrate intake in one generous glass of Raw Chocolate Banana Milkshake because I’m already at what I consider to be my ideal weight (just over 7 stone). Generally, I find this milkshake is enough on its own to sustain me until I sit down to eat my main meal of the day, which I always try and do before 6pm. If I get peckish, I might snack on some cheese, a small piece of fruit or some nuts, but basically everything I eat in a day never adds up to much more than 100g of carbohydrate, which is considered low-carb (100g to150g per day). If you want to lose weight by eating very low-carb (50g-100g per day) try substituting 125g of fresh or frozen berries e.g. blueberries, raspberries or strawberries for the banana and cacao. This will reduce the grams of carbohydrates in your milkshake by about 18g. 

I use a Vitamix C-Series blending machine to make healthy drinks, smoothies, hot soups, sauces, frozen desserts and more, in a matter of minutes. If you are using a different blender or container size, you may need to make adjustments to the processing time, and/or ingredient quantities. To be honest, if I had to choose just one kitchen gadget to magically bestow on cooks everywhere, it would be this Vitamix!

For people who are lactose intolerant, vegan or who suffer from a nut allergy, I will be developing more non-dairy, nut-free, resistant starch milkshakes and smoothies shortly. Watch this space!